
This third instalment on Volumetric Rendering will explain how to shade volumes in a realistic fashion. This essential step is what gives three-dimensionality to the flat, unlit shapes that have been generated so far with raymarching.
- Introduction
- Step 1. Lambertian Reflectance
- Step 2. Normal Estimation
- Step 3. The Shading
- Step 4. Specular Reflections
- Conclusion
You can find here all the other posts in this series:
- Part 1: Volumetric Rendering
- Part 2: Raymarching
- Part 3: Surface Shading
- Part 4: Signed Distance Fields
- Part 5: Ambient Occlusion
- 🚧 Part 6: Hard and Soft Shadows
The full Unity package is available at the end of this article. 📦
Introduction
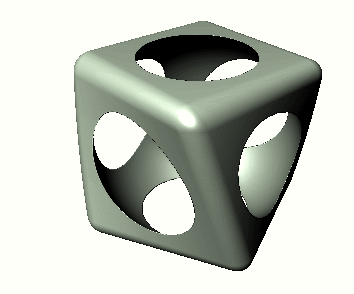
The previous part of this tutorial on volumetric rendering, Volumetric Rendering, uses the raymarching technique to draw a sphere within a cube:
This solution is only able to tell if the rays projected from the camera within the volume are hitting the virtual sphere. We have no information about its position or orientation. Consequently, we can only provide an outline. The result is an unlit, flat sphere which hardly looks any different from a circle.
Lambertian Reflectance
If we want to bring depth to volumetric rendering, we need a way to shade arbitrary geometries. In a previous tutorial, Physically Based Rendering and Lighting Models, we have seen how the shading for 3D objects is calculated in Unity 4. The technique relies on the Lambertian reflectance, which provides a simple – yet effective – model to simulate how light behaves on 3D surfaces. The amount of light reflected by a Lambertian surface depends on the surface orientation (its normal direction) and on the light direction.

We have previously seen this in a function called LightingSimpleLambert; for the purpose of this tutorial, we can rewrite it like this:
#include "Lighting.cginc"
fixed4 simpleLambert (fixed3 normal) {
	fixed3 lightDir = _WorldSpaceLightPos0.xyz;	// Light direction
	fixed3 lightCol = _LightColor0.rgb;		// Light color

	fixed NdotL = max(dot(normal, lightDir),0);
	fixed4 c;
	c.rgb = _Color * lightCol * NdotL;
	c.a = 1;
	return c;
}
The function takes the surface normal as an input; all other parameters are retrieved via the built-in variables that Unity provides to the shader (you can find the full list here). The one line that actually computes the Lambertian reflectance is highlighted.
Normal Estimation
The main idea behind this tutorial is to adopt the Lambertian reflectance to the virtual geometries that are drawn inside the cube. The lighting model chosen does not depend on the distance from the lighting source, but requires the normal direction of the surface point we are rendering.
This is not a trivial task, since the distance function used for the sphere encodes no such information. In his comprehensive guide to volume rendering (here), code artist Íñigo Quílez, suggests a technique to estimate the normal direction. His approach is to sample the distance field at nearby points, to get an estimation of the local surface curvature. If you are familiar with gradient descent, this is the gradient estimation step:
float3 x_right = p + float3(0.01, 0, 0);
float3 x_left  = p - float3(0.01, 0, 0);
float x_delta = x_right - x_left;
The difference on the X axis is calculated by evaluating the distance field on the left and on the right of the point. We can replicate this for all the Y and Z axes, and normalise it into a unit vector:
float3 normal (float3 p)
{
	const float eps = 0.01;

	return normalize
	(	float3
		(	map(p + float3(eps, 0, 0)	) - map(p - float3(eps, 0, 0)),
			map(p + float3(0, eps, 0)	) - map(p - float3(0, eps, 0)),
			map(p + float3(0, 0, eps)	) - map(p - float3(0, 0, eps))
		)
	);
}
This normal estimation introduces a new parameter, eps, which represents the distance used to calculate the surface gradient. The assumption of this technique is that the surface we are shading is relatively smooth. The gradient of discontinuous surfaces won’t correctly approximate the normal direction of the point to shade.
⭐ Suggested Unity Assets ⭐
The Shading
The raymarching code we have so far only accounts for a hit or a miss. We now want to return the actual colour of the hit point on the volumetric surface:
fixed4 raymarch (float3 position, float3 direction)
{
	for (int i = 0; i < _Steps; i++)
	{
		float distance = map(position);
		if (distance < _MinDistance)
			return renderSurface(position);

		position += distance * direction;
	}
	return fixed4(1,1,1,1);
}
The function to render the surface will calculate the normal and feed it into a Lambertian lighting model:
fixed4 renderSurface(float3 p)
{
	float3 n = normal(p);
	return simpleLambert(n);
}
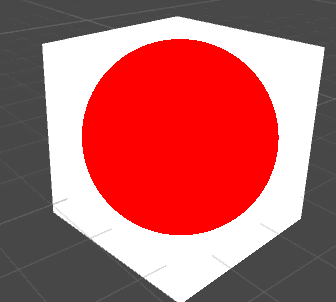
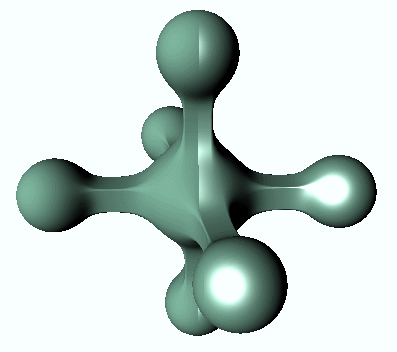
Those simple modifications are already enough to create very realistic effects:
The advantage of this shading is that it reacts to the lighting in your scene. The model provided is very simple, but you can add more details by using a more sophisticated lighting technique.
Specular Reflections
If we want to go the extra mile, we can also implement specular reflections on the surfaces. Once again, we can refer to the Blinn-Phong lighting model from Physically Based Rendering and Lighting Models, and change simpleLambert accordingly:
// Specular
fixed3 h = (lightDir - viewDirection) / 2.;
fixed s = pow( dot(normal, h), _SpecularPower) * _Gloss;
c.rgb = _Color * lightCol * NdotL + s;
c.a = 1;
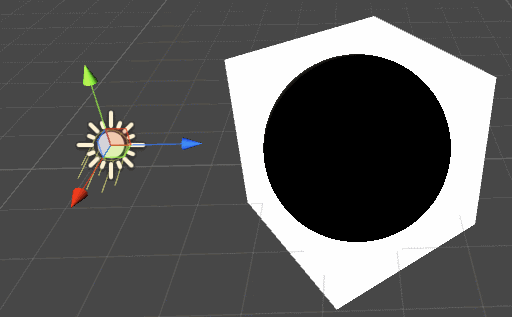
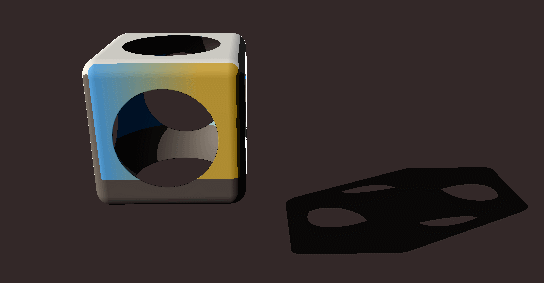
The variable _SpeculerPower controls the size or spread of the specular reflections, while _Gloss indicates how strong they are. To better appreciate the result, we need to use a more interesting piece of geometry. To highlight the difference, only the right half uses specular reflection:
What’s next…
This post has shown how to simulate realistic lighting on the volumetric shape created with a distance-aided raymarching shader. Both the Lambertian reflectance and the Blinn-Phong lighting model have been used to shade objects realistically. Both these techniques shipped as state-of-the-art real-time lighting models in Unity 4. Nothing prevents you from exploring this concept further, by implementing your own model.
The next instalment in this series will teach you how to create and combine geometrical primitives to create whichever shape you want.
You can find the full list of articles in the series here:
- Part 1: Volumetric Rendering
- Part 2: Raymarching
- Part 3: Surface Shading
- Part 4: Signed Distance Fields
- Part 5: Ambient Occlusion
- 🚧 Part 6: Hard and Soft Shadows
⚠ Part 6 of this series is available for preview on Patreon, as its written content needs to be completed.
If you are interested in volumetric rendering for non-solid materials (clouds, smoke, …) or transparent ones (water, glass, …) the topic is resumed in detail in the Atmospheric Volumetric Scattering series!
By the end of this series you’ll be able to create objects like this one, with just three lines of code and a volumetric shader:
Download Unity Package 📦
Become a Patron!The Unity package contains everything needed to replicate the visual seen in this tutorial, including the shader code, the assets and the scene.
💖 Support this blog
This website exists thanks to the contribution of patrons on Patreon. If you think these posts have either helped or inspired you, please consider supporting this blog.
📧 Stay updated
You will be notified when a new tutorial is released!
📝 Licensing
You are free to use, adapt and build upon this tutorial for your own projects (even commercially) as long as you credit me.
You are not allowed to redistribute the content of this tutorial on other platforms, especially the parts that are only available on Patreon.
If the knowledge you have gained had a significant impact on your project, a mention in the credit would be very appreciated. ❤️🧔🏻
Maybe I’m just being a noob, but Unity is saying that map(float3) is not a function and I can’t find anything on it online. What am I missing? Thanks! I love the tutorials!
Hey! That function is the one that defines the distance from the surface of the sphere!
You can use the one defined in the first tutorial:
float map (float3 p)
{
return distance(p,_Centre) – _Radius;
}
I don’t think you ever defined it in any of the tutorials here, so maybe you should add it? It was definitely confusing me while reading. And maybe name it something more like “DistanceToSphere” or whatever.
Either way, I’m enjoying the tutorials!
I confirm why Brian said, “map()” is actually “SphereDistance()” that is presented in part 2. You should rename “map” therefore, because it’s very confusing. I spent a few minutes looking for this function in the Unity doc.
Thanks for the tutorial. 🙂
Hey there! I just wanted to point out that the “map()” function is still with an incorrect name – it would be a good idea to change it in either this tutorial or the previous one for clarity 🙂
I get a lighting glitch that I can’t figure out. Moving the camera seems to make the lighting randomly flip, coming from opposite direction. Its not affected by FOV, or the eps variable or any step variables :O
Hey! There was a typo in the normal function. It’s declared as: float3 normal (float3 p). If you change that, it should work! 🙂
Having trouble getting the specular lighting to work given the shader file reads from bottom to top. Since viewDirection is declared in the fragment function (at the end of the shader) I can’t get it any earlier in the script. Is there a right way to write this that I’m missing?
Hey! You can declare it as a variable in the shader and initialising it in one of the functions! 😀 It will be available to the other functions.
Do i get a package if i become a Patron
Hi Alexander! As of Nov 2016, the package is not yet available unfortunately!
How do i render the simpleLambert its not showing up its just white? What do i have to do to make it work i tried using uniform (…) ; for _LightColor0 and _WorldSpaceLightPos0 but it does not seem to work, do i fix this?
Hey! It is very hard to know what’s wrong without seeing your setup!
The pieces of code in this tutorial alone won’t compile. You’ll need to add these new snippets of code to the shader from Part 1 and 2 of this tutorial!
This is some really good resource, thanks for spending time to write these!
Thank you! <3
It might be better to integrate the volumetric rendering into a surface shader, because it only needs to output albedo and normal, and Unity’s built-in lighting system does the rest (I haven’t worked in Unity for a while so I might be wrong).
To get proper light direction depending on the type of light in Unity (Directional, Point, Spot) I am putting this line into the lambert shading function:
lightDir *= (_WorldSpaceLightPos0.w – 0.5) * 2.0;
Would it be possible to use the ddx ddy intrinsics instead of calculating finite differences manually?
Hey!
I have not tried it, might have a look inside that.
Why wouldn’t we just get the normal of a fragment by doing something like
`normalize(sphere_center – FRAG_WORLD_COORD)`?
There isn’t really much “state-of-the-art” about the default lighting pipeline of Unity. Also sounds a bit misleading when you refer to these techniques from “Physically Based Rendering and Lighting Models”, since “physically based” or “PBR” usually means something quite different.
Lambert+specular is phong, or blinn-phong for being extended to energy conserving, but it’s still a really bad lighting model (also for 2016).
PBR uses a proper BRDR function at shading point, while taking into account micro-facets and probabilistic normal distribution. It’s a lot of words but basically means the lighting calculations need roughness and metalness.
This is also why most games shipped with Unity makes all materials look like they are made from plastic.