This online course will teach you how to recreate a popular sprite doodle effect using Shaders in Unity. If this is an aesthetic that you want in your game, this tutorial will show you how to achieve it without the need to draw dozens of different images.
Such a style has become increasingly popular over the past few years, with many games such as GoNNER and Baba is You heavily relying on it.
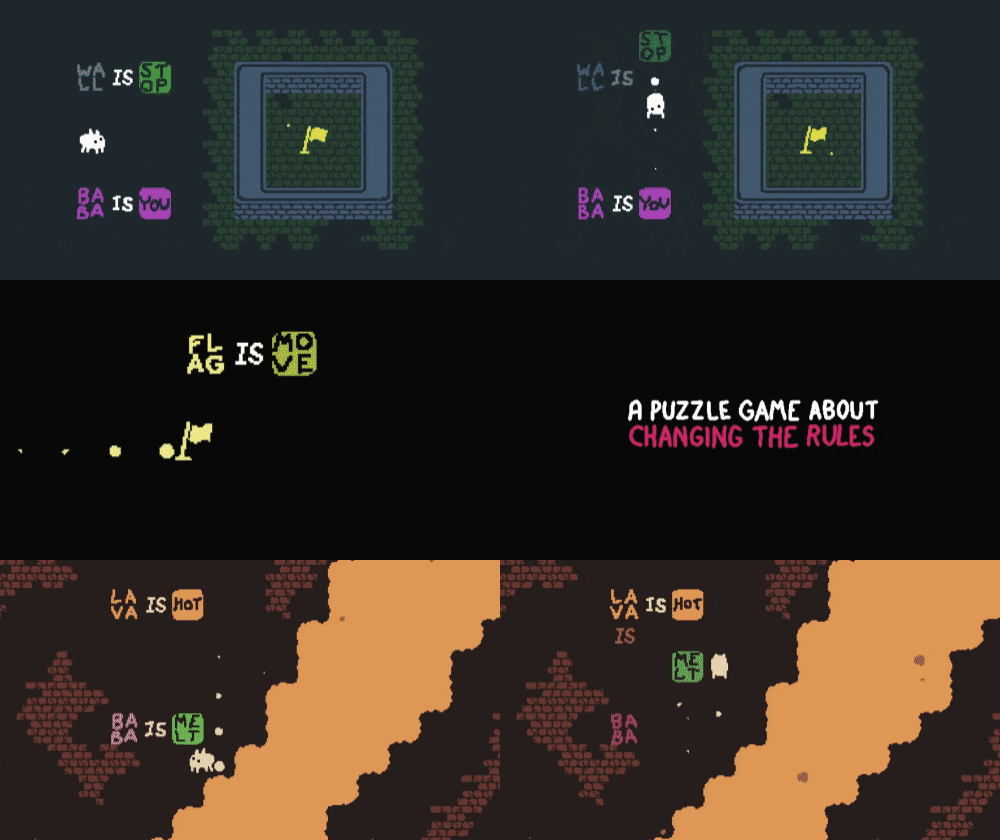
This tutorial covers everything you need to know, from teaching the basics of shader coding to the maths used. At the end, you will also find a link to download the complete Unity package.
This series is also strongly inspired by the success of Doodle Studio 95!.
Introduction
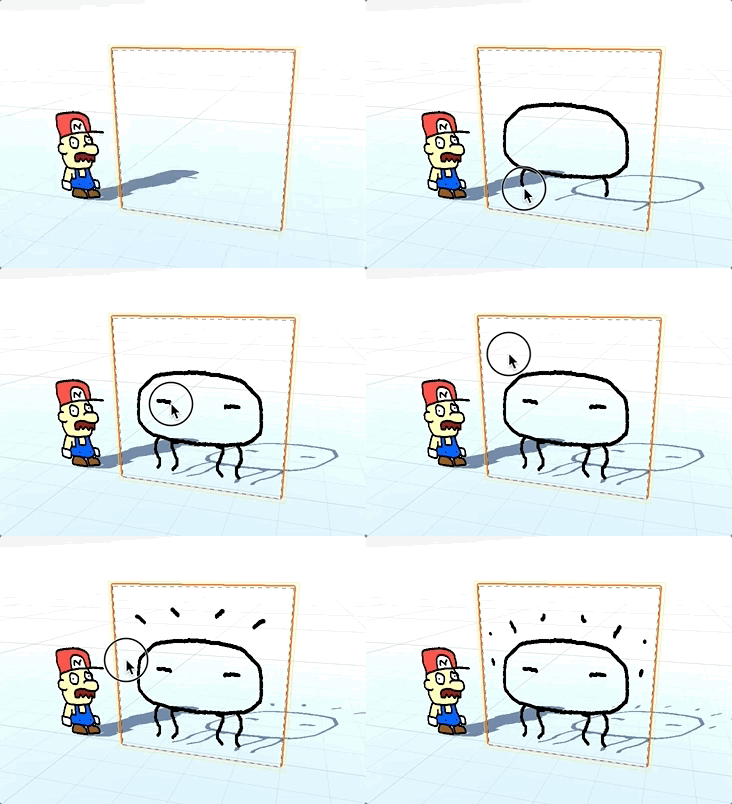
In my blog, I tend to cover rather advanced topics, from the mathematics of inverse kinematics to atmospheric Rayleigh scattering. Making such complex subjects understandable to a larger audience is something that I find very rewarding. But the number of people who are both interested and have the necessary technical knowledge to understand them is not that large. So it should not be surprising that sometimes, the things that go viral, are the very simple ones. This is definitely the case for one of Nick Kaman‘s recent tweet, in which he showed how to create a doodle effect in Unity.
Here's a little trick I like to use to get a 'doodle' effect in Unity: Instead of hand-drawing different frames of the same sprite, you can put the sprite on a mesh and offset the vertices with a normal map that scrolls heavily X times per second. #gamedev #unitytips pic.twitter.com/ycd9nf9qOz
— nick kaman (@SmashyNick) June 25, 2018
After 1000 likes and 4000 retweets, it was obvious that there is a great need for simpler tutorials that even people with little to no background in shader coding can follow.
If you are looking at a professional, effective way to animate 2D sprites with full artistic control, then I cannot recommend Doodle Studio 95! enough (GIF below). You can also see a selection of games on itch.io that are using it here.
Anatomy of the Doodle Effect
In order to reproduce the doodle effect, we first need to understand how it works and which techniques have been used.
Shader Effect. First of all, we want this effect to be as light as possible, requiring no additional scripts. This is possible through the use of shaders, instructs Unity how to render 3D models (even flat ones!) on the screen. If you are unfamiliar with the world of shader coding, A Gentle Introduction to Shaders is probably the best resource to get you started.
Sprite Shader. Unity comes with many types of shaders. If you are using the 2D tools provided by Unity, you might want to work with sprites. If this is the case, what you need is a Sprite Shader, which is a special type of shaders designed to be compatible with Unity’s SpriteRenderer. Alternatively, you can start from a more traditional Unlit shader.
Vertex Displacement. When drawing sprites by hand, no two frames are going to be the same. What we want is to somehow make a sprite “wobble” to simulate such effect. There is a very efficient way to do this in shaders, which relies on vertex displacement. This is a technique that allows changing the position of a 3D object’s vertices. If we nudge them randomly, we can get the desired effect.
Snapping Time. Hand-drawn animations usually have a low framerate. If we want to simulate – let’s say – five frames per second, we need to change the position of the sprite vertices five times per second. However, Unity is likely to run the game a much higher refresh rate; possibly 30 or even 60 frames per second. To make sure our sprite does not change 60 times per second, we need to work on the timing component of the animation.
Step 1: Extending the Sprite Shader
If you try to create a new shader from Unity, you will be prompted with a rather limited selection. The closest shader we can start from is the Unlit Shader, although is not necessarily the best one for this specific application.
If we want this doodle shader to be fully compatible with Unity’s SpriteRenderer, we need to extend its existing Sprite Shader. Unfortunately, there is no way to access it from within Unity itself.
The way to get it is to visit the Unity download archive and to download the Build in shaders pack for the version of Unity you are currently working on. That is a zip file which contains the source code for all the shaders that are shipped with that specific build of Unity.
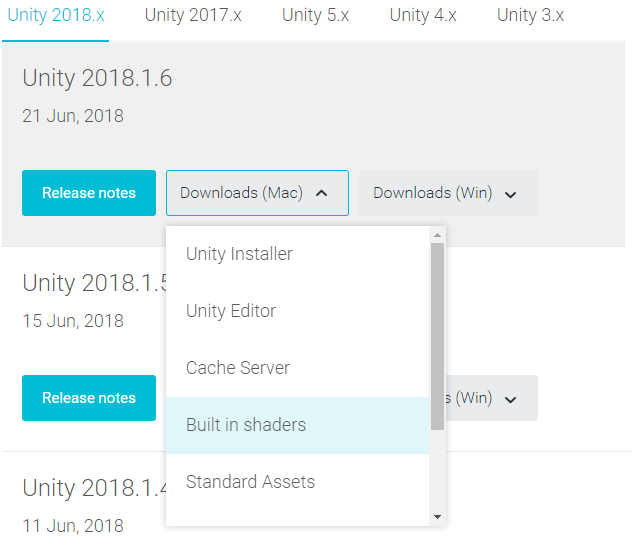
Once downloaded, extract it and look for a file called Sprites-Diffuse.shader in the folder builtin_shaders-2018.1.6f1\DefaultResourcesExtra. That is the file we will use for this tutorial.
![]()
Sprites-Default.shader, not Sprites-Diffuse.shader.
The difference between the two is that the former is unlit, while the latter reacts to lights in the scene. Due to Unity’s implementation choices, the diffuse version is much simpler to edit compared to the unlit one.
At the end of this tutorial you will find a link to download both lit and unlit doodle shaders.
Step 2: Vertex Displacement
Inside the Sprites-Diffuse.shader there is a function called vert; that is the vertex function previously discussed. Its name is not important, as long as it matches the one indicated in the vertex: section of the #pragma directive:
#pragma surface surf Lambert vertex:vert nofog nolightmap nodynlightmap keepalpha noinstancing
The vertex function, in a nutshell, is invoked on each vertex of a 3D model and decides how to map it on the 2D screen space. For the purpose of this tutorial, we are only interested in understanding how to displace an object.
The parameter appdata_full v contains a field called vertex, which contains the 3D position of each vertex in object space. Changing its value moves the vertex. So, for instance, the snippet below would translate an object with this shader by one unit along the X axis.
void vert (inout appdata_full v, out Input o)
{
	v.vertex = UnityFlipSprite(v.vertex, _Flip);

	v.vertex.x += 1;

	#if defined(PIXELSNAP_ON)
	v.vertex = UnityPixelSnap (v.vertex);
	#endif

	UNITY_INITIALIZE_OUTPUT(Input, o);
	o.color = v.color * _Color * _RendererColor;
}
By default, 2D games made in Unity only operates on the X and Y axes, so we need to change v.vertex.xy to move the sprite on the 2D plane.
vertex of the struct appdata_full contains the position of the current vertex processed by the shader in object space. This is the position of the vertex assuming the object is located in the centre of the world (0,0,0) unscaled and with no rotation.
Conversely, vertices expressed in world space reflect their real position within Unity’s scene.
❓ How come the object is not moving at one meter per frame?
x component of transform.position in the Update method of a C# script, you will see your object flying right at the speed of 1 unit per frame, which is about 216 Kilometres per hour.
That happens because that change that a C# makes to the position changes the position itself. In a vertex function, this does not happen. The shader is only altering the visual representation of a model, but is not updating or changing the model’s stored vertices. This is why adding +1 to v.vertex.x only moves an object by one metre once.
❗ Don't forget to import the sprite as Tight!
For a more intense and realistic distortion, you should make sure that the sprites are imported with Mesh Type set to Tight, which wraps them into a convex hull (below, right).

This increases the numbers of vertices. While not always desirable, this is exactly what we need.
⭐ Suggested Unity Assets ⭐
Random Displacement
The doodle effect alters the position of each vertex randomly. Sampling random numbers in a shader have always been a tricky subject. This is mostly due to the stateless architecture of GPUs, which makes harder (and inefficient) to replicate the same algorithm used by most libraries (including Mathf.Random).
The original submission by Nick Kaman relied on a noisy texture that, when sampled, gave the illusion of randomness. Depending on your context, this might not be the most efficient approach because it doubles the number of texture lookups that the shader has to perform.
Hence, many shaders rely on rather obscure and chaotic functions that, even though they fully deterministic, look pattern-less to us. And since they have to be stateless, each random number has to be generated with its own seed. This works well because the position of each vertex should be unique. We can use it to associate a random number to each vertex. We will discuss the implementation of this random function later; for now, let’s call it random3.
We can use random3 to generate a random displacement for each vertex. In the example below, the random numbers are scaled with a property called _NoiseScale, which allows controlling how strong the displacement is.
void vert (inout appdata_full v, out Input o)
{
	...
	float2 noise = random3(v.vertex.xyz).xy * _NoiseScale;
	v.vertex.xy += noise;
	...
}
Now we have to actually write the code for random3.
Randomness In a Shader
One of the most used and iconic pseudo-random functions used in shaders comes from a 1998 paper by W.J.J. Rey, titled “On generating random numbers, with help of y= [(a+x)sin(bx)] mod 1“.
float rand(float2 co)
{
    return fract(sin(dot(co.xy ,float2(12.9898,78.233))) * 43758.5453);
}
The function is deterministic (meaning that is it not truly random), but behaves so erratically that it looks completely random. Such functions are called pseudo-random. For this specific tutorial, I am using a more advanced function, by Nikita Miropolskiy.
Generating pseudo-random number in a shader is a very complex subject. If you are interested in knowing more about it, The Book of Shaders has a nice write up that is related to this. Also, Patricio Gonzalez Vivo has compiled a large repository of pseudo-random functions that you can use in your shaders, titled GLSL noise.
Step 3: Adding Time
With the code written so far, we are in a position where each point is displaced by the same amount each frame. This makes for a wonky sprite, not for a doodle effect. To fix this, we need to find a way to change the effect over time. One of the easiest ways is to use both the vertex position and the current time to generate the random number.
In this specific case, I have simply added the current time in seconds, _Time.y, to the vertex position.
float time = float3(_Time.y, 0, 0);
float2 noise = random3(v.vertex.xyz + time).xy * _NoiseScale;
v.vertex.xy += noise;
More advanced effects might more sophisticated ways to integrate time into their equation. But since we are only interested in a discontinuous random effect, adding the two values is more than enough.

Snapping Time
The major issue of adding _Time.y is that this causes the sprite to animate each frame. This is undesirable, since most hand-drawn animations have a low framerate. Instead of being continuous, the time component should be discretised. This means that if we want five frames per second, it should only change five times per second. To use a more familiar term, the time should “snap” to one-fifth of a second. The only allowed values should be ![]() ,
, ![]() ,
, ![]() ,
, ![]() ,
, ![]() ,
, ![]() seconds, and so on…
seconds, and so on…
Snapping has been covered already on this blog, in the article How To Snap To Grid. In that article, it was proposed a solution to the problem of snapping the position of an object on a spatial grid. The mathematics, and consequently the code, are the same if we want to snap a time to a temporal grid.
The following function takes a number x and snaps to integer multiples of snap.
inline float snap (float x, float snap)
{
	return snap * round(x / snap);
}
Which updates our code to:
float time = snap(_Time.y, _NoiseSnap);
float2 noise = random3(v.vertex.xyz + float3(time, 0.0, 0.0) ).xy * _NoiseScale;
v.vertex.xy += noise;
Download Unity Package
Become a Patron!
You can download the Unity package for this effect here.
Additional Resources…
In the past few months, there has been a surge in the number of games which feature a doodle aesthetics. I want to believe this is also due to the success of Doodle Studio 95!, a tool for Unity developed by Fernando Ramallo. If this is the style you want for your game, I strongly advise you to invest in this awesome tool.
💖 Support this blog
This website exists thanks to the contribution of patrons on Patreon. If you think these posts have either helped or inspired you, please consider supporting this blog.
📧 Stay updated
You will be notified when a new tutorial is released!
📝 Licensing
You are free to use, adapt and build upon this tutorial for your own projects (even commercially) as long as you credit me.
You are not allowed to redistribute the content of this tutorial on other platforms, especially the parts that are only available on Patreon.
If the knowledge you have gained had a significant impact on your project, a mention in the credit would be very appreciated. ❤️🧔🏻


“Night in the woods” does this effect with the text. What additional things should we do to apply this effect to Unity Text or TMPro Text ?
Unfortunately there is no easy way to apply this effect to Text Mesh Pro. This is because they use a custom shader which is quite advanced. And messing with it is not something I can explain a couple of lines. Also, this means you will not be able to update Text Mesh Pro, or you will override their shader.
I might get in touch with them and see if they have a preferred way to extend their shaders.
Well, although maybe inefficient I think you can access the vertices positions of the text mesh via script. At least in older versions of tmp I remember you could, because that’s how I think I did some wave-like movement for a game I was working on a year ago.
Yes, you can, but that is going to be *very* inefficient.
So I’d probably try deriving a custom shader for that.
Yes, a shader is always the better choice, but I believe this still works as a solution for things like a 2d desktop game or something like that.
After you left that comment I wanted to know how bad was doing it that way and tried checking the performance in my game. Modifying the vertices like that didn’t drop any frames and checking the Unity profiler (though this is the first time I’ve looked at it, so I might be wrong) looked like it didn’t use much additional CPU time (+0,02ms) or GPU.
The real problem is that the text characters are quads, so the effect doesn’t look perfect. A vertex shader won’t be much different, but maybe a fragment shader could get a good effect.
Anyways, this isn’t to fight you or anything. I just wanted to offer Ralof a solution.
Your tutorials are always great and incredibly useful, thanks for writing them.
Nice! What your next plans?
Hi there!
Im trying to reproduce your tutorial but it isn’t affecting my sprite.
Where Im suppose to define _NoiseSnap and _NoisesScale ?
Hi Alan 🙂
Great shader! It works perfectly on my UI elements, until I start to animate them, when it forgets about the frame rate and updates every frame. Any tips on how to fix this?
Thanks!
Hey!
Could it be because the effect uses the position of the vertices and you are moving them?
Hi! I went on the Unity Reddit to ask about how I could do a “wave warp effect” and people lead me to this post, I’m looking into learning how to do such effect on a overlay-interface space, can you give me some hints? 🙂