
This tutorial shows how to automatically generate simplified colliders for 3D models imported into Unity. The tutorial uses Google SketchUp as an example, but its knowledge and code is agnostic to whichever modelling tool you are using.
- Introduction
- Step 1. The Problem
- Step 2. The Solution
- Step 3. Custom Editor
- Step 4. Improvements
Introduction
Modern games often features very details 3D models. It is not uncommon for characters to render thousands of vertices and triangles. However, collisions with the player are often calculated on a simplified mesh. The standard player controllers Unity comes with, for instance, replies on capsule colliders. When it comes to collisions, there is often no need to be that accurate about the shape of the player. Collision between spheres, cubes, capsules and similar geometrical primitives can be performed very efficiently. Calculating and resolving collision between the individual faces of each 3D models is doable; Unity offers a special component called MeshCollider that is specifically designed for this. However, its dramatic cost rarely translates into an equally significant improvement in the overall gaming experience.
Step 1. The Problem
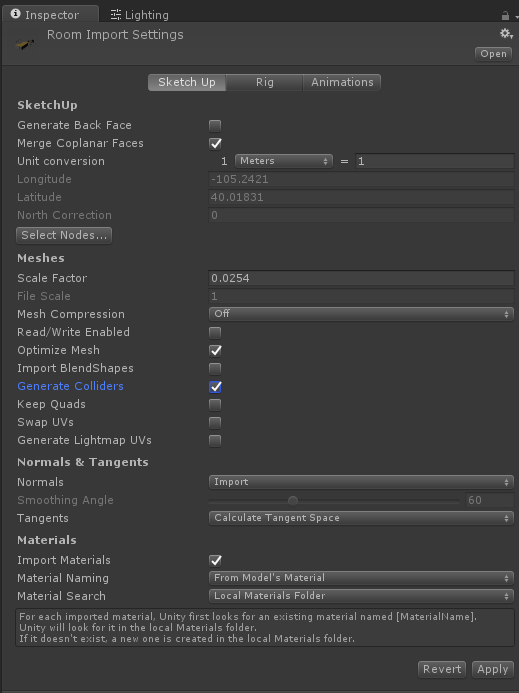
A standard approach in modern games relies on the idea that physical objects uses simplified collision meshes. This introduces an extra step in the development pipeline of a game. On top of creating 3D models, developers now also have to create collision meshes and to place them in the right position. Depending on the software you are using, this task could be massively simplified. If you are using 3D modelling tools such as Google SketchUp (Unity Manual: Importing Objects From SketchUp), unfortunately, this is not the case. SketchUp does not provide any way to distinguish between render and collision geometry. When a model is imported in Unity, you only have the option to generate a MeshCollider.
A possible approach to this problem relies on the idea that you can add, automatically, all the geometry you need. The first thing to understand is that once a model is imported from SketchUp, Unity will preserve the hierarchy of its components. SketchUp supports the concepts of groups and components; they represents containers for the actual geometrical entities (vertices and triangles) that make up your models. Both groups and components are translated into Unity as game objects. For components, the name that Unity chooses is the name used in SketchUp, plus an incremental number. If your Sketchup model contains two instances of the Table components, Unity will name them Table #1 and Table #2.

Step 2. The Solution
The idea behind this simple tutorial is to iterate over the imported game objects, and to add colliders only for certain specific components. Since an imported model consists of many nested game objects, we will need to iterate through all of them recursively. If you are unfamiliar with recursion, it works like this:
- We start from the game object that represents the imported model;
- We iterate over the game objects it contains;
- If the current game object satisfies our criteria (it’s name starts with
Table), then we add a collider and terminates; - If it doesn’t, we iterate on its children repeating [2]
- If the current game object satisfies our criteria (it’s name starts with
In terms of C# code:
public void CreateCollidersRecursively (Transform root)
{
    // [2] Iterates over all children of "root"
    foreach (Transform child in root)
    {
        // [A] Check if we need to create a collider
        if (child.name.StartsWith("Table") )
        {
            child.gameObject.AddComponent<BoxCollider>();
            return;
        }

        // [B] Repeats the process for each child
        CreateCollidersRecursively(child);
    }
}
Adding a BoxCollider with AddComponent has the same effect of adding a collider manually from the inspector. Unity will automatically resize it to fit the bounding box of the 3D mesh. This generates a box around the object, which works in most cases.
Step 3. The Custom Editor
To test CreateCollidersRecursively, we can invoke it from the Start method of a C# script.
public Transform yourModel;
void Start ()
{
    CreateCollidersRecursively(yourModel);
}
The main issues with this approach is that the code is executed each time you start the game. There’s no reason why this couldn’t be done before starting the game, reducing its loading time. In order to do this, we need a way to execute the script in the editor, rather than in the game. This is possible by creating a custom editor script. If you are unfamiliar with this technique, Unity allows to extends the functionality and the look of its editor with custom scripts. We can use the attribute MenuItem to a function so that we can invoke it directly from the editor, before running the game.
using UnityEngine;
...
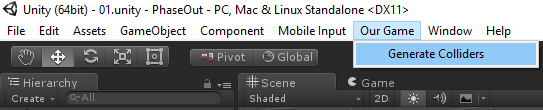
[MenuItem("Our Game/Generate Colliders")]
static void ColliderMenu ()
{
CreateCollidersRecursively(myModel);
}
This new setup allows us to generate colliders without damaging the final player’s experience. If you have more than one models, you can simply place them under the same game object and invoke the script on that one.
Step 4. Improvements
Deleting previous colliders. If you have run the CreateCollidersRecursively function multiple times, you might have noticed that colliders are added multiple times. This can cause many issues. For this reason, we should ensure that the script deletes all previous colliders before creating new ones.
public void CreateCollidersRecursively (Transform root)
{
    // Iterates over all children of "root"
    foreach (Transform child in root)
    {
        // Check if we need to create a collider
        if (child.name.StartsWith("Table") )
        {
            // Deletes all the previous colliders
            Collider [] colliders = root.gameObject.GetComponents<Collider>();
            foreach (Collider collider in colliders)
                Destroy (collider);

            // Creates a new colliders
            child.gameObject.AddComponent<BoxCollider>();
            return;
        }

        // Repeats the process for each child
        CreateCollidersRecursively(child);
    }
}
Instantiating prefabs. We can use this very technique to automatically instantiate other objects that Sketckup does not natively support. Lights, audio sources, collectibles, enemies… they can all be created in the recursive step of the function. For instance, the following snipped allows to create a light from a prefab when the name of the group matches “Light”.
public GameObject lightPrefab;

public void CreateCollidersRecursively (Transform root)
{
    // Iterates over all children of "root"
    foreach (Transform child in root)
    {
        // Check if we need to create a collider
        if (child.name.StartsWith("Table") )
        {
            // ...
        }

        // Creates a light
        if (child.name.StartsWith("Light") )
        {
            GameObject light = Instantiate(lightPrefab, root.position, Quaternion.identity) as GameObject;
            light.transform.parent = root;
        }

        // ...
    }
}
Conclusion
This tutorial briefly covered how to recursively loop over the components of 3D model in Unity. This was used to automatically add colliders and to instantiate prefabs such as lights, audio sources and collectibles.
💖 Support this blog
This website exists thanks to the contribution of patrons on Patreon. If you think these posts have either helped or inspired you, please consider supporting this blog.
📧 Stay updated
You will be notified when a new tutorial is released!
📝 Licensing
You are free to use, adapt and build upon this tutorial for your own projects (even commercially) as long as you credit me.
You are not allowed to redistribute the content of this tutorial on other platforms, especially the parts that are only available on Patreon.
If the knowledge you have gained had a significant impact on your project, a mention in the credit would be very appreciated. ❤️🧔🏻
This is awesome, I would pay money for a consolidated and categorized PDF book of all these tutorials in one spot for offline reference. Do you have any plans to release something like that? I guess I could go through and save them all myself, but idk if you have all the tutorial material all somewhere where it would be easy and convenient for you to do something like that.
Hey! 🙂
I have actually published a book about shaders. It’s not a collection of tutorials, but a shader recipes book. If you want to have a look, it’s only £5 for few more days! 🙂
https://www.packtpub.com/game-development/unity-5x-shaders-and-effects-cookbook
I have ideas for few other books… but no plan so far! 🙂