
This is the second part of the online series dedicated to Journey Sand Shader.
- Part 1. A Journey Into Journey’s Sand Shader
- Part 2. Journey Sand Shader: Diffuse Colour
- Part 3. Journey Sand Shader: Sand Normal
- Part 4. Journey Sand Shader: Specular Reflection
- Part 5. Journey Sand Shader: Glitter Reflection
- Part 6. Journey Sand Shader: Sand Ripples
In this second post we will focus on the lighting model used in the game, and how to recreate it in Unity.
In the previous instalment of this series, we have laid the foundation for what is going to become our take on Journey’s sand shader. As previously discussed, the lighting function is used in surface shaders to calculate the light contribution, which results in a surface exhibiting shades and highlights. In Journey, we have identified several effects that fall into this category. We will start by tackling the most basic (and simple) effect that is at the very core of this shader: its diffuse lighting.

For now, let’s ignore all of the other effects and components, so that we can only focus on the sand lighting.
The custom lighting function seen in the previous post, called LightingJourney, is simply delegating the calculation of the sand’s diffuse colour to a function called DiffuseColor.
float4 LightingJourney (SurfaceOutput s, fixed3 viewDir, UnityGI gi)
{
    // Lighting properties
    float3 L = gi.light.dir;
    float3 N = s.Normal;

    // Lighting calculation
    float3 diffuseColor	= DiffuseColor(N, L);

    // Final color
    return float4(diffuseColor, 1);
}
By keeping each effect self-contained in its own function, we are programming in a more modular and clean way.
The Lambertian Reflectance
Before introducing Journey’s diffuse lighting, it is good to start showing what a “basic” diffuse lighting function looks like. The simplest lit shading technique for matte materials is based on a principle known as Lambertian reflectance. It is a model that well approximate the look of most non-shiny, non-metallic surfaces. It is named after Swiss polymath Johann Heinrich Lambert, who introduced the concept in 1760.
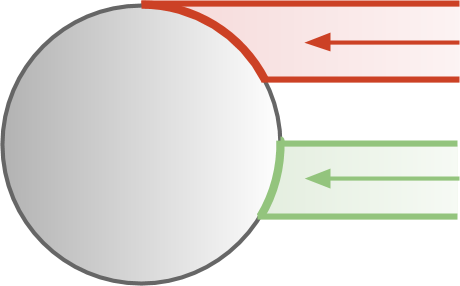
There is a basic idea behind the concept of Lambertian reflectance: the brightness of a surface depends on the amount of light it receives. Geometrically, this can be seen in the diagram below, where a sphere is illuminated by a light source far away. While the red and green regions of the sphere receive the same amount of light, they have significantly different surface areas. If light on the red region is spread over a larger area, it means that each red unit receives less light, compared to the green ones.
Technically speaking, the Lambertian reflectance depends on the relative angle between the surface and the incoming light. Mathematically, we say that it is a function of the surface normal and the light direction. Those quantities are expressed using two vectors of length one (called unit vectors),  and
and  , respectively. Unit vectors are the standard way to represents directions in the context of shader coding.
❗ The conventions for N and L
By convention, the normal to a surface is a unit vector that points away from the surface itself.
By using this analogy, one would imagine that the light direction points away from the light source, following the direction travelled by the light. That is not the case, as the light direction is the unit vector that points towards the direction the light is coming from.
This can be confusing, especially if you are new to shader coding. However, using this convention actually makes the equations easier.
❗ Lambertian reflectance in Unity
Before the introduction of the Standard Shader in Unity 5, the Lambertian reflectance was the model of choice for shading lit surfaces.
It is still accessible from the material inspector, under “Legacy shader“, as “Diffuse“.
If you are writing your own surface shader, instead, the Lambertian reflectance is available as lighting function called Lambert:
#pragma surface surf Lambert fullforwardshadows
Its implementation can be found in the function LightingLambert, defined in the file CGIncludes\Lighting.cginc.
❗ Lambertian reflectance and climate
The Lambertian reflectance is a rather old model, but it provides an insightful understanding of something so complex like surface shading. It can also be used to explain many other phenomena. For instance, that very same diagram explains why the poles are colder than the equator.
From a closer inspection, we can see that a surface receives the maximum amount of light when its normal is aligned with the light direction. Conversely, no light is received when the two unit vectors are orthogonal to each other.

It appears that the angle between and is critical for the Lambertian reflectance. Moreover, the intensity peaks to  when the angle is
  , and it reaches a minimum of
  as the angle approaches
  . If you are familiar with vector algebra, you might have recognised that the quantity that represents the Lambertian reflectance
  is
is  (pronounced “N dot L“), where the operator
  is known as the dot product.
(1) 
The dot product measures how “aligned” two vectors are to each other, and ranges from  (for two identical vectors) to
  (for two opposite vectors). The dot product is at the heart of shading, and it has been covered extensively in Physically Based Rendering and Lighting Models.
Implementation
Both and are easily accessible in the lighting function of a surface shader as s.Normal and gi.light.dir. For simplicity, they will be renamed just N and L in the shader code.
float3 DiffuseColor(float3 N, float3 L)
{
    float NdotL = saturate( dot(N, L) );
    return NdotL;
}
The saturate function keeps the value clamped between and  . However, since the dot product ranges from to , we only need to operate on its negative values. This is why the Lambertian reflectance is often implemented as:
float NdotL = max(0, dot(N, L) );
⭐ Recommended Unity Assets
Unity is free, but you can upgrade to Unity Pro or Unity Plus subscription plans to get more functionalities and training resources for your games.
The Diffuse Contrast Reflectance
While the Lambertian reflectance shades most materials well, it is neither physically based nor photorealistic. Historically speaking, most 3D games from the older generation heavily relied on Lambertian shaders. Games which are relying on this technique often feel old, because they might unintentionally resemble the aesthetic of older titles. Unless this is your intention, the Lambertian reflectance should be avoided in favour of more modern approaches.
One such model is the Oren-Nayar reflectance model, which was originally discussed in Generalization of Lambert’s Reflectance Model in a paper published in 1994 by Michael Oren and Shree K. Nayarin. The Oren-Nayar model is a generalisation of the Lambertian reflectance, and is specifically designed for rough surfaces. The developers of Journey initially wanted to use Oren-Nayar reflectance as the base for their sand shader. However, that idea has been dropped, due to its computational cost.
In his talk from 2013, Technical Artist John Edwards explained that the actual reflectance model devised for Journey’s sand was based on a series of trials and errors, Their intention was not to recreate a photorealistic rendering of a desert, but to give life to a precise and immediately recognisable aesthetics.
Following his indication, the shading model they have devised follows this equation:
(2) ![\begin{equation*} I = 4 * \left( \left(N\odot \left[1, 0.3, 1\right]\right) \cdot L\right)\end{equation*}](https://www.alanzucconi.com/wp-content/ql-cache/quicklatex.com-73d1932fd0e9821f4d3f6697a2c72f0e_l3.png "Rendered by QuickLaTeX.com")
where  is the element-wise product between two vectors.
float3 DiffuseColor(float3 N, float3 L)
{
    N.y *= 0.3;
    float NdotL = saturate(4 * dot(N, L));
    return NdotL;
}
The reflectance model (2) was referred by John Edwards simply as diffuse contrast, so that is the name that will be used for the rest of this tutorial.
The animation below shows a comparison between a Lambertian shading (left) and Journey’s diffuse contrast (right).
❓ What is the purpose of 4 and 0.3?
Even though the diffuse contrast reflection was not developed to be physically correct, we can still try to understand what it does.
At its core, it still used the Lambertian reflectance. The first obvious change is the fact that the overall result is multiplied by  . This means that all pixels that would have normally received
  of light, now shine as if they were receiving . Multiplying everything by makes the gentle Lambertian shading much stronger and its transition from darkness to light becomes smaller. This suits t is sharpening the shadow.
The effect of multiplying the y component of the normal direction by  is much trickier to explain. Changing the components of a vector changes the overall direction it points at. By reducing the y component to only
  of its original value, the diffuse contrast reflectance forces the shadows to be more vertical.
As a side note, the dot product directly measures the angle of two vectors only when they both have length . The change that has been introduced shortens the length of , which is not a unit vector any more.
From Black & White To Colours
All the animations seen so far are black and white because they were showing the values of their reflectance model, which ranges from to . We can easily add colours by using NdotL as the coefficient to interpolate between two colours: one for the fully shaded and one for the fully lit sand.
float3 _TerrainColor;
float3 _ShadowColor;

float3 DiffuseColor(float3 N, float3 L)
{
    N.y *= 0.3;
    float NdotL = saturate(4 * dot(N, L));

    float3 color = lerp(_ShadowColor, _TerrainColor, NdotL);
    return color;
}
What’s Next…
In this second part of the online series about the sand rendering in Journey, we focused on how the dunes were shaded, using a custom reflectance model.
In the next part, Journey Sand Shader: Sand Normal, we will explore how to give three-dimensionality to the dunes using bump mapping.
- Part 1. A Journey Into Journey’s Sand Shader
- Part 2. Journey Sand Shader: Diffuse Colour
- Part 3. Journey Sand Shader: Sand Normal
- Part 4. Journey Sand Shader: Specular Reflection
- Part 5. Journey Sand Shader: Glitter Reflection
- Part 6. Journey Sand Shader: Sand Ripples
Credits
The videogame Journey is developed by Thatgamecompany and published by Sony Computer Entertainment. It is available for PC (Epic Store) and PS4 (PS Store).
The 3D models of the dunes, backgrounds and lighting settings were made by Jiadi Deng.
The 3D model of the Journey’s player was found on the (now closed) FacePunch forum.
Download Unity Package
Become a Patron!
If you want to recreate this effect, the full Unity package is available for download on Patreon. It includes everything needed, from the shaders to the 3D models.
Leave a Reply