This article will explain how to create four dimensional objects, in a format compatible with the Unity4D extension.

You can find all the articles in this series here:
- Part 1: Understanding the Fourth Dimension
- Part 2: Extending Unity from 3D to 4D
- Part 3: Rendering 4D Objects
- Part 4: Creating 4D Objects
Introduction
The past three articles in this series talked at length about hypercubes and hyperspheres. And while Part 1 gave some basic intuitions on how hyperobjects are built, we have yet to see any code. The purpose of this final article is to show how such shapes can be constructed within the Unity4D framework that we developed.
In particular, we need to remember that a Mesh4D instance is a scriptable object which serves and the 4D counterpart of Unity’s 3D Mesh. Like Mesh, Mesh4D contains a list of vertices. Unlike Mesh, however, Mesh4D contains a list of edges, instead of triangles It is also important to remember that the Unity4D library works with any 4D shape, but can only render convex ones. If you need to render a concave 4D shape, you will have to built it out of multiple convex pieces.
That being said, it should be clear that to create a 4D object in Unity4D, we will need a list of vertices and the edges connecting it. The faces between them are implicitly assumed from the convex hull of its vertices.
Hypercubes
The concept of cube can be generalised in any dimension as an  -cube.
| n | Name | Vertices | Edges | Faces |
|---|---|---|---|---|
| 0 | Point |  | ||
| 1 | Segment |  | | |
| 2 | Square |  | | |
| 3 | Cube |  |  |  |
| 4 | Tesseract |  |  |  |
| n | -cube |  |  |  |
All of them can be constructed with an iterative process. An -cube can be assembled from two  -cubes, by connecting their respective edges together.

This process can be repeated endlessly, progressively creating hypercubes in higher dimensions. This is effectively a hyper-extrusion: en extrusion in a higher dimension.
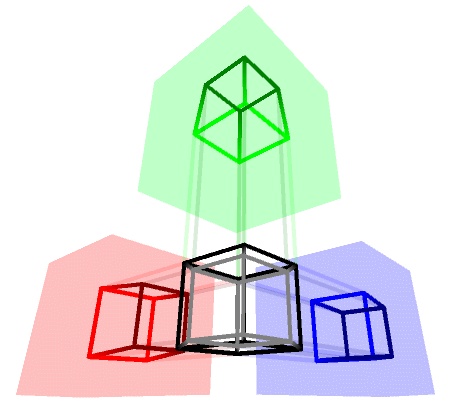
If we are only interested in building a -cube—also know as a tesseract—we can also do it manually, according to the following schematics which uses two  -cubes:

The following scripts encodes the vertices and edges from the diagrams above into a Mesh4D object. The various x0, x1, y0, y1, z0, z1, w0 and w1 passed as parameters are used to indicate the X, Y, Z and W coordinates of those vertices.
public void CreateCube4 (Mesh4D mesh,
    float x0, float x1,
    float y0, float y1,
    float z0, float z1,
    float w0, float w1)
{
    Vector4[] vertices = new Vector4[8 * 2];
    Mesh4D.Edge[] edges = new Mesh4D.Edge[12 * 2 + 8];

    // w = 0
    // Face down
    vertices[0] = new Vector4(x0, y0, z0, w0);
    vertices[1] = new Vector4(x1, y0, z0, w0);
    edges[0] = new Mesh4D.Edge(0, 1);

    vertices[2] = new Vector4(x0, y0, z1, w0);
    vertices[3] = new Vector4(x1, y0, z1, w0);
    edges[1] = new Mesh4D.Edge(2, 3);

    edges[2] = new Mesh4D.Edge(0, 2);
    edges[3] = new Mesh4D.Edge(1, 3);

    // Face up
    vertices[4] = new Vector4(x0, y1, z0, w0);
    vertices[5] = new Vector4(x1, y1, z0, w0);
    edges[4] = new Mesh4D.Edge(4, 5);

    vertices[6] = new Vector4(x0, y1, z1, w0);
    vertices[7] = new Vector4(x1, y1, z1, w0);
    edges[5] = new Mesh4D.Edge(6, 7);

    edges[6] = new Mesh4D.Edge(4, 6);
    edges[7] = new Mesh4D.Edge(5, 7);

    // Connects the two faces
    edges[8] = new Mesh4D.Edge(0, 4);
    edges[9] = new Mesh4D.Edge(1, 5);
    edges[10] = new Mesh4D.Edge(2, 6);
    edges[11] = new Mesh4D.Edge(3, 7);

    // w = 0
    // Face down
    vertices[0 + 8] = new Vector4(x0, y0, z0, w1);
    vertices[1 + 8] = new Vector4(x1, y0, z0, w1);
    edges[0 + 12] = new Mesh4D.Edge(0 + 8, 1 + 8);

    vertices[2 + 8] = new Vector4(x0, y0, z1, w1);
    vertices[3 + 8] = new Vector4(x1, y0, z1, w1);
    edges[1 + 12] = new Mesh4D.Edge(2 + 8, 3 + 8);

    edges[2 + 12] = new Mesh4D.Edge(0 + 8, 2 + 8);
    edges[3 + 12] = new Mesh4D.Edge(1 + 8, 3 + 8);

    // Face up
    vertices[4 + 8] = new Vector4(x0, y1, z0, w1);
    vertices[5 + 8] = new Vector4(x1, y1, z0, w1);
    edges[4 + 12] = new Mesh4D.Edge(4 + 8, 5 + 8);

    vertices[6 + 8] = new Vector4(x0, y1, z1, w1);
    vertices[7 + 8] = new Vector4(x1, y1, z1, w1);
    edges[5 + 12] = new Mesh4D.Edge(6 + 8, 7 + 8);

    edges[6 + 12] = new Mesh4D.Edge(4 + 8, 6 + 8);
    edges[7 + 12] = new Mesh4D.Edge(5 + 8, 7 + 8);

    // Connects the two faces
    edges[8 + 12] = new Mesh4D.Edge(0 + 8, 4 + 8);
    edges[9 + 12] = new Mesh4D.Edge(1 + 8, 5 + 8);
    edges[10 + 12] = new Mesh4D.Edge(2 + 8, 6 + 8);
    edges[11 + 12] = new Mesh4D.Edge(3 + 8, 7 + 8);

    // Connects the two cubes
    edges[24] = new Mesh4D.Edge(0, 0 + 8);
    edges[25] = new Mesh4D.Edge(1, 1 + 8);
    edges[26] = new Mesh4D.Edge(2, 2 + 8);
    edges[27] = new Mesh4D.Edge(3, 3 + 8);
    edges[28] = new Mesh4D.Edge(4, 4 + 8);
    edges[29] = new Mesh4D.Edge(5, 5 + 8);
    edges[30] = new Mesh4D.Edge(6, 6 + 8);
    edges[31] = new Mesh4D.Edge(7, 7 + 8);

    // Copies the new geometry
    mesh.Vertices = vertices;
    mesh.Edges = edges;
}
Hyperspheres
A naive approach to build a hypersphere should be to extude a sphere into the fourth dimension. While that is definitely a valid approach to create a 4D object, it does not ultimately create a -sphere. The reason is simple: a sphere is the set of points that are all at the same distance from the center. A hyper-extrusion would not produce such a shape.
This means to produce a hypersphere we need an entirely new approach.
4D Icosphere: 600-cell
Many modern game engines are building 3D spheres through subdividision of a regular icosahedron. This process usually requires two steps:
- Subdividing the faces of a regular icosahedron
- Projecting the vertices onto a sphere
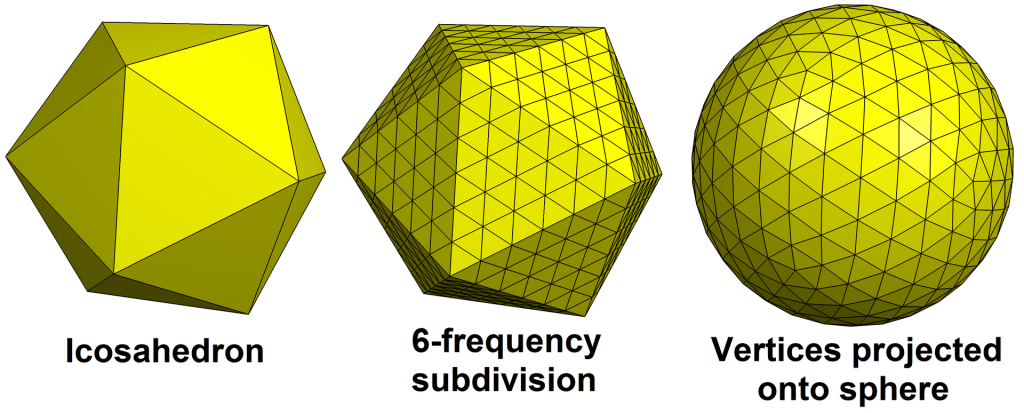
The same approach could be used in 4D. The 4D equivalent of a icosahedron is a 600-cell. Compared to a much more tamed tesseract, a 600-cell can be very difficult to visualise. The website qfbox wrote an interesting articles that helps visualising its inner structure: The 600-Cell.
Constructing a 600-cell via code is rather nasty. If you are interested in such a task, these are the list of vertices of a 600-cell. First, you need to include the following 8 vertices, which represents the vertices of a 16-cell (a 4D tetrahedron):
(1) 
Secondly, you need to include the 16 vertices of a tesseract with side length :
(2) 
And finally including the 96 vertices of a snub 24-cell. They are the even permutations of the following set:
(3) 
where  is the golden ratio.
8 vertices of -cell:
(4) 
16 vertices of a 4-cube:
(5) 
96 verties of a snub 24-cell:
(6) 
(7) 
(8) 
(9) 
(10) 
(11) 
(12) 
(13) 
(14) 
(15) 
(16) 
(17) 
Providing a set of vertices is not enough to construct a mesh. In fact, Mesh4D also requires a list of edges. Writing such a list by hand is incredibly tedious, so an easier approach is to simply construct the convex hull that envelops the vertices, and extracting the edges from the faces.
The following function initialises the vertices and edges of a given Mesh4D object, from a set of 4D vertices:
public static void ConstructConvexHull (Mesh4D mesh, IList<Vector4> vertices)
{
    // Vertex4 to Vertex
    Vertex[] vertices4 = vertices.Select(x => (Vertex)x).ToArray();

    // Convex hull
    var result = ConvexHull.Create(vertices4);

    // Extracts edges
    Vector4[] verticesC = new Vector4[result.Faces.Count() * 4];
    Mesh4D.Edge[] edgesC = new Mesh4D.Edge[result.Faces.Count() * 4];

    int v = 0;
    foreach (var face in result.Faces)
    {
        // edge(0,1)
        verticesC[v] = face.Vertices[0];
        edgesC[v] = new Mesh4D.Edge(v, v + 1);
        v++;

        // edge(1,2)
        verticesC[v] = face.Vertices[1];
        edgesC[v] = new Mesh4D.Edge(v, v + 1);
        v++;

        // edge(2,3)
        verticesC[v] = face.Vertices[2];
        edgesC[v] = new Mesh4D.Edge(v, v + 1);
        v++;

        // edge(3,0)
        verticesC[v] = face.Vertices[3];
        edgesC[v] = new Mesh4D.Edge(v, v - 3);
        v++;
    }

    mesh.Vertices = verticesC;
    mesh.Edges = edgesC;
}
Where Vertex is a wrapper for a double[4], which is how the MIConvexHull accepts vertices.
The code shown above is far from perfect. In fact, every face is equipped with its own set of unique vertices. To use an expression that the ones of you who are familiar with 3D modelling will understand: ConstructConvexHull does not weld the vertices of the constructed 4D shape.
This is what a standard 600-cell looks like as it gently moves in and out of the 3D world:
Once a 600-cell is constructed, the next step is to subdivide its faces, and to reproject all of its vertices onto a sphere. This means—assuming we are constructing a unit hypersphere—normalising all vertices so that their overall length is .
The overall process is indeed rather nasty, which is why it is only presented as a series of steps, and is not really implemented in the Unity4D package.
Random points
Creating a hyper-icosphere is definitely not for the faint-hearted. Another approach is to simply generate a set of random points, all at the same distance from the centre. Unity comes with a method called Random.onUnitSphere which returns a random point on the surface of the unit sphere.
Unfortunately, there is no such method for a -sphere. However, it is not too difficult to create one. Any random point on the unit hyper-cube can be normalised to have length equal to . This effectively means that all normalised random 4D points are lying on the surface of a -sphere.
public static Vector4 OnUnitSphere4()
{
    return new Vector4
    (
        Random.Range(-1f, +1f),
        Random.Range(-1f, +1f),
        Random.Range(-1f, +1f),
        Random.Range(-1f, +1f)
    ).normalized;
}
One easy solution is to generate a high number of points using OnUnitSphere4, and to then construct their convex hull from which the full set of edges can be extracted. This method is very efficient, but results in cross-sections that are not necessarily very spherical.

Yes, it’s a hyper-potato.
Random points uniformly distributed
The reason why a the cross-section of a random set of points on the unity -sphere looks like a hyper-potato is simple: those points are not uniformly distributed. As the object passes through the 3D space, fewer and fewer vertices are part of the cross-section, resulting in a progressively rougher shape.
A slightly better result can be obtained by ensuring the points are not overlapping too much, and possibly even performing some gentle relaxation on them:

The problem of sampling points that are uniformly distributed and are not overlapping has been studied extensively in the filed of Computer Graphics. When a distribution has both of the properties mentioned above, we are in the presence of the so-called blue noise.

Poisson-disk sampling is a technique that is often used to generate points that follow a blue noise distribution. You can read more about this on Poisson-Disk Sampling by Jason Davies.
Our problem is also made more complicated by the fact that the points have to be distributed on the surface of a -sphere. Another article by Jason Davies that nicely explains the problem of generating Random Points on a Sphere.
Casey Muratori also wrote an interesting article titled The Color of Noise, explaining how blue noise can affect the quality of 3D renderings.
That is still far from being, well, spherical. One solution to this is to rely on a function that, unlikely OnUnitSphere4, provides a better random distribution.
One such technique has been proposed by StackExchange user whuber, and relies on the statistical properties of the Gaussian distribution. If you are unfamiliar with the concept, that is one of the most used random distributions in Statistics as it well represents the distribution of many natural phenomena. In this blog we have covered the Gaussian distribution extensively, including an efficient way to sample Gaussian random numbers.
- Part 1: Understanding the Gaussian distribution
- Part 2: How to sample from the Gaussian distribution

Assuming we have 4 numbers which are sampled from a normalised Gaussian distribution  :
:
(18) 
Let’s calculate the following quantity:
(19) 
Then, the following points  are uniformly distributed on the unit sphere in 4D.
(20) 
This technique is fairly efficient, and generalises well in higher dimensions as well. The animation below shows a sphere with a slightly higher vertex count, resulting in a much better cross-section.

Attempting to create topologically sound cross-sections of a -sphere is a really big challenge. This is because when the -sphere is barely intersecting the 3D world, there are not enough vertices in the cross-section to generate a proper smooth surface.
There is a cheeky way to fix this, which like many things in video games, is all about cheating. The cross-section of a -sphere is a -sphere, so one could simply calculate its radius, and construct an instantiate an actual sphere with the desired level of precision.
Although unverified, I suspect this is how “4D Toys” actually renders hyperspheres.
Conclusion
This article concludes our journey through the fourth dimension. Thoughtout these four posts, we have learnt how visualise, represents, manipulate and create four dimensional objects. And while this tutorial was targeted at Unity users, its knowledge can be easily extended to any other gaming engine such as Unreal or Godot.
What’s not left for you to do, is to make sure you can use this knowledge to build some awesome!
You can read all the articles in the series here:
- Part 1: Understanding the Fourth Dimension
- Part 2: Extending Unity from 3D to 4D
- Part 3: Rendering 4D Objects
- Part 4: Creating 4D Objects
Additional Resources
If you are interested in learning more about the fourth dimension and the hidden beauty of the objects it contains, I would suggest having a look at the following articles and books:
- 🌐 Tesseract by Bartosz Ciechanowski, one of the best explorables about hypercubes.
- 🌐 4D Visualization by qfbox, a series of short articles explaining different methods and techniques to visualise 4D objects.
- 🌐 Poisson-Disk Sampling by Jason Davies, an interactive page with several links related to blue noise.
- 🌐 The Color of Noise by Casey Muratori, a detailed article about the difference blue noise can make in 3d renderings.
- 📖 The Visual Guide To Extra Dimensions by Chris McMullen, one of the best books about understanding 4D geometries.
📦 Download Unity4D Package

All of the diagrams and animations seen in this tutorial have been made with Unity4D, the unity package that extends support for 4D meshs in Unity.

The Unity4D package contains everything needed to replicate the visual seen in this tutorial, including the shader code, the C# scripts, the 4D meshes, and the scenes used for the diagrams and animations. It is available through Patreon.
💖 Support this blog
This website exists thanks to the contribution of patrons on Patreon. If you think these posts have either helped or inspired you, please consider supporting this blog.
📧 Stay updated
You will be notified when a new tutorial is released!
📝 Licensing
You are free to use, adapt and build upon this tutorial for your own projects (even commercially) as long as you credit me.
You are not allowed to redistribute the content of this tutorial on other platforms, especially the parts that are only available on Patreon.
If the knowledge you have gained had a significant impact on your project, a mention in the credit would be very appreciated. ❤️🧔🏻
Thank you for such an informative post! Your clear and concise writing style made it easy to understand the subject matter, and I’ve come away with valuable knowledge that I can apply in practical ways.