Part 1, Part 2, Part 3, Part 4, Part 5, [download the Unity3D package]
If you are using Unity3D you may be familiar with image effects. They are scripts which, once attached to a camera, alter its rendering output. Despite being presented as standard C# scripts, the actual computation is done using shaders. So far, materials have been applied directly to geometry; they can also be used to render offscreen textures, making them ideal for postprocessing techniques. When shaders are used in this fashion, they are often referred as screen shaders.
Step 1: The shader
Let’s start with a simple example: a postprocessing effect which can be used to turn a coloured image to greyscale.
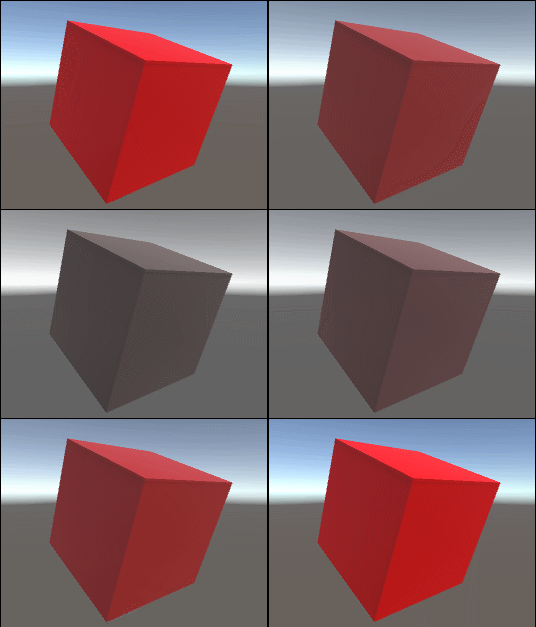
The way to approach this problem is assuming the shader is provided with a texture, and we want to output its grayscaled version.
Shader "Hidden/BWDiffuse" {
	Properties {
		_MainTex ("Base (RGB)", 2D) = "white" {}
		_bwBlend ("Black & White blend", Range (0, 1)) = 0
	}
	SubShader {
		Pass {
			CGPROGRAM
			#pragma vertex vert_img
			#pragma fragment frag

			#include "UnityCG.cginc"

			uniform sampler2D _MainTex;
			uniform float _bwBlend;

			float4 frag(v2f_img i) : COLOR {
				float4 c = tex2D(_MainTex, i.uv);

				float lum = c.r*.3 + c.g*.59 + c.b*.11;
				float3 bw = float3( lum, lum, lum );

				float4 result = c;
				result.rgb = lerp(c.rgb, bw, _bwBlend);
				return result;
			}
			ENDCG
		}
	}
}
This shader won’t alter the geometry, so there is no need for a vertex function; there’s a standard, “empty” vertex function is called vert_img. We also don’t define any input or output structure, using the standard one provided by Unity3D which is called v2f_img.
Line 20 takes the colour of the current pixel, sampled from _MainTex, and calculate its greyscaled version. As nicely explained by Brandon Cannaday in a post with a similar topic, the magic numbers .3, .59 and .11 used represent the sensitivity of the Human eye to the R, G and B components. Long story short: they’ll make a nicer greyscale image, based on the perceived luminosity. You can also just average the R, G and B channels, but you won’t get a result as nicer as this one.
Line 24 interpolates the original colour and the new one using _bwBlend as a blending coefficient.
This shader is not really intended to be used for 3D models; for this reason its name starts with Hidden/, which won’t make it appear in the drop-down menu of the material inspector.
Step 2: The C# script
The next step is to make this shader working as a postprocessing effect. MonoBehaviours have an event called OnRenderImage which is invoked every time a new frame has to be rendered on the camera they are attached to. We can use this event to intercept the current frame and edit it, before it’s rendered on the screen.
using UnityEngine;
using System.Collections;

[ExecuteInEditMode]
public class BWEffect : MonoBehaviour {

	public float intensity;
	private Material material;

	// Creates a private material used to the effect
	void Awake ()
	{
		material = new Material( Shader.Find("Hidden/BWDiffuse") );
	}

	// Postprocess the image
	void OnRenderImage (RenderTexture source, RenderTexture destination)
	{
		if (intensity == 0)
		{
			Graphics.Blit (source, destination);
			return;
		}

		material.SetFloat("_bwBlend", intensity);
		Graphics.Blit (source, destination, material);
	}
}
Line 13 creates a private material. We could have provided a material directly from the inspector, but there’s the risk of that being shared between other instances of BWEffect. Perhaps a better option would be to provide the script with the shader itself, rather than using its name as a string.
Line 26 is where the magic happens. The function Blit takes a source RenderTexture, process it with the provided material and renders it onto the specified destination. Since Blit is typically used for postprocessing effects, it already initialises the property _MainTex of the shader with what the camera has rendered so far. The only parameters which has to be initialised manually is the blending coefficient. Line 19 skips the usage of the shader, if the effect has been disabled.
⭐ Suggested Unity Assets ⭐
The CRT effect
One of the most used effects in games today is the CRT. Whether you grew up with old monitors or not, games are constantly using them to give that good vibe of old and retro. Games such as Alien Isolation and ROUTINE, for instance, owe lot of their charm to CRT monitors. This section will show how is possible to recreate a very simple CRT effect using screen shaders.
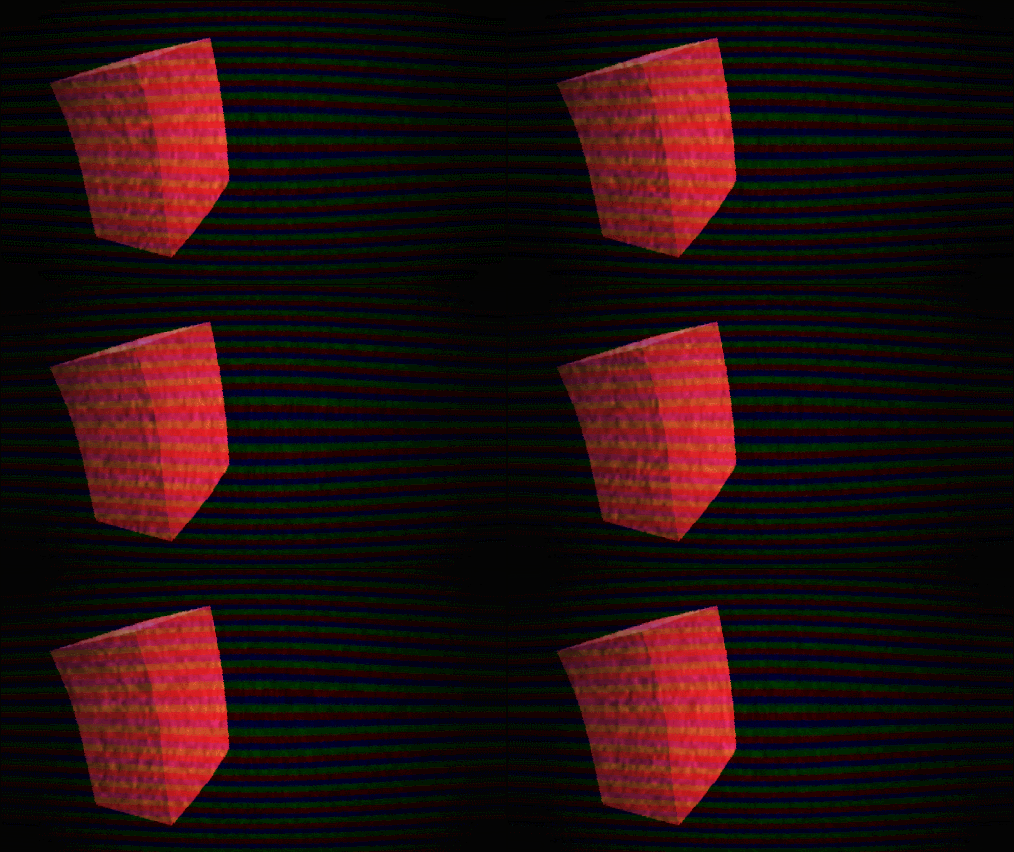
First of all, let’s look at what makes CRT monitors:
- White noise
- Scanlines
- Distortion
- Fading
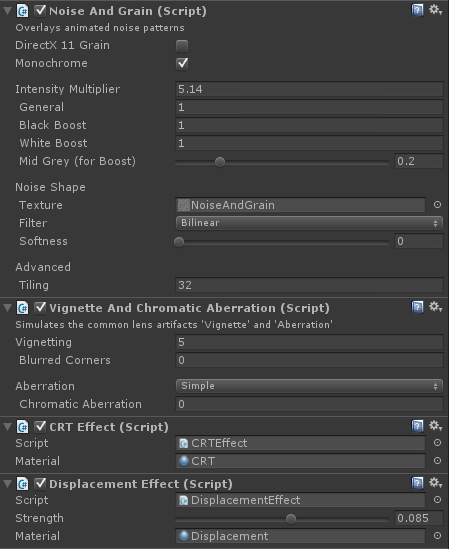
Rather then using a single shader, we’ll use four of them. This is not very efficient, but it shows how post processing effects can be stacked one on top of the other. For the white noise and the fading effect we will rely on Noise and Grain and Vignette and Chromatic Aberration filters.
Scanlines
The effect will have RGB lines, which will appear in screen space. As seen before, it has two components: a shader, and a script which is attached to the camera. This time, however, we also need an external material (BWEffect creates its own material in Awake). This is because the scanline effect requires a texture which is easier to pass to a material, rather than to a script.
Shader "Hidden/CRTDiffuse" {
	Properties {
		_MainTex ("Base (RGB)", 2D) = "white" {}
		_MaskTex ("Mask texture", 2D) = "white" {}
		_maskBlend ("Mask blending", Float) = 0.5
		_maskSize ("Mask Size", Float) = 1
	}
	SubShader {
		Pass {
			CGPROGRAM
			#pragma vertex vert_img
			#pragma fragment frag
			#include "UnityCG.cginc"

			uniform sampler2D _MainTex;
			uniform sampler2D _MaskTex;

			fixed _maskBlend;
			fixed _maskSize;

			fixed4 frag (v2f_img i) : COLOR {
				fixed4 mask = tex2D(_MaskTex, i.uv * _maskSize);
				fixed4 base = tex2D(_MainTex, i.uv);
				return lerp(base, mask, _maskBlend	);
			}
			ENDCG
		}
	}
}
The scanlines are sampled from a texture, which has be imported in the inspector with Wrap Mode: Repeat. This will repeat the texture over the entire screen. Thanks to the variable _maskSize it is possible to decide how big the texture will be.
Fianlly, the script:
using UnityEngine;
using System.Collections;

[ExecuteInEditMode]
public class CRTEffect : MonoBehaviour
{
    public Material material;

    // Postprocess the image
    void OnRenderImage(RenderTexture source, RenderTexture destination)
    {
        Graphics.Blit(source, destination, material);
    }
}
You should notice that if you are planning to use this effect on multiple cameras, you should make a copy of the material in the Awake method. This will ensure every script has its own instance and you can tweak them individually without any problem.
Distortion
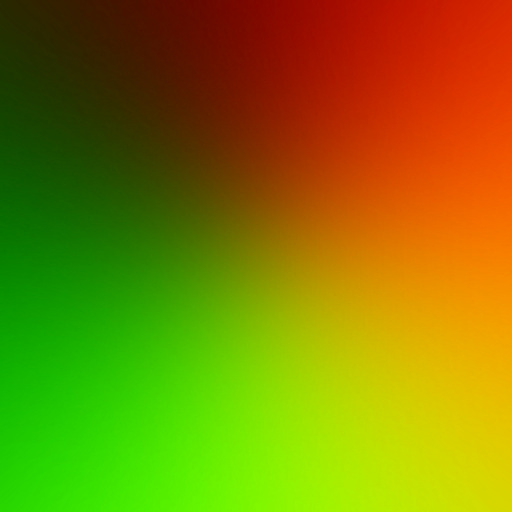
The distortion on CRT monitors is due to the curvature of the glass where the image is projected. To replicate the effect we’ll need an extra texture called _DisplacementTex. It’s red and green channels will indicate how to displace pixels on the X and Y axes, respectively. Since colours in an image go from 0 to 1, we’ll rescale them to -1 to +1.
float4 frag(v2f_img i) : COLOR {
	half2 n = tex2D(_DisplacementTex, i.uv);
	half2 d = n * 2 -1;
	i.uv += d * _Strength;
	i.uv = saturate(i.uv);

	float4 c = tex2D(_MainTex, i.uv);
	return c;
}
The quality of the CRT distortion heavily depends on the displacement texture which is provided. A very bad possible one is, for instance:
Conclusion
This post shows how vertex and fragment shaders can be used to create post processing effects in Unity3D.
This post concludes the basic tutorial about shaders. More posts will follow, with more advanced techniques such as fur shading, heatmaps, water shading and volumetric explosions. Many of these posts are already available on Patreon.
- Part 1: A gentle introduction to shaders in Unity3D
- Part 2: Surface shaders in Unity3D
- Part 3: Physically Based Rendering and lighting models in Unity3D
- Part 4: Vertex and fragment shader in Unity3D
- Part 5: Screen shaders and postprocessing effects in Unity3D
💖 Support this blog
This website exists thanks to the contribution of patrons on Patreon. If you think these posts have either helped or inspired you, please consider supporting this blog.
📧 Stay updated
You will be notified when a new tutorial is released!
📝 Licensing
You are free to use, adapt and build upon this tutorial for your own projects (even commercially) as long as you credit me.
You are not allowed to redistribute the content of this tutorial on other platforms, especially the parts that are only available on Patreon.
If the knowledge you have gained had a significant impact on your project, a mention in the credit would be very appreciated. ❤️🧔🏻


Link on a previous (4 out of 5) tutorial to this one is broken, had to use your webpage’s built-in search function.
The CRT scanlines example doesn’t seem to work in the newest version of Unity (5.3.0F4)
Brilliant tutorial, simple and effective!
Thanks to you i was able to quickly understand postprocessing and build the shader that i needed.
The CRT effect is really nice btw 🙂
This is confusing as fuck.
Hi Jon.
Which aspect of this tutorial is confusing you? Have you read the previous parts?
Hi Alan,
I would like to know how to finish the CRT effect which seems incomplete. I don’t understand which textures are supposed to be given in the CRTDiffuse shader.
How can we replace the first frag function by the “float4 frag(v2f_img i) : COLOR” one ? And if we do that, how can we declare the _DisplacementTex in the Properties field ? And which texture are we supposed to give to that field ?
Hey! 🙂
There is a Unity project with all the missing bits. You can download it from here if you’re a patron: https://www.patreon.com/posts/2881298 ! 🙂
Unfortunately, I’m not one :/
I’m just currently trying to edit a water shader that is really complicated (at least for me) and I follow your tutorials to understand how things work in Unity shaders. Thanks for your great work by the way.
Great tutorial. I was looking into making a grayscale postprocess effect and it’s spot on!
I knew I needed to get the image rendered by the camera but didn’t know which functionality to use. Thank you!
You’re welcome! 😀
Hello! I am currently trying to make part of an object light up based on collisions. Currently my plan is to write a shader that alters the RGB values when the worldPos is within a certain radius of the collision point. However, I do not know how to pass the location of the collision point into the shader. Is it possible to pass values into the shader at runtime from a script?
Hey!
Yes, this is totally possible. You need to define a variable such as:
uniform Vector3 _position;
in your shader. Then, you need a C# scripts that takes the material which has that shader and does:
material.SetFloat(“_position”, value);
You can read more here: https://docs.unity3d.com/ScriptReference/Material.SetFloat.html .
Ah yes that’s exactly what I was looking for, I’ll read up on that. Thank you so much!
Hey, Alan.
I’m trying yo figure out how to make a heat distortion effect for the whole screen, I’m new at shaders. Thanks!
I read all your articles about shader scripting and i’m ready for shading
Amazed. Inspired. Grateful. 😍😍😍
you can’t see me but I’m totally doing a happy dance.
Hi Alan,
thanks for the great tutorial.
I have a quick question: how do I apply a warping on a texture? I don’t want the vertices of the model to change. I just want to warp the texture that gets mapped onto the material of the model.
I tried multiplying the i.uv of the frag() function with the warp parameters but that does not seem to work.
Any ideas?
Hi Nik!
It really depends on what you mean by “wraping”.
The easiest approach is to do something like:
tex2D(_MainTex, i.uv + fixed2(sin(_Time.y), 0) * _NoiseScale);
so you add the sine of the current time to the UV.
If you play with different functions you can have a very nice effect.
Keijiro has some nice resources on noise: https://github.com/keijiro/NoiseShader
Hi Alan,
Thank you for a great tutorial. I read all of it, and now I have a general understanding of what shader is, and what it does, and how it works. Great introduction to shaders!
Thank you so much!
I’m glad it helped! 🙂
Hi Alan. Am I understanding correctly: you can’t do these post process effects
when Cinemachine plugin is used in the project? (i.e. when you attach post process script to the camera it has no effect whatsoever?)
Thanks for the great tutorial. I am finally starting to get into unity and in particular shaders and this tutorial helped me a lot.
Glad this helped!
Have a look at this page: I have a lot of other shader-related tutorials!
https://www.alanzucconi.com/tutorials/
Hello,
Great tutorial it was very helpful. I have an issue. I implement your codes on Empty project and use Cubes like you showed. However, same codes didnt work on my current project. What can be issue here? Could you please help me?