
This post continues our journey in the depth of Inverse Kinematics. In this tutorial you will learn how to apply this powerful technique to create realistic tentacles.

The other post in this series can be found here:
- Part 1. An Introduction to Procedural Animations
- Part 2. The Mathematics of Forward Kinematics
- Part 3. Implementing Forward Kinematics
- Part 4. An Introduction to Gradient Descent
- Part 5. Inverse Kinematics for Robotic Arms
- Part 6. Inverse Kinematics for Tentacles
- Part 7. Inverse Kinematics for Spider Legs 🚧 (work in progress!)
At the end of this post you can find a link to download all the assets and scenes necessary to replicate this tutorial.
Introduction
The previous part of this tutorial, Inverse Kinematics for Robotic Arms, discussed how to use gradient descent to perform inverse kinematics on a robotic arm. The movement performed by machines is rather simple, as they lack the complexity of real human limbs. In a robotic arm, each joint is controller by a motor. In a limb, each muscle is, de-facto, an independent motor that can expand and contract on its own.
Several creatures possess limbs are able of several degrees of freedom. Elephants’ trunks, and octopuses’ tentacles are such an example. Modelling those limbs is particularly challenging, as the traditional techniques introduces so far fail to produce realistic results.
We will start from the example of the previous post, changing as we go until we obtain a behaviour that is realistic enough for our application.
Tentacle Rigging
When we built a robotic arm, each part was moving independently. Conversely, tentacles can bend. This is an essential feature that we cannot ignore if we are aiming for realism. Our tentacle will need to bend.
The Unity component which allows for this feature is called Skinned Mesh Renderer:
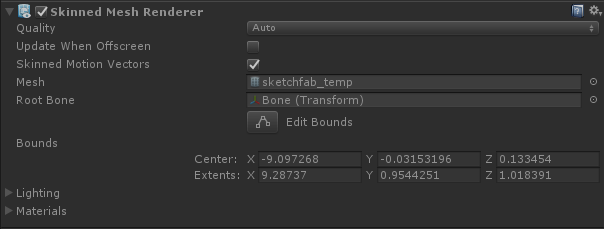
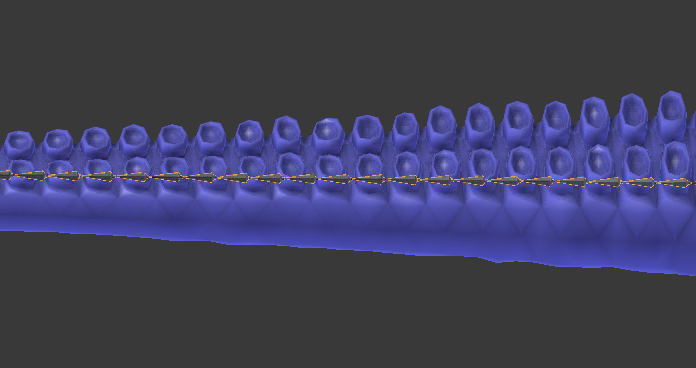
Unfortunately, Unity does not provide a way to create skinned mesh renderer from the editor. A 3D modelling software, such as Blender, is needed. The image below shows the model of the tentacle that will be used for the rest of this tutorial. Inside, it is visible a series of bones, one after the other. They are the objects that allows to bend the model.
Adding bones to a model, also known as rigging, goes beyond the scope of this tutorial. Blender 3D: Nood to Pro/Bones provides a good introduction to this subject.
Bones and Joints
The next step to allow inverse kinematics on a tentacle, is to attach a RobotJoint script to each bone. By doing so, we are giving to our inverse kinematics solver the ability to bend the tentacle.
In a normal octopus, each “joint” is able to rotate freely along all its three axes. The code designed in Inverse Kinematics for Robotic Arms, unfortunately, only allows joints to move on a single axis. Changing this would mean introducing a new level of complexity to our existing code. Instead, we can cycle the axis on the joints, so that joint 0 rotates on X, joint 1 rotate on Y, joint 2 rotates on Z, and so on. This can lead to unnatural behaviours, but you might never experience any issue if the bones are small enough.
In the downloadable Unity project that comes with this tutorial, the script SetRobotJointWeights automatically initialises the parameters for all the joints in the tentacle. Alternatively, you can do this by hand for a finer control on the way each bone can be moved.
Comfort Function
The following animation shows two tentacles. The one on the left is reaching for the red sphere using the algorithm presented in Inverse Kinematics for Robotic Arms. The one of the right, instead, adds a completely new twist of realism by spiralling in a more organic fashion. This example should be enough to understand why tentacles do need their own tutorial.
Both tentacles relies on gradient descent. The difference is in the error function they are trying to minimise. The robotic tentacle on the left only wants to reach the ball; it does not care about any other parameter. Once the end effector is touching the ball, convergence is reached and the tentacle simply stops moving.
The tentacle on the right, on the other hand, is minimising a different function. The function DistanceFromTarget used for the robotic arm is replaced by a new, more complex ones. We can design this new ErrorFunction to take into account several other parameters that we want to take into consideration. The tentacles shown in this tutorial tries to minimise three different functions:
- Distance from target: as already defined,
- End effector rotation: the tip of the tentacle tries to match the rotation of the object we want to reach. This behaviour can be seen in the animation above, where the right tentacle is spiralling around the sphere. Since each joint has a limited range of movements, this will cause ripples to be transmitted down the kinematic chain of bones.We can force the tentacle to match the rotation of the object it tries to reach. To do so, we can measure the angle between the end effector rotation and the target rotation. Unity comes with a handy function to do so
Quaternion.Angle:float rotationPenalty = Mathf.Abs ( Quaternion.Angle(EndEffector.rotation, Destination.rotation) / 180f );Matching the local rotation like this might not always be a good idea. Depending on the situation, you might want to align your tentacle in a different way.
- Torsion: keeping limbs in unnatural positions is uncomfortable. This parameter penalises convoluted solutions, forcing the inverse kinematics to a more linear, simple rotation.To calculate a penalty for the torsion, we first have to define what “torsion” means in our context. The easiest approach is to define it as the average of the angles for all joints. Such penalty wants the tentacle to be relaxed, punishing solutions that requires lot of twists.
float torsionPenalty = 0;
for (int i = 0; i < solution.Length; i++)
     torsionPenalty += Mathf.Abs(solution[i]);
torsionPenalty /= solution.Length;
These three penalties score leads to tentacles that moves in a rather realistic way. A more sophisticate version could make sure that they keep wobbling even when all the other constraints are fully satisfied.
❓ Using different unitsIdeally, they should all be normalised between  and
and  . Then, it is possible to use coefficients to specify their relative importance:
public float ErrorFunction (Vector3 target, float [] angles)
{
    return
        NormalisedDistance(target, angles) * DistanceWeight +
        NormalisedRotation(target, angles) * RotationWeight +
        NormalisedTorsion (target, angles) * TorsionWeight  ;
}
This approach also allows a finer control over the behaviour of the tentacle. They can be changed at any time, depending on the situation, to alter the way they move. For instance, you can increase TorsionWeight to untangle messy tentacles.
❓ We don't have an analytical definition!
What we have now is a function that, potentially, cannot be described analytically. If we had chosen to use a traditional, analytical approach to solve inverse kinematics, we would be unable to add those nuances to our tentacles. Using gradient descent means that we are now able to minimise (almost!) any arbitrary function, whether or not we have its equation.
Improvements
There is virtually no limit to the number of improvements that one can do. Something that will definitely increase the realism of your tentacles is a slowdown function. Tentacles should go slower when they are closer to their destination target.
Also, tentacles should not self intersect. To avoid this, one could use actual colliders on each joint. This, however, can lead to bizarre behaviours. The code ignores collisions, and might still converge to a solution where self collisions occur. A solution is to change the fitness function so that self intersecting solutions are highly penalised.
Other resources
- Part 1. An Introduction to Procedural Animations
- Part 2. The Mathematics of Forward Kinematics
- Part 3. Implementing Forward Kinematics
- Part 4. An Introduction to Gradient Descent
- Part 5. Inverse Kinematics for Robotic Arms
- Part 6. Inverse Kinematics for Tentacles
- Part 7. Inverse Kinematics for Spider Legs 🚧 (work in progress!)
Become a Patron!
Patreon You can download the Unity project for this tutorial on Patreon.
Credits for the 3D model of the robotic arm goes to Petr P.
Credits for the 3D model of the tentacle goes to Daniel Glebinski.
A big thanks also goes to Federico Fasce.
💖 Support this blog
This website exists thanks to the contribution of patrons on Patreon. If you think these posts have either helped or inspired you, please consider supporting this blog.
📧 Stay updated
You will be notified when a new tutorial is released!
📝 Licensing
You are free to use, adapt and build upon this tutorial for your own projects (even commercially) as long as you credit me.
You are not allowed to redistribute the content of this tutorial on other platforms, especially the parts that are only available on Patreon.
If the knowledge you have gained had a significant impact on your project, a mention in the credit would be very appreciated. ❤️🧔🏻
link for Inverse Kinematics for Spider Legs is 404
Sorry, that is not ready yet!
:'(
Any plans to finish it?
YES!
Is just hard to find the time!
But I definitely want to resume it at some point! It will likely be two or three posts long!
More IK please 🙂
Ah loving this so much, I seriously couldn’t have made it this closer to my dream without you. I’ve played pikuniku too, it’s so cute and beautiful! Something about the procedural animation just gives it more personality and I’m loving it 😍. Thanks a tonnnn for this, you are my dream come true
Glad to hear that!!!
The frefab of tentacle is missing
我在blender中打开tentacle_rigged并再次保存之后没有错误了
Do you have Blender installed?
Which OS are you using?
Which version of Unity?
Hi Alan. Have you banned Malaysian’s IP from accessing your site? I’ve been trying for 2 months now and I always get ERR_CONNECTION_TIMED_OUT.
Would be nice to be able to visit your site without going through an EU proxy.
Hi Fei!
I am very sorry to hear that you are experiencing this issue. :\
It seems my provides is blocking several IPs.
This is becoming more of an issues for my readers, but I have no direct control over it.
I might have to switch provider sooner or later. :\
When should the Spider Limb tutorial be up? Thanks for these helpful tutorials.
Hey!
Part of that (upcoming) tutorial might be used in a game I’m working on.
So I’ll release it as soon as that is out! :p
Kk, thanks and good luck!
Still no spider tutorial? These are awesome, can’t wait for the next one!
Apologies for the long wait!
The code is mostly done, but I still have to finish the article!
Thanks a lot for all these tutorial about ik and fk in unity.It’s really hard to find tutorials about these topics…
You’re welcome!
It’s one of the reasons why I’m writing these tutorials!
Uh, will the Spider legs thingy be done soon? it still has a 404 error 🙁 Thanks
Sorry for that!
The tutorial has not been done yet!
However, a very similar technique can be read in this other article!
https://www.alanzucconi.com/2018/05/02/ik-2d-1/
It’s quite alright! I can’t wait for when it comes out! thanks for responding :D, also, I wanted to say, thank you for making these tutorials, I haven’t done them yet, but I took a quick glance and they look awesome. Thanks for making them!
You’re welcome! <3
No idea if you still check comments here, but figured I’d try. I implemented this up to the last step, and it’s working ok . However, I can’t get the “leg” to match the rotation of the target. I wrote an AngleFromTarget function that uses the equation above and returns the value. If I call AngleFromTarget instead of DistanceFromTarget (for testing just the rotation part), nothing seems to happen even if I rotate my target quite drastically. I drew some Debug Rays to make sure I was looking at the right directions in the AngleFromTarget, and they were what I expected to see (but boy did that make my fan spin!). Any thoughts on what I might be missing?
In true programmer form, as soon as I asked I figured it out. I was looking at the direction currently on the leg, NOT the angles from the calculated solution being tested. Duh.
Figured I’d post an update in case someone else runs into the same problem.
I guess no spider leg tutorial then … 🙂
I am getting a null reference error in Tentacle scene from this line
Vector3 nextPoint = prevPoint + rotation * Joints[i].StartOffset;
The tentacle bones seem to be missing RobotJoint scripts, are we supposed to add them manually?
Hi Hank!
It is quite hard to reply not knowing what your current setup is!
Are you able to get the demo scenes to work?
If so, everything is set up correctly.
Yes, the IK script is not enough alone! You need to add a RobotJoint script to each gameobject that you want to be used a joint/pivot for your arm! And then, to link them in the Joints list on the IK script. Each RobotJoint scripts indicates on which the joint can move, and how far.
For the robot arm, I did that manually. For the tentacle, I created a script that sets them automatically or I would have gone crazy!
Hi Alan!
Indeed after I added RobotJoint to each bone (ofc not manually), and click GetJoint button, it worked!
Thank you for the reply, and keep up the great content!
Awesome!
And don’t forget to show me what you have been working on!
Link for part 7 broken.
wow thanks for this!
I have a question: where did you learn this? and when will you do the spider leg tutorial?
I enjoyed the tutorial pretty much.
Let me know when the final part is available 🙂
Hey!
I realised I couldn’t possibly cover all I wanted to talk about in one single post!
So I started another series:
– Inverse Kinematics in 2D: https://www.alanzucconi.com/2018/05/02/ik-2d-2/
– Inverse Kinematics in 3D: https://www.alanzucconi.com/?p=12166
These are in preparation for the ACTUAL final series on spider legs!
It’s been 4 long years… and I’m still waiting for the Spider Legs… 😭😭😭
Thank you for the amazing tutorial series! When I brought it up with my colleagues over lunch, they immediately knew which blog I was talking about. Keep up the great work!
This is pretty interesting and approachable. I am wondering about the performance of the analysis in a real game. Imagine you model a character using this approach and the character is running, it would seem that it would be difficult to make these calculations fast enough to make the animation look fluid. Thoughts?
Ah loving this so much, I seriously couldn’t have made it this closer to my dream without you. I’ve played pikuniku too, it’s so cute and beautiful! Something about the procedural animation just gives it more personality and I’m loving it 😍. Thanks a tonnnn for this, you are my dream come true
Thanks!!!