

You can read all the posts in this series here:
- Part 1. An Introduction to DeepFakes and Face-Swap Technology
- Part 2. The Ethics of Deepfakes
- Part 3. How To Install FakeApp
- Part 4. A Practical Tutorial for FakeApp
- Part 5. An Introduction to Neural Networks and Autoencoders
- Part 6. Understanding the Technology Behind DeepFakes
- Part 7. How To Create The Perfect DeepFakes
If you are interested in reading more about AI Art (Stable Diffusion, Midjourney, etc) you can check this article instead: The Rise of AI Art.
Introduction
Despite what media is claiming, creating deepfakes is not easy. To be more precise, creating deepfakes is very easy, but creating good ones is not. There is no doubt that the most accessible application to create deepfakes is FakeApp, which recently hit version 2.2. This tutorial will show you how to install it and use it. For an in-depth discussion on how to get the most out of face-swap technology, you can refer to How To Create The Perfect DeepFakes.
FakeApp, like most face-swapping software, is based on the original implementation provided by the Reddit user deepfakes. There are other softwares available, such as faceswap on GitHub), but FakeApp remains the most accessible one due to its friendly interface. Whichever application you are going to use, make sure to download it from an official source, as many are infected with Bitcoin miners and Trojans.
Step 1. Installing NVidia CUDA9
FakeApp relies on neural networks, which are notoriously expensive to train. Despite their cost, the process of training a neural network is highly parallelisable. For this reason, most Machine Learning frameworks (such as Keras and TernsorFlow) can dispatch the computation on a GPU. GPU stands for Graphics Processing Unit, and is the chip that inside your machine that usually processes graphics inputs.
GPUs are designed to perform operations in parallel, hence they are perfect to train neural networks which are built upon independent neurons working in parallel. FakeApp uses TensorFlow, a Machine Learning framework which supports GPU-accelerated computation using NVIDIA graphics cards. Before using that, however, you need to install CUDA®, a parallel computing platform that delegates intensive computation to an NVIDIA GPU.
Check your Graphics Card. Not all graphics cards from NVIDIA have integrated support for GPU Computing. You can check whether your GPU is compatible or not visiting the CUDA GPUs list. Any graphics card with Compute Capability greater or equal to 3.0 will work.
For instance, all the models on the right will support CUDA®:

FakeApp allows to train your models without a GPU. This is strongly discouraged, as the process might take weeks, instead of hours.
Update your NVIDIA Drivers. Before being able to use CUDA®, you must update your NVIDIA drivers. You can do so from the official NVIDIA Driver Downloads page.

Make sure you are choosing the right model and architecture.
❓ How do I know the model of my GPU?
If you are unsure about which GPU model you have, you can choose Option 2 which will automatically find it for you. Alternatively, you can search for “Device Manager” in your Start bar and check it yourself under “Display adapters“:
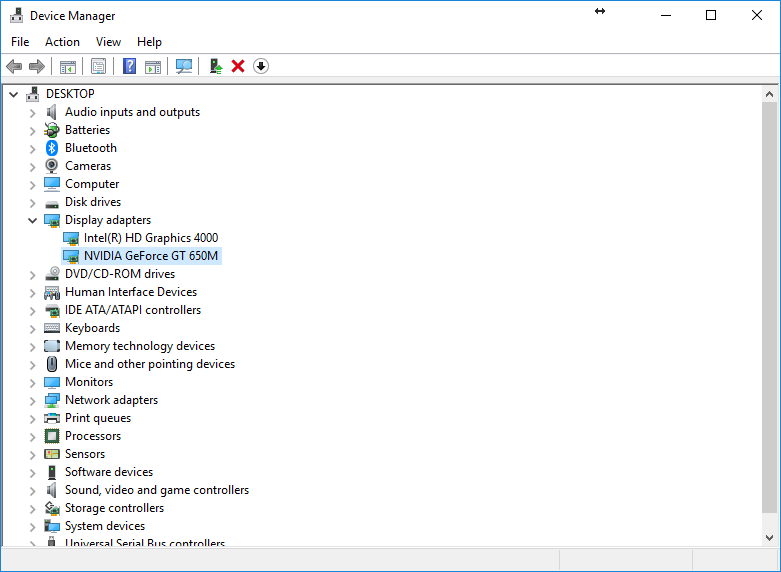
Names might vary slightly depending on your version of Windows.
Install CUDA® Toolkit 9.0. Now that your NVIDIA drivers are up to date, you can download the actual CUDA® Toolkit from the official CUDA® Toolkit Download page.

Make sure that you select the right version for both CUDA and your OS.
You can choose whichever Installer Type you prefer. “exe (local)” will download the entire installer first. The file is rather big, so get ready to wait.
During the installation, choose the “Custom” option and select all of its components.
Install cuDNN. While the CUDA® Toolkit provides the basic set of tools required for GPU computing, it does not include the libraries for certain specialised tasks. ML-Agents uses reinforcement learning to training neural networks. As such, you will also need to download the CUDA® support for deep neural networks, also known as cuDNN.
Downloading cuDNN requires a login. You can register for free as an NVIDIA Developer, and then visit the webpage again to access the download link. FakeApp works with cuDNN 7, so make sure to select the right version.
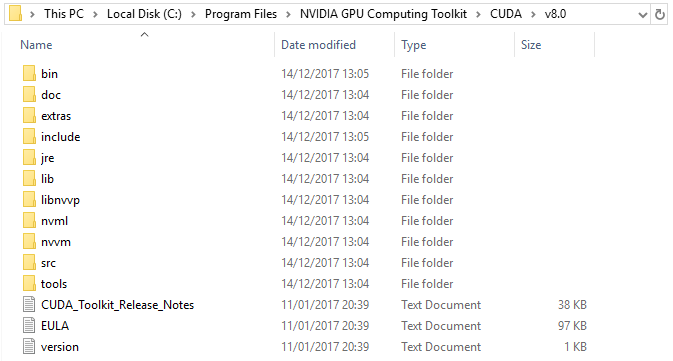
While CUDA® Toolkit comes with a proper installer, cuDNN is simply a zip file with all the necessary libraries. To install it, you will need to extract its content and merge it with the CUDA/v9.0 folder in your system (typically: C:\Program Files\NVIDIA GPU Computing Toolkit\CUDA\v9.0):
While this is the suggested option, you can keep the cuDNN files in a separate folder. If you do this, remember to follow the next step carefully so that they are still accessible through your Path.
Configure your Path System Variable. Both CUDA® and cuDNN needs to be accessible by FakeApp. By default, installing CUDA9.0 updates your Path. This is a system variable that Windows uses to find critical files and applications.
Search for “system variable” on your Search bar and open the “Edit the system environment variables” application (the name might be slightly different, depending on your version of Windows). Click on “Environment Variables…” and find the Path variable from the list below:
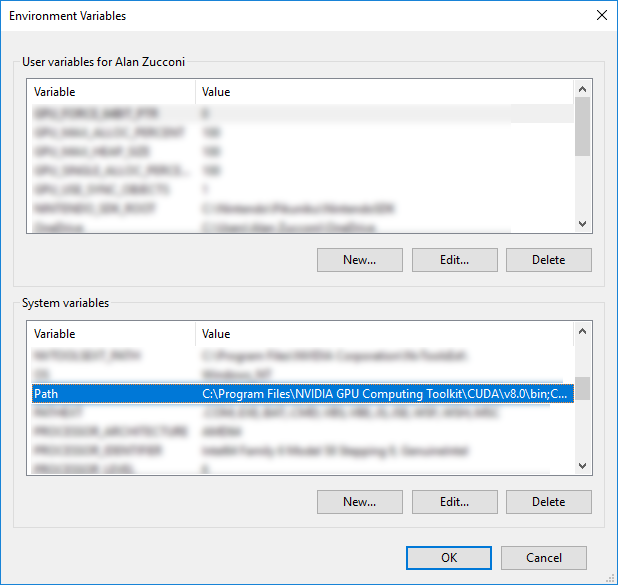
Click on “Edit…” and make sure that there are two entries: one for the bin and one for the libnvvp folders of your CUDA® installation. Typically they are:
C:\Program Files\NVIDIA GPU Computing Toolkit\CUDA\v9.0\binC:\Program Files\NVIDIA GPU Computing Toolkit\CUDA\v9.0\libnvvp
The installer for CUDA® should automatically update your Path; double check this is the case, or FakeApp will not be able to work.
Step 2. Installing FakeApp
Installing FakeApp is the easiest step, although it still requires some configuration. The installer can be downloaded from the FakeApp Download page. Make sure to download it from there, as many other sources are infected with malware and Bitcoin miners.
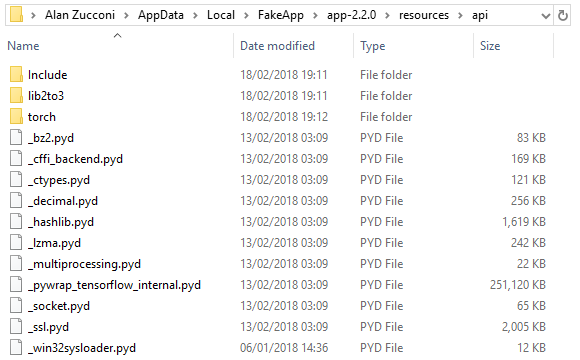
There are two files that you need to download. One is the actual installer for the FakeApp binaries, while the other is called core.zip and contains all the dependencies that it requires. Once extracted, all of its content should be merged in the C:\Users\[USER]\AppData\Local\FakeApp\app-2.2.0\resources\api folder, which should look like this:
If everything works correctly, you should now be able to use FakeApp.
Conclusion
Now that FakeApp (and all of its dependencies) are installed, the next tutorial will teach how to use it.
You can read all the posts in this series here:
- Part 1. An Introduction to DeepFakes and Face-Swap Technology
- Part 2. The Ethics of Deepfakes
- Part 3. How To Install FakeApp
- Part 4. A Practical Tutorial for FakeApp
- Part 5. An Introduction to Neural Networks and Autoencoders
- Part 6. Understanding the Technology Behind DeepFakes
- Part 7. How To Create The Perfect DeepFakes
A special thanks goes to Christos Sfetsios and David King, who gave me access to the machine I have used to create the deepfakes used in this tutorial.
Leave a Reply