

You can find all the post in this series here:
- Part 1. Volumetric Atmospheric Scattering
- Part 2. The Theory Behind Atmospheric Scattering
- Part 3. The Mathematics of Rayleigh Scattering
- Part 4. A Journey Through the Atmosphere
- Part 5. Atmospheric Sphere Shader
- Part 6. Intersecting The Atmosphere
- Part 7. Atmospheric Scattering Shader
- 🔒 Part 8. An Introduction to Mie Theory
You can download the Unity package for this tutorial at the bottom of the page.
Introduction
Writing the Shader
There are endless ways in which we can start writing the shader code for this effect. Since we want to render atmospheric scattering on planets, it makes sense to assume that it will be used on spheres.

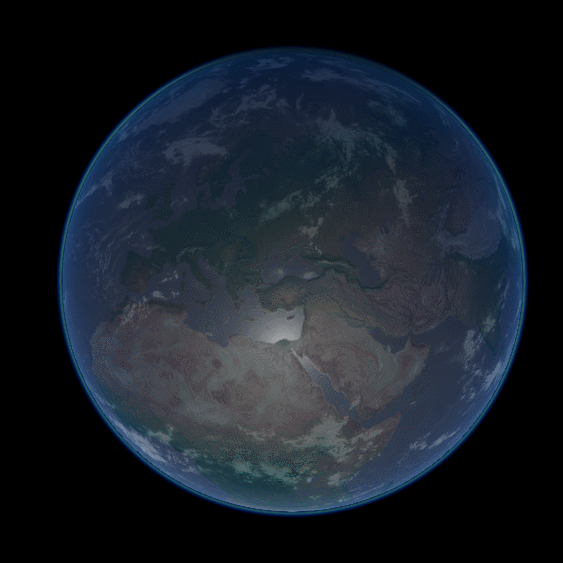
If you are using this tutorial for a game, chances are that you will use it on an existing planet. Adding the calculations for the atmospheric scattering on top a sphere is possible, but will generally yield poor results. The reason is that the atmosphere is larger than the planet radius, so it needs to be rendered on a transparent, slightly larger sphere. The image below (credits: NASA) shows how the atmosphere extends way above the surface of the planet, blending with the empty space behind it.
Applying a scattering material to a separate sphere is possible, but redundant. In this tutorial I propose to extend the Unity Standard Surface Shader, adding a shader pass that renders the atmosphere on a slightly larger sphere. We will refer to it as the atmospheric sphere.
Two-Pass Shader
If you have worked with surface shaders in Unity before, you might have noticed that there is no support for the Pass block, which is how multiple passes are usually defined in a vertex and fragment shader.
Creating a two-pass surface shader is possible, simply by adding two separate sections of CG code in the same SubShader block:
Shader "Custom/NewSurfaceShader" {
	Properties {
		_Color ("Color", Color) = (1,1,1,1)
		_MainTex ("Albedo (RGB)", 2D) = "white" {}
		_Glossiness ("Smoothness", Range(0,1)) = 0.5
		_Metallic ("Metallic", Range(0,1)) = 0.0
	}
	SubShader {

		// --- First pass ---
		Tags { "RenderType"="Opaque" }
		LOD 200

		CGPROGRAM
		// Cg code here
		ENDCG
		// ------------------

		// --- Second pass ---
		Tags { "RenderType"="Opaque" }
		LOD 200

		CGPROGRAM
		// Cg code here
		ENDCG
		// -------------------
	}
	FallBack "Diffuse"
}
You can edit the first pass to render the planet. From now on, we will focus on the second one for the atmospheric scattering.
Normal Extrusion
The atmospheric sphere is slightly larger than the planet. This means that the second pass needs to extrude the sphere out. If the model that you are using has smooth normals, we can achieve this effect using a technique called normal extrusion.
Normal extrusion is one of the oldest shader tricks and, usually, the first one to be taught. This blog has plenty of references to learn about it; a good starting point the post Surface Shader from the series A Gentle Introduction to Shaders.
If you are unfamiliar with how normal extrusion works, all vertices are processed by a shader through its vertex function. We can use that function to modify the position of each vertex, making the sphere larger.
The first step is to change the pragma directive to include vertex:vert; this forces Unity to run a function called vert on each vertex.
#pragma surface surf StandardScattering vertex:vert

void vert (inout appdata_full v, out Input o)
{
	UNITY_INITIALIZE_OUTPUT(Input,o);
	v.vertex.xyz += v.normal * (_AtmosphereRadius - _PlanetRadius);
}
The snippet above shows a vertex function that extrudes a sphere along its normal. The amount by which the sphere is extruded depends on the size of the atmosphere and the size of the planet. Both those quantities need to be provided in the shader as properties that can be accessed from the material inspector.
Our shader will also need to know the centre of the planet. We can include this calculation as well in the vertex function. Finding the central position of an object in world space is something that we have discussed in the article Vertex and Fragment Shaders.
struct Input
{
	float2 uv_MainTex;
	float3 worldPos; // Initialised automatically by Unity
	float3 centre;   // Initialised in the vertex function
};

void vert (inout appdata_full v, out Input o)
{
	UNITY_INITIALIZE_OUTPUT(Input,o);
	v.vertex.xyz += v.normal * (_AtmosphereRadius - _PlanetRadius);
	o.centre = mul(unity_ObjectToWorld, half4(0,0,0,1));
}
❓ What is UNITY_INITIALIZE_OUTPUT?
If you look at the vertex function, it always includes a mysterious call to UNITY_INITIALIZE_OUTPUT. The shader receives the position of the vertices in object space, and it has to project them in world coordinates, using the position, scale and rotation provided by Unity.
This is exactly one of the operations that UNITY_INITIALIZE_OUTPUT performs. Without it, you’d be forced to write the code necessary to do this calculation yourself.
⭐ Recommended Unity Assets
Unity is free, but you can upgrade to Unity Pro or Unity Plus subscription plans to get more functionalities and training resources for your games.
Additive Blending
Another important feature we need to address is the transparency. Normally, a transparent material allows seeing what’s behind it. That solution would not work well here, since the atmosphere is more than a transparent plastic sheet. It carries light, hence we should use an additive blending mode to make sure we increase the luminosity of the planet.
The standard surface shader provided by Unity does not have, by default, any blending mode activated. To change this, we can replace the tags in the second pass with these new ones:
Tags { "RenderType"="Transparent"
	"Queue"="Transparent"}
LOD 200
Cull Back

Blend One One
The expression Blend One One is used by the shader to refer to the additive blending mode.
Custom Lighting Function
Most of the time programmers have to write a surface shader, they modify its surf function, which is used to provide “physical” properties such as the albedo, the smoothness, the metallicity and so on. All of those properties are then used by the shader to calculate a realistic shading.
In this particular case, we don’t want any of those calculations. To do this, we need to replace the lighting model that the shader is using. We have covered this topic extensively; you can refer to the following posts if you want a better understanding on how to do it:
The new lighting model will be called StandardScattering; we need to provide functions for realtime lighting and for the global illumination, LightingStandardScattering and LightingStandardScattering_GI , respectively.
The code that we need to write also relies on properties such as the light direction and the view direction. They are retrieved in the following snippet.
#pragma surface surf StandardScattering vertex:vert

#include "UnityPBSLighting.cginc"
inline fixed4 LightingStandardScattering(SurfaceOutputStandard s, fixed3 viewDir, UnityGI gi)
{
	float3 L = gi.light.dir;
	float3 V = viewDir;
	float3 N = s.Normal;

	float3 S = L;	// Direction of light from the sun
	float3 D = -V;  // Direction of view ray piercing the atmosphere

	...
}

void LightingStandardScattering_GI(SurfaceOutputStandard s, UnityGIInput data, inout UnityGI gi)
{
	LightingStandard_GI(s, data, gi);
}
The ... will contain the actual shader code that we need to implement this effect.
Floating Point Precision
For the purpose of this tutorial, we will assume that all calculations are done in metres. This means that if you want to simulate Earth, you’ll need a sphere with a radius of 6371000 metres. This is actually not possible in Unity, due to floating point errors that occur when dealing with very large and very small numbers at the same time.
If you want to overcome those limitations, you can rescale the scattering coefficient to compensate accordingly. For instance, if your planet has a radius of only 6.371 metres, the scattering coefficient  should be 1000000 larger and the scale height
  1000000 smaller.
In the actual Unity project, available for download, all properties and calculations are expressed in metres. This allows us to use real, physical values for the scattering coefficients and scale height. However, the shader also receives the size of the sphere in metres, so that it can perform a scale conversion from Unity units to life scale metres.
Coming Next…
This post started the shader code necessary to simulate atmospheric scattering. The next post will focus on the geometry necessary to calculate the entrance and exit points of the view ray in the atmosphere.
You can find all the post in this series here:
- Part 1. Volumetric Atmospheric Scattering
- Part 2. The Theory Behind Atmospheric Scattering
- Part 3. The Mathematics of Rayleigh Scattering
- Part 4. A Journey Through the Atmosphere
- Part 5. Atmospheric Sphere Shader
- Part 6. Intersecting The Atmosphere
- Part 7. Atmospheric Scattering Shader
- 🔒 Part 8. An Introduction to Mie Theory
Download
Become a Patron!
You can download all the assets necessary to reproduce the volumetric atmospheric scattering presented in this tutorial.
Leave a Reply