
This tutorial will explore one of the most used Mathematical tools in Game Development: linear interpolation! This first post will focus on its Mathematical definition and implementation. The following parts of this series will explore how to extend linear interpolation to non-linear mappings, and how to use them to correct colour curves.
- Part 1: Linear Interpolation
- Part 2: Piecewise Interpolation
- Part 3: Color Curve Correction
You can find a link to download the C# scripts and the Unity package used at the end of this post.
Linear Interpolation
One of the most useful—and somewhat underrated—functions in Game Development is lerp. Shorthand for linear interpolation, you can imagine lerp as a way to “blend” or “move” between two objects, such as points, colours and even angles.
Virtually every software comes with a function to perform linear interpolation. Unity, for instance, has several; the most well-known being being Mathf.Lerp. It takes two numbers, namely  and
and  , and lerp them using another numbers
  which value must be between
  and
and  .
.
The result is simple: when  , the result is ; when
  , the result is ; when
  , the result is the average between the two,
  ; and so on.
In a nutshell, the parameter allows to move in the range between and . Mathematically, we can say that lerp is a function that maps the interval ![\left[0, 1\right]](https://www.alanzucconi.com/wp-content/ql-cache/quicklatex.com-ac0ef5000a04390b73f0f437f914143d_l3.png "Rendered by QuickLaTeX.com") to the interval
to the interval ![\left[a, b\right]](https://www.alanzucconi.com/wp-content/ql-cache/quicklatex.com-b86fa516b1e81febd67b558baea849a8_l3.png "Rendered by QuickLaTeX.com") , and it can be expressed using the following equation:
, and it can be expressed using the following equation:
(1) 
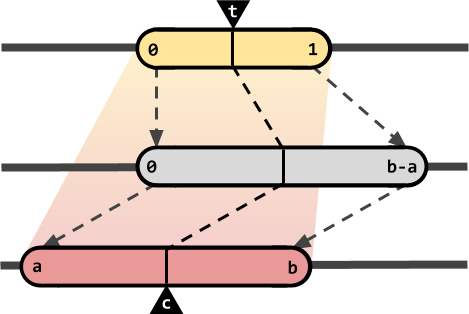
This equation might seem confusing at first, but it has a very simple geometrical interpretation, as seen in the diagram below. The value of can range anywhere from to . Once multiplied by  , it will range between and : exactly the size of the desired interval. Then, all that is needed is to shift it accordingly by .
Inverse Lerp
Some libraries also feature a complementary function; Mathf.InverseLerp, in case of Unity. As the name suggests, inverse lerp does exactly the opposite of what lerp does: it remaps a number in the interval to the interval .
(2) 
A degenerate case can occur when  , as that would lead to a division by zero. In that case, it is not uncommon to assume .
Even (2) can be interpreted geometrically. In this case, the exact same operations of lerp are preformed, but in reverse:

Linear Mapping
With these two functions, it is possible to remap any arbitrary value ![x \in \left[a, b\right]](https://www.alanzucconi.com/wp-content/ql-cache/quicklatex.com-50e38ece4e9fc11fd1b0861bd6d294ca_l3.png "Rendered by QuickLaTeX.com") to any other integer interval
to any other integer interval ![\left[c, d\right]](https://www.alanzucconi.com/wp-content/ql-cache/quicklatex.com-9e601090d7c25be74cf47eec386330bb_l3.png "Rendered by QuickLaTeX.com") .
.
(3) 
which, once again, has a very immediate geometrical interpretation:
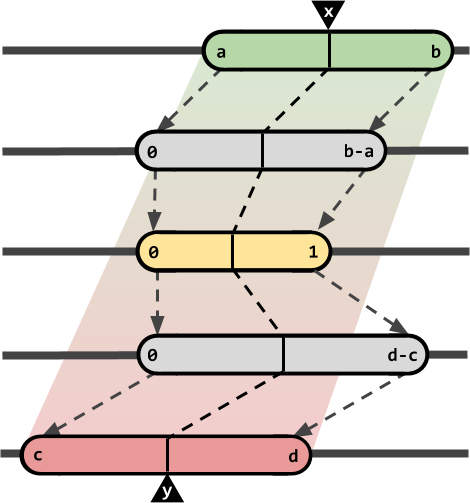
What linear interpolation does, is to keep the proportion between  with respect to equal to the proportion between
  with respect to . We can imagine the two intervals as “loading bars”, and and the two cursors that indicate which percentage of the loading is done. Given , linear interpolation asks to find the value of so that both “loading bars” are showing the same percentage.
This “percentage” is calculating dividing the “current loading” by the “total loading”. And ensuring that both quantities are set to be equal for both intervals:
(4) 
Solving for , yields the expression previously described in (3).
Some libraries wrap those two functions into one; Arduino, for instance, calls this map. No equivalent function is present in Unity, but it can be easily implemented like this:
float y = Mathf.Lerp(c, d, Mathf.InverseLerp(x, a, b));
Or, slightly more efficiently, like this:
public static float Lerp (float x0, float x1, float y0, float y1, float x)
{
    float d = x1 - x0;
    if (d == 0)
        return (y0 + y1) / 2;

    return y0 + (x - x0) * (y1 - y0) / d;
}
Linear interpolation is indeed linear because it creates a linear relationships between between the input and output intervals. If we look at lerp as a mathematical function plotted in the cartesian plane (below), it is easy to see that it represents the equation of a line that passes between  and
and  :
:

⭐ Suggested Unity Assets ⭐
Lerping Everything…
For instance, lerping between two points means moving along the shortest path that connected them. On the other hand, lerping between two colours means blending
Points
So far, we only interpolated two numbers. But nothing stops us from interpolating two points. In this case, the easiest way to do so is to interpolate the individual X and Y coordinate:
Vector2 Lerp (Vector2 a, Vector2 b, float t)
{
    return new Vector2
    (
        Mathf.Lerp(a.x, b.x, t),
        Mathf.Lerp(a.y, b.y, t)
    );
}
Unity comes with both Vector2.Lerp and Vector3.Lerp which, as expected, allow to interpolate between points in 2D and 3D. Lerping between points, regardless of their dimension, is equivalent to moving along the line that connected them.
While lerp is inherently linear, it can actually be used to create curves. Successive interpolations on a series of points results in a family of shapes known as Bézier curves (pronounced: /ˈbɛz.i.eɪ/, BEH-zee-ay).
Vector2 Bezier (Vector2 p0, Vector2 p1, Vector2 p2, Vector2 p3, float t)
{
    // Lerp between the control points
    Vector2 a = Vector2.Lerp(p0, p1, t);
    Vector2 b = Vector2.Lerp(p1, p2, t);
    Vector2 c = Vector2.Lerp(p2, p3, t);

    // Lerp between the lerped points
    Vector2 d = Vector2.Lerp(a, b, t);
    Vector2 e = Vector2.Lerp(b, c, t);

    // Lerped between the lerped points (again!)
    return Vector2.Lerp(d, e, t);
}

The Ever so Lovely Bézier Curve by Shader Witch Freya Holmér is possibly the most accessible article on the topic (and the source of the animation above).
Colours
Another very common way in which lerp is used is to blend colours. Conceptually, you can imagine lerping between colours as mixing different amounts of paint. Lerping between red and blue with  , for instance, is a bit like filling a can with 20% of red paint and 80% of blue paint.

The easiest way to interpolate between colours is to interpolate the single red, green and blue components independently:
Color Lerp (Color a, Color b, float t)
{
    return new Color
    (
        Mathf.Lerp(a.r, b.r, t),
        Mathf.Lerp(a.g, b.g, t),
        Mathf.Lerp(a.b, b.b, t),
        Mathf.Lerp(a.a, b.a, t)
    );
}
That is exactly how Color.Lerp works in Unity. While this technically works, it often yields rather poor results. This is because the RGB colour space is good to store colours, but not so much to manipulate them in a way that makes sense, perceptually.
Learning how to properly interpolate between colours is a dark art, which is heavily discussed in The Secrets of Colour Interpolation. You can play with the swatches below to see for yourself what difference it makes to lerp between different colour spaces.
Rotations
The last aspect that this first post is going to discuss, is about angles and rotations. From what we covered so far, one might be tempted to lerp between angles in order to perform rotations. That is actually not going to work; or at least, not always, and not as you expect.
The reason is that angles are “looping”, and being able to take that into account requires a non-linear operator. Let’s make a simple example: lerping between 90° and 180° should work as intended, giving you a nice angle that goes from 90 to 180. However, lerping from 350° to 10° will not! There are two ways to reach 10 from 350: going up, or going down. The linear interpolation does not know that it is working with angles, and it will take the longer path, decreasing the angle from 350 to 10.
One way to fix this is to use quaternions instead. Quaternions are an alternative—and somewhat safer—way or representing and working with angles in 3D. But they are also incredibly counterintuitive and difficult to grasp.
Unity comes with its own way to lerp between quaternions, called Quaternion.Slerp. The term slerp stands for spherical linear interpolation. In a nutshell, slerp allows to lerp between any two points on a sphere, rather than a flat plane. A future series will delve into the absolute madness that are quaternions; luckily for you, this is not that series.
What’s Next…
The second part of this series will see how the linear interpolation can be extended to non-linear functions.
- Part 1: Linear Interpolation
- Part 2: Piecewise Interpolation
- Part 3: Color Curve Correction
Download Unity Package
Become a Patron!The Standard package contains the script to perform piecewise linear interpolation. It uses extension methods which allows to easily interpolated numbers, vectors, colours and even quaternions! The Advanced package, instead, contains a test scene which also shows how to correct colour curves.
| Feature | Standard | Advanced |
|---|---|---|
| Linear Interpolation | ✅ | ✅ |
| Piecewise Interpolation | ✅ | ✅ |
| Test scene | ❌ | ✅ |
| Colour Curve Correction | ❌ | ✅ |
💖 Support this blog
This website exists thanks to the contribution of patrons on Patreon. If you think these posts have either helped or inspired you, please consider supporting this blog.
📧 Stay updated
You will be notified when a new tutorial is released!
📝 Licensing
You are free to use, adapt and build upon this tutorial for your own projects (even commercially) as long as you credit me.
You are not allowed to redistribute the content of this tutorial on other platforms, especially the parts that are only available on Patreon.
If the knowledge you have gained had a significant impact on your project, a mention in the credit would be very appreciated. ❤️🧔🏻
You don’t need to use an exotic colour space like LCH to get quality lerping between colours, you just need to use a linear colour space. RGB is fine as long as it’s Linear RGB. If you’re not sure if your RGB colour space is Linear RGB, it almost certainly isn’t.
If you’re using non-linear (“Gamma”) RGB and you want to do good quality linear interpolation, the easiest solution is to convert to Linear, do the interpolation, and then convert back to Gamma. A quick and dirty approximation to convert from Gamma to Linear is to normalize your RGB values to to range 0.0 – 1.0, and then take the square root. To convert back to Gamma you square each value (and multiply by 255 if needed). Depending on the actual colour space of your target device this conversion probably isn’t exactly right, but it’s still a lot better than interpolating in Gamma space.
Unity has an option to use a Linear RGB colourspace, which you should turn on if you can to get much better quality lighting (but it isn’t supported on some target platforms). I don’t know if this affects the behaviour of Color.Lerp but that should be easy to check.
I got the conversion between gamma and linear backwards but hopefully you get the gist.
Also note HSV/HSL aren’t linear colourspaces either, which is why linear interpolation in HSV space still looks kind of muddy, although not usually as bad as Gamma RGB.
This is dope! I was looking into how to make AI movement patterns and this Linear Interpolation looks like a great way to accomplish some unique movement.
great article! one tiny typo… “excepted” should be “expected” in one place.
Thank you for spotting that!
Waiting for the quaternions series man. I found your site now and will read all the articles. Great stuff! Cheers man!
Not making games.
Thank you! 🙂
I hope to publish the Quaternion series soon!