
A slippy map (sometimes also referred to as tiled web map, tile map, or simply interactive map) is a web-based map that can be zoomed in and out seamlessly. The most popular slippy map you might be familiar with is Google Maps, alongside many others like that.
This tutorial will show you how to create your own web-based slippy map with Unity. Such a technique can be used to create interactive maps for your own games, or to better explore complex phenomena such as fractals or even Mathematical functions. For clarity, the actual map will be created with Unity, but it will be served using a JavaScript library called LeafletJS. A link to download the full Unity package is also available at the end of the article.
The image used in the cover has been generated using Stamen.
Introduction
The reason why slippy maps exist is to address a simple problem: it is not efficient to create a single high-resolution image of the entire world. The entire Google Maps database, for instance, is several petabytes: a single PNG of that size would be virtually impossible to transfer over the internet.
Slippy maps rely on the fact that most users will either need a very zoomed-out view of the entire map, or a very zoomed-in view of a small section. For these reasons, they adopt two strategies:
- Storing different maps at different zoom levels
- Each zoom level is split into many tiles
Slippy maps are effectively constructed by joining together a series of images (tiles) at different resolutions. In most implementations, tiles are 256×256 pixels, and the zooms levels increase exponentially.
Zoom level  , for instance, is a single 256×256 image of the entire map. At zoom level
  , the world is made out of four 256×256 images. And at zoom level
  , each previous tile is subsequently divided into four more, and so on. With every zoom, the number of tiles multiplies by four. Most map services have between 18 and 22 zoom levels, which allow zooming at the street level. You can learn more about zoom levels here: Zoom levels.


Different frameworks have different naming conventions for the tiles. Most of them, however, are some variations on z/x/y.png and z_x_y.png. In the former, files are grouped into folders, while in the latter they are all in the same folder. LeafletJS, the framework used in this article, gives complete freedom to the developers in this regard.
Some tools also differ in the tile coordinate system. Google Maps, for instance, the origin is the top-left corner, meaning that the top-left tile is considered (0,0). The other most common variant is bottom-left. There are many other different standards that are quite important depending on which tool you are using. MapTiler wrote an interesting article about this: Tiling scheme in Folder output.
Another important factor if you are planning on using slippy maps for geographical data, is how latitude and longitudes are transformed into xs and ys. OpenStreetMap has a great article about this, which includes examples in various different programming languages: Slippy maps tilenames.
Slippy maps are one the most popular ways to display large maps, whether or not the data comes from an actual satellite. There are many interactive maps that specifically focus on videogames words, such as Zelda: Breath of the Wild. Diablo 4 and Tunic. In case you are interested, Loren Gillilan of Map Genie has one of the largest and most detailed collections of interactive game maps.


Another very interesting use of interactive maps is to visualise complex diagrams or mathematical functions. The one below allows navigating the parameter space of a reaction-diffusion system, which will be the subject of a future tutorial series.
Anatomy of the Effect
The plan to create a web-based slippy map from Unity is divided into three steps:
- Part 1. Shader Code: A shader is used to draw a map into a render texture. For this tutorial, we will use the Mandelbrot fractal as an example. The shader is configured in such a way that can draw a specific region on demand.
- Part 2. Tile Generation: A C# script is used to subdivide the region to draw into tiles, at different zoom levels. Each tile is drawn thanks to the shader, and saved to a file.
- Part 3. Slippy Map: A JavaScript library called LeafletJS is used to create a web-based slippy map using the tiles generated.
Part 1. Shader Code
In this tutorial, we will show how to create a slippy map using Unity: more specifically, using shaders. To do this, what we need is a shader that can render the map we want to display. Depending on your setup, this step is not really necessary. If you have a 3D model of your world, you could generate the various tiles by using an orthographic camera.
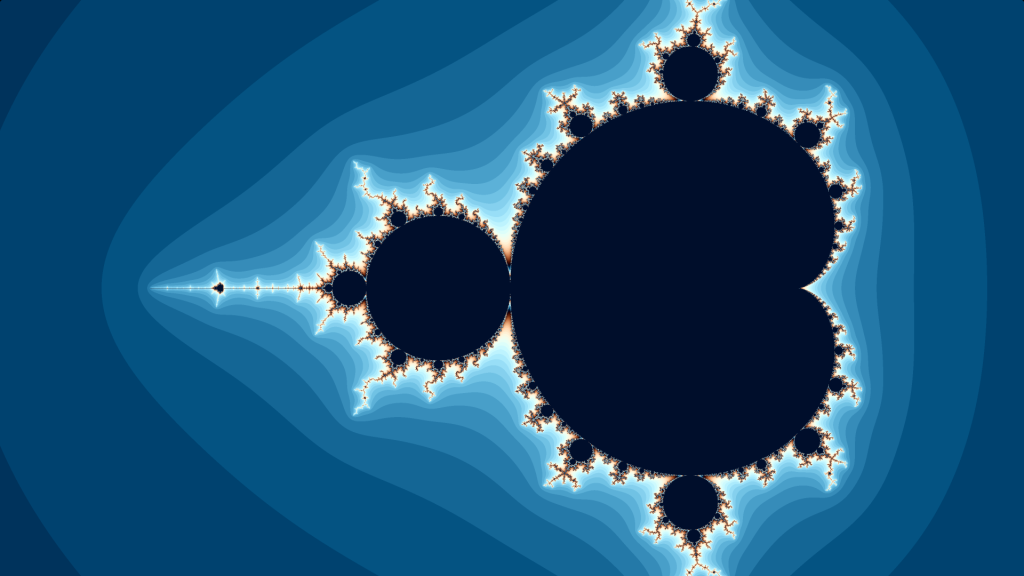
For this toy example, we will use a simple Mandelbrot fractal. The Mandelbrot Set is one of the most popular and recognisable fractals. Where it originates from and how it is calculated has been covered extensively in a previous article titled Fractals 101: The Mandelbrot Set.
In a nutshell, a point  on the complex plane belongs to the Mandelbrot Set if the following function does not diverge to infinity when iterated from
  :
:
(1) 
This means calculating the sequence  ,
,  , and so on to find out if it will eventually explode to infinity or remain forever bound. If the latter occurs, then belongs to the Mandelbrot set.
In case you are interested, there are many variations on the Mandelbrot Set, including a 3D version known as the Mandelbulb:
Mandelbrot Shader
Calculating if a point belongs or not to the Mandelbrot set is very easy, even in a shader. The following Cg snippet shows a function that takes a point on the complex plain c, and iterates the function  for a maximum of 256 times.
#define ITERATIONS 256
float mandelbrot(float2 c)
{
	float2 z = 0;
	float2 zNext;
	int i;
	for (i = 0; i < ITERATIONS; i++)
	{
		// f(z) = z^2 + c
		zNext.x = z.x * z.x - z.y * z.y + c.x;
		zNext.y = 2 * z.x * z.y + c.y;
		z = zNext;

		// Bounded?
		if (distance(z, float2(0, 0)) > 2)
			break;
	}

	return i / float(ITERATIONS);
}
There are a couple of things that are worth noticing:
- is a complex function, which means that we need to take into account both the real and imaginary components of and
 ;
; - It has been proven that once goes beyond , it will eventually diverge to infinity. This can be used to break out of the loop earlier;
- We assume that if a point stays bounded within 256 iterations, it will never diverge.
If we only focus on which points belong to the Mandelbrot set and which ones do not, we obtain a rather dull black-and-white image. Instead, the mandelbrot function here presented returns how rapidly the number explodes. This information can be used to create much more colorful representations of the Mandelbrot set.
The first-ever rendering of the Mandelbrot set is attributed to a 1978 paper by Robert Brooks and J Peter Matelski, titled “The dynamics of 2-generator subgroups of PSL(2,ℂ)“.

The paper also included a dot matrix print of the Julia set.
The mandelbrot function shown above results in a characteristic banding effect. The images used in this tutorial are generated using a more advanced algorithm—developed by Íñigo Quílez—which results in a smoother look.

The shader code presented in the mandelbrot function is one of the most naive implementations. There are several improved variants available, including a smoother version published by Íñigo Quílez in a 2007 article titled smooth iteration count for generalized Mandelbrot sets.
If you are interested, that is the code that will be used for the rest of this tutorial, as it creates a much more pleasant visualisation:
float mandelbrotSmooth(float2 c)
{
	const float B = 256.0;

	float n = 0.0;
	float2 z = float2(0,0);
	for (int i = 0; i < 200; i++)
	{
		z = float2(z.x*z.x - z.y*z.y, 2.0*z.x*z.y) + c; // z = z² + c
		if (dot(z, z) > (B*B)) break;
		n += 1.0;
	}

	//float sn = n - log(log(length(z))/log(B))/log(2.0); // smooth iteration count
	float sn = n - log2(log2(dot(z, z))) + 4.0;  // equivalent optimized smooth iteration count

	return sn;
}
Rendering Tiles
In order for this shader to be compatible with a slippy map, we need to specify which tile (i.e.: which region of the map) to render. The easiest way to do this at the shader level is to provide the coordinates or the region of the complex plane that we want to draw. This can be easily done by passing four values inside two properties: _X and _Y. They will contain the coordinates for the bottom left (_X.x, _Y.x) and top right (_X.y, _Y.y) points of the region to render.
Properties
{
	...

	_X("X range (min, max)", Vector) = (0.0, 1.0, 0, 0)
	_Y("Y range (min, max)", Vector) = (0.0, 1.0, 0, 0)
}

Pass
{
	...
	float2 _X;
	float2 _Y;
	...
}
Once the shader has these XY coordinates, we can stretch them to fit into its UV coordinates:

This can be done by remapping the U coordinate (which goes from to ) onto the interval [_X.x, _X.y], and the V coordinates onto [_Y.x, _Y.y]. This way, when the shader is rendered into a render texture, it will stretch the desired tile into it.
float4 frag(v2f i) : COLOR
{
	float x = lerp(_X.x, _X.y, i.uv.x);
	float y = lerp(_Y.x, _Y.y, 1-i.uv.y);
	float2 z = float2(x, y);

	float v = mandelbrot(z);
	float3 rgb = 0.5 + 0.5*cos(3.0 + v * 0.15 + float3(0.0, 0.6, 1.0));
	return float4(rgb, 1);
}
The code for the fragment shader shown above uses a rather complex formula to convert the iteration count (returned by the mandelbrot function) into an RGB colour. The formula has been taken directly from Íñigo Quílez’s shader code, and remaps the iteration count onto the periodic pattern below:

⭐ Suggested Unity Assets ⭐
Part 2. Tile Generation
Part 1 was dedicated to the creation of a shader able to draw an arbitrary region of the Mandelbrot set. Part 2 will focus on how to instruct the shader to render the necessary tiles that will be used by the slippy map.
For this, we need a script that iterates over the various zoom levels. At zoom level 0, we need to render the entire fractal onto a single 256×256 png. At zoom level 1, we need to split that area over four 256×256 quadrants, and so on.
The GenerateZoomLevels function starts this process by looping through the desired number of zoom levels that needs to be generated (called ZoomLevels). The actual code to render the tiles is contained in the GenerateTilesAtZoomLevel coroutine.
public IEnumerator GenerateZoomLevels ()
{
    // Initialises the buffer
    TileBuffer = new RenderTexture(TileSize, TileSize, 0, RenderTextureFormat.ARGBFloat);
    TileBuffer.anisoLevel = 0;
    TileBuffer.filterMode = FilterMode.Point;

    // Loops through all the zoom levels
    for (int zoom = 0; zoom < ZoomLevels; zoom++)
        yield return StartCoroutine(GenerateTilesAtZoomLevel(zoom));
}
The function above also does one important task: it initialises TileBuffer, which is the render texture used to render the Mandelbrot set. In the code, I am assuming Material is a material created from the Mandelbrot shader, with any additional parameter properly configured.
Both the GenerateZoomLevels and GenerateTilesAtZoomLevel functions have been defined as coroutines. Technically speaking, that was not really necessary. The reason why they are coroutines is that they are expected to run for quite a long time: minutes at best, hours at worst. Unity cannot advance to the next frame until all functions have terminated; this means that running this code could potentially make the editor unresponsive for a significant amount of time.
Defining them as coroutines and appropriately yielding control to the next frame guarantees that the editor can still be fully responsive.
If you are unfamiliar with how coroutines in Unity work, and how one can wait for another, I suggest reading one of the most popular articles on this blog: Nested Coroutines in Unity.
The core of Part 2 is GenerateTilesAtZoomLevel, which calculates the coordinates of each tile at a given zoom level. To do so, it is easy to remember that the number of tiles per size at zoom level is  .
.
From this, two for loops iterate on all tiles, configuring their boundaries in the shader through the _X and _Y vectors:
// Generates all the tiles at a given zoom level
public IEnumerator GenerateTilesAtZoomLevel (int zoom)
{
    // How many tiles per side, based on the zoom level
    int sides = (int) Mathf.Pow(2, zoom);

    // The size of each tile
    float xStep = (X.y - X.x) / sides;
    float yStep = (Y.y - Y.x) / sides;

    // Loops through all the tiles
    for (int xi = 0; xi < sides; xi ++)
        for (int yi = 0; yi < sides; yi++)
        {
            // The coordinates of the cour corners of the tile
            float xMin = X.x + xStep * xi;
            float xMax = xMin + xStep;

            float yMin = Y.x + yStep * yi;
            float yMax = yMin + yStep;

            // Configures the shader
            Material.SetVector("_X", new Vector2(xMin, xMax));
            Material.SetVector("_Y", new Vector2(yMin, yMax));

            // Renders the tile
            Graphics.Blit(null, TileBuffer, Material);
            SaveRenderTexture(TileBuffer, $".\\tiles\\{zoom}_{xi}_{yi}.png");

            yield return null;
        }
}
Once the shader is configured, it can be forced to render inside a render texture using the Graphics.Blit function. Its first parameter usually is reserved for the main texture to be passed to the shader; in this case we used null since the Mandelbrot shader does not need any.
When the function terminates, the render texture TileBuffer will contain the desired section of the Mandelbrot set rendered, ready to be saved to a file.
The function above used a notation that not many are familiar with: $".\\tiles\\{zoom}_{xi}_{yi}.png". Starting a string in C# with the dollar sign is known as string interpolation, and allows for a very expressive way to print variables without the need to truncate the string like you otherwise would: ".\\tiles\\" + zoom + "_" + xi + "_" + yi + ".png".
You can learn more about this feature here: String interpolation using $
The function SaveRenderTexture is used to save a render texture to a file. In Unity, this is not as straightforward as it is in other engines. The full code is provided below:
void SaveRenderTexture(RenderTexture renderTexture, string fileName)
{
    RenderTexture.active = renderTexture;
    Texture2D texture = new Texture2D
    (
        renderTexture.width, renderTexture.height,
        TextureFormat.RGB24,
        false

    );

    texture.ReadPixels(new Rect(0, 0, texture.width, texture.height), 0, 0);
    texture.Apply();
    RenderTexture.active = null;

    var bytes = texture.EncodeToPNG();
    File.WriteAllBytes(fileName, bytes);

    Destroy(texture);
}
For ease of use, it is also possible to turn this function into an extension method for the RenderTexture class. You can read more on how to do that here: Extension Methods in C#.
Part 3. Slippy Map
The last part of this tutorial is to actually use a web-based library that can make use of the tiles generated in Part 2. LeafletJS is the one used in this article, although many more are also available. Compared to competitors, however, Leaflet is one of the simplest and most lightweight.
All you need to access its potential is to include its Javascript library and CSS in your header:
  <head>
    <title>Mandebrot</title>
    <link rel="stylesheet" href="https://unpkg.com/[email protected]/dist/leaflet.css" integrity="sha256-p4NxAoJBhIIN+hmNHrzRCf9tD/miZyoHS5obTRR9BMY=" crossorigin="">
    <script src="https://unpkg.com/[email protected]/dist/leaflet.js" integrity="sha256-20nQCchB9co0qIjJZRGuk2/Z9VM+kNiyxNV1lvTlZBo=" crossorigin=""></script>

    <style>
      #map {
        height: 100%;
        width: 100%;
      }

  .leaflet-container {
        background: #000;
        outline: 0;
    }

    </style>
  </head>
Rendering the map is very easy, and it can all be done with just a few lines of code. The following JS script shows how the map can be rendered into an empty div with id map:
  <body>
    <div id="map"></div>
    <script>
      var map = L
        .map('map', { attributionControl: false })
        .setView([1,1], 2);

      L.tileLayer('./tiles/{z}_{x}_{y}.png',{
      	minZoom: 0,
        maxZoom: 5,
        zoomSnap: 0.0,
        wheelPxPerZoomLevel: 60*5, // higher = slower zoom
        zoomDelta: 0.25, // [+],[-] smaller = more granularity
        noWrap: true, //Whether the map can be zoomed to a rectangular area specified by dragging the mouse while pressing// the shift key.
      }).addTo(map);
    </script>
  </body>
Particular attention needs to be paid to the tileLayer function, which indicates in a string where and how to find the files. './tiles/{z}_{x}_{y}.png', for instance, indicates that they are all in the subfolder “tiles”, and have a name in the format {z}_{x}_{y} where {z} is the zoom level, and {x} and {y} are horizontal and vertical coordinates (which can be simply integers). For instance:
./tiles/0_0_0.png./tiles/1_0_1.png./tiles/1_1_0.png./tiles/1_1_1.png./tiles/2_0_0.png- …
Conclusion
This tutorial covered how to create a web-based interactive map, generating the tiles using Unity and LeafletJS. This approach is perfect if you want to render a detailed map of your game worlds, or if you want to visualise complex functions.
In case you are interested, the following tutorial also shows how to create interactive maps directly within Unity:
Addition Resources
If you are interested in this topic, I would also suggest having a look at this article, which renders the world map in the style of “The Legend of Zelda”:
📦 Download Unity Package

The Unity package contains everything needed to replicate the visual seen in this tutorial, including the shader code, the C# scripts, and a test scene with the terrain. It is available through Patreon.
💖 Support this blog
This website exists thanks to the contribution of patrons on Patreon. If you think these posts have either helped or inspired you, please consider supporting this blog.
📧 Stay updated
You will be notified when a new tutorial is released!
📝 Licensing
You are free to use, adapt and build upon this tutorial for your own projects (even commercially) as long as you credit me.
You are not allowed to redistribute the content of this tutorial on other platforms, especially the parts that are only available on Patreon.
If the knowledge you have gained had a significant impact on your project, a mention in the credit would be very appreciated. ❤️🧔🏻