
This is the second part of the online series dedicated to the creation of 360° videos in Unity. With this course, you will be able to produce 360° videos trailers for your VR games that can be played with YouTube, and even produce effective educational content like the one below.
This online course is split into two modules. The first one will focus on how to create the videos in Unity, and is already available:
- Part 1. An Introduction to 360° Videos
- Part 2. How to Create a 360° Video in Unity
The second module will focus on editing the videos, and will be released at a later time:
- Part 3. 🚧 How to Edit a 360° Video in Premiere Pro
- Part 4. 🚧 How to Edit Ambisonic Audio in Premiere Pro
- Part 5. 🚧 How to Record Ambisonic Audio in Unity
A link to download a working Unity scene can be found at the end of this page.
One of the many features introduced by Unity 2018.1 allows taking screenshots from a camera in a format that is compatible with YouTube 360° videos. The technique is briefly explained in a blog post on the Unity website titled Stereo 360 Image and Video Capture, which unfortunately does not provide a scene for people to test.
The Theory
It is common practice to record the footage of a game while it is running. While this works for standard videos, it usually does not for 360° ones. The main reason is that rendering a 360° game requires to render a much larger area, causing the framerate to drop significantly. A more common approach is to render and export each frame in the background, so that they can all be edited properly with an external software like ffmpeg or Premiere Pro. That is what we will do in this tutorial.
Rendering a 360° scene in Unity is relatively easy, and it requires three steps:
- Rendering the scene into a cubemap texture (the preferred format used by Unity for 360° textures)
- Converting the cubemap into an equirectangular projection (the preferred format used by YouTube for 360° videos)
- Saving the equirectangular projection into a PNG
These first two steps are necessary because of the way Unity cameras work.
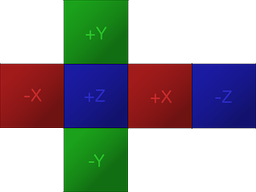
If you are familiar with Unity, you probably know that the preferred way in which 360° textures are stores is a cubemap, which is indeed a way of packing six different images without any deformation (below). Cubemaps are often used for skyboxes and reflection probes, so there is a chance you might have encountered them already.
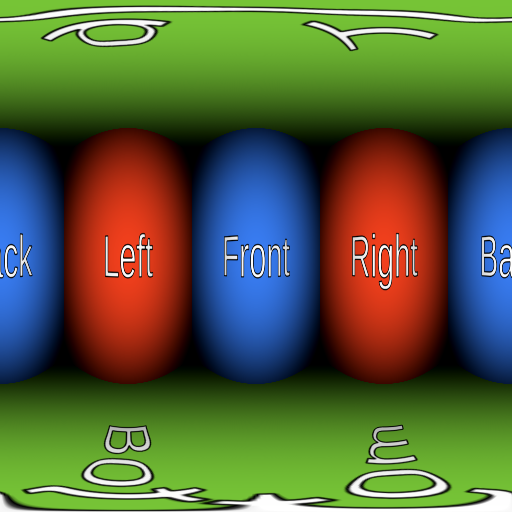
To create a 360° texture, Unity will render the scene six times, each time from a different angle. The camera is rotated, as if it has to be aligned with the six faces of a cube. As a result, each 360° screenshot is actually six traditional screenshots, stitched together.
Once the cubemap has been filled, the second step is to convert that into a format compatible with YouTube. As seen before, YouTube accepts 360° videos in an equirectangular projection. Such a conversion would normally require some intense shader coding, but luckily Unity has added a function for that as well.
The last step is to export the equirectangular texture into a PNG file. Once all of the frames of your video have been rendered, you can join them using a program such as ffmpeg or Premiere Pro.
The Code
The first step is to create a script (Camera360 in the snippets below) and to attach it to the camera you want to be rendered. The code, however, changes whether or not you want to render a mono (360°/mono/2D) or stereo (VR/stereo/3D) video.
Mono
Let’s start with the mono version first:
public class Camera360 : MonoBehaviour
{
    public Camera Camera;

    public RenderTexture EyeCubemap;
    public RenderTexture EquirectTexture;

    void Update ()
    {
        Camera.RenderToCubemap(EyeCubemap, 63, Camera.MonoOrStereoscopicEye.Mono);
        EyeCubemap.ConvertToEquirect(EquirectTexture, Camera.MonoOrStereoscopicEye.Mono);
    }
}
The script above renders every frame into the render texture called Equirect, which will contain a 360° screenshot saved as an equirectangular projection.
The 63 used in the RenderToCubemap method indicates that we want to take screenshots from all of the six faces of the cubemap.
Both the EyeCubemap and the EquirectTexture can either be created in the editor, or via code.

Stereo
The code for the stereo version is very similar, but requires an additional step:
    void Start ()
    {
        Camera.stereoSeparation = 0.064f; // 64mm
    }

    void Update ()
    {
        Camera.RenderToCubemap(EyeCubemap, 63, Camera.MonoOrStereoscopicEye.Left);
        EyeCubemap.ConvertToEquirect(EquirectTexture, Camera.MonoOrStereoscopicEye.Left);

        Camera.RenderToCubemap(EyeCubemap, 63, Camera.MonoOrStereoscopicEye.Right);
        EyeCubemap.ConvertToEquirect(EquirectTexture, Camera.MonoOrStereoscopicEye.Right);
    }
Rendering a stereo image means rendering two cubemaps. The stereoSeparation indicates how far from each other those cubemaps should be. A common value is 64mm, which is the approximate distance between the left and right eye.

Creating and Saving the Textures
The two snippets above simply write to a texture, but do not actually save it anywhere. If you want your frames to be stored on the disk, we will need to do that manually.
Unfortunately, exporting a render texture to a PNG file is not as straightforward as it should be. The first problem is that Unity does not allow to access the individual pixels of a RenderTexture object directly. Instead, the render texture has to be copied into a Texture2D object first.
The piece of code below does exactly that, using the ReadPixels method which copies pixels from the currently active render texture.
public string FileName;

void Update ()
{
    ...

    // Creates buffer
    Texture2D tempTexture = new Texture2D(EquirectTexture.width, Equirect.height);

    // Copies EquirectTexture into the tempTexture
    RenderTexture currentActiveRT = RenderTexture.active;
    RenderTexture.active = EquirectTexture;
    tempTexture.ReadPixels(new Rect(0, 0, EquirectTexture.width, EquirectTexture.height), 0, 0);

    // Exports to a PNG
    var bytes = tempTexture.EncodeToPNG();
    System.IO.File.WriteAllBytes(FileName, bytes);

    // Restores the active render texture
    RenderTexture.active = currentActiveRT;
}
Providing that FileName contains a valid path for your PNG file, the code above will do everything you need. One small change you will need to do is to make sure that the script does not override the same file over and over again. This can be achieved simply by adding a counter to the filename, so that instead of repeatedly overriding “frame.png”, it can write to “frame_0.png”, “frame_1.png”, and so on.
Issues
This solution is not without any issues. The most significant one is that certain postprocessing effects might not work as intended.
Performance
Rendering a 360° in Unity is very expensive. The solution proposed causes to render the scene from 6 to 12 times (depending on if you are creating a mono or stereo 360° video). The postprocessing necessary to stitch the images together and to save each frame to the disk can lower the performance from 10 to 15 times. If you are rendering videos at high quality (8192×8192 pixels) each individual frame can be over 100Mb in size. It is clear that unless you have a very powerful machine, you might be unable to run your game in realtime and exporting 360° frames at the same time.
Post Processing
Vignetting, for instance, adds a dark halo around the camera. Since Unity creates a 360° image by rendering the scene six times, the vignette effect will be applied to each image. This results in a weird black halo where the images have been stitched together.
Similarly, blur and bloom effects will typically fail around the edges, revealing where the seams are. There is really no easy work around for this, since none of the PostProcessing stacks created by Unity was designed to work with 360° images.
That being said, blur and bloom effects can still be used, in moderation. If you desperately need these effects to work at all times, the best way is to apply them in postproduction using Premiere Pro.
Line Renderers
One massive issue with 360° images is that line renderers might not appear correctly. If a line is set to face the camera at all times, Unity will simply discard that line when rendering it in 360°. This is exceptionally frustrating, as there should really be no reason why this happens.
Unity has developed an alternative version of the line renderer, called XRLineRenderer, which will work correctly. While it does not support all the features of a standard Line Renderer component, you should be able to get most things done.
The XRLineRenderer also has a feature to create simple glow effects, which might attenuate the issues described in the previous section.
What’s Next…
This second post explained how to create 360° videos in Unity, and it concludes the first module on this online course.
- Part 1. An Introduction to 360° Videos
- Part 2. How to Create a 360° Video in Unity
The second module will focus on editing the videos, and will be released at a later time:
- Part 3. 🚧 How to Edit a 360° Video in Premiere Pro
- Part 4. 🚧 How to Edit Ambisonic Audio in Premiere Pro
- Part 5. 🚧 How to Record Ambisonic Audio in Unity
Download
You can download the script used for this tutorial on Patreon.
💖 Support this blog
This website exists thanks to the contribution of patrons on Patreon. If you think these posts have either helped or inspired you, please consider supporting this blog.
📧 Stay updated
You will be notified when a new tutorial is released!
📝 Licensing
You are free to use, adapt and build upon this tutorial for your own projects (even commercially) as long as you credit me.
You are not allowed to redistribute the content of this tutorial on other platforms, especially the parts that are only available on Patreon.
If the knowledge you have gained had a significant impact on your project, a mention in the credit would be very appreciated. ❤️🧔🏻
Nice article, but I think this:
it can write to “frame_0.png”, “frame_0.png”, and so on.
should be:
it can write to “frame_0.png”, “frame_1.png”, and so on.
Lovely article!
Is there a way to “solve” the postprocessing problem nowadays directly inside of Unity?
Vignetting does not make sense in 360 for sure, but for bloom etc, could it be applied after the texture is generated? Do you know any resources on that?
Great tutorial! This has been quite helpful!
I found a suspected memory leak, and the solution below seems to solve this issue. Basically, objects were not being garbage collected.
public void RecordFrame()
{
var eC = new RenderTexture(_eyeCubemap);
var rT = new RenderTexture(_equirectTexture);
_camera.RenderToCubemap(eC, 63, Camera.MonoOrStereoscopicEye.Left);
eC.ConvertToEquirect(rT, Camera.MonoOrStereoscopicEye.Left);
_camera.RenderToCubemap(eC, 63, Camera.MonoOrStereoscopicEye.Right);
eC.ConvertToEquirect(rT, Camera.MonoOrStereoscopicEye.Right);
// Creates buffer
Texture2D tempTexture = new Texture2D(rT.width, rT.height);
tempTexture.hideFlags = HideFlags.HideAndDontSave; //added to avoid memory leak
tempTexture.ReadPixels(new Rect(0, 0, rT.width, rT.height), 0, 0);
// Exports to a PNG
var bytes = tempTexture.EncodeToPNG();
System.IO.File.WriteAllBytes(FileName, bytes);
Destroy(tempTexture); //added to avoid memory leak
Destroy(eC); //added to avoid memory leak
Destroy(rT); //added to avoid memory leak
}