

In this tutorial you will learn how Unity and Arduino can communicate using the serial port. This tutorial requires both C# and Arduino scripts; the labels Unity and Arduino will be used to avoid confusion.
- Step 0: Configuring…
- Step 1: Opening…
- Step 2: Writing…
- Step 3: Reading…
- Step 4: Communicating…
- Conclusion
The topic of connecting Arduino to Unity is further expanded in Asynchronous Serial Communication, where you can also download the entire Unity package.
Step 0: Configuring…
The communication between Arduino and the PC is mediated using the serial port. This method is the default one to upload sketches, so we’ll be using it also to exchange messages with Unity. If this is the first time you are doing it, you’ll need to follow these extra steps.
 Unity The class
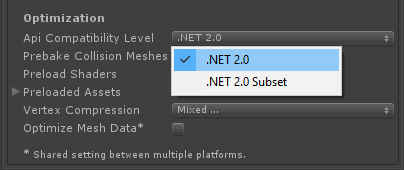
 SerialPort is the one that mediates such communication in C#. However, Unity doesn’t usually include the necessary libraries to use it. To compensate for this, we need to force Unity to include the full .NET 2.0 library in its executables:
- Go on Edit | Player Settings to open the PlayerSettings in the inspector;
- From Optimization, look for Api Compatibility Level and select .NET 2.0.
Arduino Arduino doesn’t come with a sophisticated library for the serial port. While C# has all the expected functions to send strings, Arduino simply doesn’t. This is very frustrating and is often a strong limitation for beginners. To compensate this, I’ll be using Steven Cogswell‘s ArduinoSerialCommand library. Follow these steps to install it:
- Download the entire repository by clicking “Download ZIP” from its GIT page;
- Extract the ZIP file and place its content in
C:\Users\<username>\Documents\Arduino\SerialCommand\(make sure that folder contains the SerialCommand.cpp file); - Restart the Arduino IDE.
Step 1: Opening…
Unity To initialise the serial port in C#, we need its address (or port) and speed (also called baud rate).
using System.IO.Ports;

stream = new SerialPort("COM4", 9600);
stream.ReadTimeout = 50;
stream.Open();
While the baud rate is determined by the Arduino code, we cannot chose the name for the serial port. It is automatically assigned by the OS depending on which device and port you are using.
Arduino Now that SerialCommand has been installed, we can use it in our sketch. The library allows to specify commands that can be received on the serial port. For this toy example, we want to define a command called “PING”. When we receive such string from Unity, we’ll send a “PONG” back. Let’s start by defining the command; its code will be stored in the pingHandler function.
#include <SoftwareSerial.h>
#include <SerialCommand.h>
SerialCommand sCmd;

void setup() {
	Serial.begin(9600);
	while (!Serial);

	sCmd.addCommand("PING", pingHandler);
}
The 9600 used to initialise the serial port represents its baud rate. This value must match the one used in the C# script.
Step 2: Writing…
Unity Writing a string to the serial port in C# is relatively easy.
public void WriteToArduino(string message) {
	stream.WriteLine(message);
        stream.BaseStream.Flush();
}
If there is a problem, WriteLine will throw a IOException (read more here). We flush the stream to make sure the data it sent to the Arduino, without any buffering. Following our toy protocol, we should send a “PING” to Arduino.
WriteToArduino("PING");
Arduino As discussed before, the SerialCommand library takes care of reading strings from the serial port for us. To do this, we need to update the loop function.
void loop () {
	if (Serial.available() > 0)
		sCmd.readSerial();
}
The function readSerial is the one where the magic happens; it reads strings from the serial port and invokes the right handler. If it receives a “PING”, it will execute pingHandler:
void pingHandler (const char *command) {
	Serial.println("PONG");
}
This will write “PONG” on the serial port. You can also use Serial.println to send data from Arduino to Unity at any time.
Step 3: Reading…
Unity Reading from the serial port is theoretically as easy as writing, since C# offers a very intuitive stream.ReadLine() function.
public string ReadFromArduino (int timeout = 0) {
	stream.ReadTimeout = timeout;
	try {
		return stream.ReadLine();
	}
	catch (TimeoutException e) {
		return null;
	}
}
However, there’s a catch. How long do you want to wait for before considering the read failed? If you are waiting indefinitely for Arduino to send data, this might block the execution of your program. Reading from the serial port is, essentially, a system call and can introduce lag. A lot of lag. To avoid this, we should do very quick reads alternated by quick waits. In order to implement an asynchronous waiting mechanism, we have to use coroutines.
public IEnumerator AsynchronousReadFromArduino(Action<string> callback, Action fail = null, float timeout = float.PositiveInfinity) {
    DateTime initialTime = DateTime.Now;
    DateTime nowTime;
    TimeSpan diff = default(TimeSpan);

    string dataString = null;

    do {
        try {
            dataString = stream.ReadLine();
        }
        catch (TimeoutException) {
            dataString = null;
        }

        if (dataString != null)
        {
            callback(dataString);
            yield break; // Terminates the Coroutine
        } else
            yield return null; // Wait for next frame

        nowTime = DateTime.Now;
        diff = nowTime - initialTime;

    } while (diff.Milliseconds < timeout);

    if (fail != null)
        fail();
    yield return null;
}
Which can be invoked like this:
StartCoroutine
(
    AsynchronousReadFromArduino
    (   (string s) => Debug.Log(s),     // Callback
        () => Debug.LogError("Error!"), // Error callback
        10000f                          // Timeout (milliseconds)
    )
);
The code below starts the AsynchronousReadFromArduino coroutine, passing three arguments. The first one is a function (created on the spot) which get the string read from Arduino and logs it. The second one is a callback if the reading fails, and the third one is the timeout (10 seconds).
Arduino There are cases in which you might want to send parameters from Unity to Arduino. Let’s do this with an echo function.
void echoHandler () {
  char *arg;
  arg = sCmd.next();
  if (arg != NULL)
    Serial.println(arg);
  else
    Serial.println("nothing to echo");
}
We can use the function next to get the next argument provided on the serial command. For instance, if we send from Unity “ECHO message”, “message” will be the first parameter. If next returns NULL, it means there are no more parameters.
Step 4: Communicating…
Now that all the pieces are here, you just have to implement your own communication protocol. Arduinos are usually used as sensors, constantly sending updates to Unity. If this is your case, you should not make the mistake of doing something like this:
void loop () {
    // Get data
    // ...

    Serial.println(data);
}
Is very likely that this will overflow the serial port buffer, causing either a crash or a severe lag. What you should do instead is creating a protocol in which Arduino is sending data only when is queried by a “PING” from Unity. This ensures data is always fresh and minimises lags.
Downloads
This article presented a simple, yet effective way to connect Arduino with Unity. The necessary files are available for download on Patreon, in two versions:
- Basic Version: The Unity and Arduino code presented in this tutorial.
- Advanced Version: A complete library to fully integrate Unity and Arduino which users thread for an efficient two-ways asynchronous communication. This solution is discussed in the post titled Asynchronous Serial Communication.
Conclusion
Last year at GDC a guy approached me and asked my opinion about UNIDUINO, an extension to connect Arduino with Unity. It was only after I said something on the line of “I would never pay so much to use it” that he introduced himself as the creator. Despite this not-so-great start, our conversation highlighted an important issue when it comes to development: how much time are you willing to invest into something? Many software developers have little to no experience with hardware, and they rather spend €32 than a week of headaches to connect Unity to Arduino. To misquote Mike Bithell during his talk at Develop Brighton a couple of years ago, some developers have “more money than time“, If you are going to use an Arduino for your project, you definitely need to invest some money in it. But if you think paying for an extension is out of your budget, this tutorial is definitely here to help. Despite not providing the full range of functions of UNIDUINO, it is surely a good starting point which will suit the majority of applications.
How to start with Arduino
The most annoying part of working with hardware is that you’ll constantly need new components to build things. If you are new to Arduino, my advice is to start with the Arduino Starter Kit. It has a lot (I mean… a lot!) of components and it comes with some great instructions. If you have a little bit more experience, you might want to buy the components you need separately. In this case, the Arduino Uno is the “default” option you should go for.
If you have already experience with hardware, I advise you to start using Teensy 3.1 instead. It’s a micro-controller fully compatible with the Arduino IDE. It’s compact and more powerful, although it usually doesn’t come with pins. There’s also a Teensy 3.1 Starter Kit which comes with a very bright Color LCD screen. I also suggest a book I particularly liked: 30 Arduino Projects for the Evil Genius. I got it few years ago and it helped me to understand how to use all the most common components.
💖 Support this blog
This website exists thanks to the contribution of patrons on Patreon. If you think these posts have either helped or inspired you, please consider supporting this blog.
📧 Stay updated
You will be notified when a new tutorial is released!
📝 Licensing
You are free to use, adapt and build upon this tutorial for your own projects (even commercially) as long as you credit me.
You are not allowed to redistribute the content of this tutorial on other platforms, especially the parts that are only available on Patreon.
If the knowledge you have gained had a significant impact on your project, a mention in the credit would be very appreciated. ❤️🧔🏻
hey, with your code i have problem in unity 3d and arduino, and i dont know how could i resolve them??
i am using the code that you gave us for download in both and I change de port for COM4, bacause in my pc it is the port that use arduino.
unity problem:
default parameter specifiers are not permited.
arduino problem:
Arduino: 1.6.5 (Windows 8.1), Board: “Arduino/Genuino Uno”
In file included from UnityConnector.ino:1:0:
C:\Users\Sebastian\Documents\Arduino\libraries\ArduinoSerialCommand-master/SerialCommand.h:60:30: fatal error: SoftwareSerial.h: No such file or directory
#include
^
compilation terminated.
Error compiling.
C:\Users\Sebastian\Documents\Arduino\libraries\ArduinoSerialCommand-master/SerialCommand.h:60:30: fatal error: SoftwareSerial.h: No such file or directory
#include
Hey! I’ve never experienced this error myself, but it seems is because the version of Arduino you’re using is not fully compatible. Did you try updating the IDE?
Did you try including #include in your Arduino sketch?
This is easily resolved if you go to Tools>import .zip library in your arduino ide. Just select the path to where you downloaded the serialcommand and the include should work 🙂
Hi Alan,
Can you verify the link of your Google Drive account? I can download the files for Arduino and Unity!
Thanks
Hey! I can download both of them. Which problem are you experiencing?
Hi, Alan:
Thanks for your work!
I tried your solution but there are error message in both side.
In Unity:
” Assets/Script/ArduinoConnector.cs(31,16): error CS1061: Type `System.IO.Ports.SerialPort’ does not contain a definition for `WriteLine’ and no extension method `WriteLine’ of type `System.IO.Ports.SerialPort’ could be found (are you missing a using directive or an assembly reference?)”
In Arduino:
‘arg’ does not name a type.
Do you have any idea on what going on?
Hey Carol!
Did you install the libraries correctly on Arduino? Also, did you make sure that the full set of .NET2.0 is included?
Hi, Alan:
Glad to have your reply!
I had put the ArduinoSerialCommand library under the normal library path, and its example code can be correctly executed, thus I think the library part should be no problem.
In Unity, I have change to .NET 2.0. Some stream commend such as stream.timeout, stream.open can be corrected interpret, but only stream.WriteLine(message), stream.BaseStream.Flush(), stream.ReadLine() can’t. I check the error message in google, no explicit answer but point to security protection.
Any idea on it?
Hi, Alan:
Few updates.
I test your code also in windows (in before it was in Mac).
In Unity, when choosing the .NET 2.0, all the error messages gone!
In Arduino, even though all the example code can be corrected executed, I get the same error message as Sebastian. May I ask which version of arduino are you using? and any special way to place those files?
Thank you!
Did you try including #include in your Arduino sketch?
Hi, Alan:
I just try your sample code UnityConnector.ino which already included the #include , and get the error message mentioned above.
In my understanding, I must able to run the sample code before adding any new lines.
Hi Carol,
Did you find a solution for the ” ‘arg’ does not name a type” issue? I’m running into the same problem.
Same issue here.
exit status 1
‘arg’ does not name a type
Hey!
Which version of Unity / Arduino / Board are you using?
This tutorial is few months old. So some things might have changed.
Hello Alan,
Thank you very much for your tutorial, I have been trying to make this work for a while, but I am not sure on how to implement it properly as I keep on getting errors and lag in the connection.
I wonder if you would have an example for reading a single analog sensor from the arduino? I have been checking but didn´t find anything.
Hi Alan I follow your tutorial step by step, but when I tried to execute the first part, about writing data, my arduino IDE throws me the following error:
invalid conversion from ‘void (*)(const char*)’ to ‘void (*)()’ [-fpermissive]
sCmd.addCommand(“PING”, pingHandler);
Do you know why? My code it’s exactly what you have:
#include
#include
SerialCommand sCmd;
void setup() {
Serial.begin(9600);
while (!Serial);
sCmd.addCommand(“PING”, pingHandler);
}
void loop () {
if (Serial.available() > 0)
sCmd.readSerial();
}
void pingHandler (const char *command) {
Serial.println(“PONG”);
}
Thanks in advance.
I had the same issue. While I don’t know the details, it would appear the error message indicates a mismatch in the function pointer passed into the second argument of the sCmd.addCommand method. You can fix it by removing the “const char *command” pointer argument from the pingHandler function declaration. It should just read:
void pingHandler()
{
//your code here
}
**For Mac USERS** arduino and unity 5.3.5 it works!!!
Use your terminal of mac and type ls /dev/tty.*
and you will get your address to your arduino port.
when reading in unity, use this following line of code instead of your “comX”
SerialPort sp = new SerialPort(“/dev/tty.usbmodem1421”,9600);
and voila! remember to run in arduino first, and close the serial monitor. Now in unity run your scene…
Hey, Sai:
If you can describe more about the setting on Mac it will be great!
Mine doesn’t work even if I change the unity version.
However, I eventually find a solution from Pierre Rossel, https://github.com/prossel/UnitySerialPort/blob/master/Assets/Serial/Serial.cs, where he mention a component from uniduino is necessary for “activate” the serial port.
Best,
Carol
how do you test the scripts once you’re done writing them?
I’ve downloaded them and uploaded the arduino code to my Uno and attached the c# script to an empty object in a game scene in Unity and nothing happens in the command windows.
(same question)
Hi, amazing tutor.
But, can you say: if this sollution will working on unity compiled for android (as .apk)
??????
Hey! I have not tried that, so unfortunately I can’t tell.
This was great, Thank you!
However there is one thing that I can’t get to work.. I’m only going to use this to have Unity send information to the arduino, so I only did the writing part. And it seems to work fine except for that there seems to be a collision when I want both Arduino and Unity to use the same COM port? Is the COM port in Unity supposed to be the same as the COM port that we select in Arduino Sketch? Because if I do that I get an error in which ever software that I try to have use the port last, telling me that the COM port is occupied. If I choose another COM port then nothing happens when I do the WriteToArduino (“PING”) thing.
In this tutorial you write that we cannot chose the name of our COM port in our Unity script, and I don’t quite understand that? In you example it still looks to me like you chose COM4 when you write:
stream = new SerialPort(“COM4”, 9600);
Also you write that the COM port will be chosen automatically, which I’m not experiencing that it does. Maybe I’m doing something wrong I don’t know.
I would very much appreciate some guidance here 🙂
Thanks for the effort put into this!
Hey!
Sorry if there has been any part that was not super clear. When you plug a device, it is automatically assigned a COM port. You cannot decide directly whether that is going be COM1, COM2 or COM10. This is what I meant. Once the device is connected and you know it’s on (let’s say) COM4, then you can safely write COM4.
The serial port, in your example, becomes a shared resource. It’s important that you architect your communication protocol so that every time there is a WRITE on one end, there is a READ on the other. If BOTH Arduino and Unity are waiting on a read operation, they’ll both get stuck in a deadlock. Asynchronous communications like those ones are tricky. Is best to have the communication ONE way. For instance… Unity sends commands to Arduino. Arduino NEVER initiates a communication itself. If you want Arduino to send some data, Unity can query it periodically. Then Arduino will have to reply THIS IS THE DATA or NO THERE IS NO DATA. This might not be the most efficient protocol, but is guaranteed you’ll never get stuck in a deadlock.
Hey Allen,
Thanks for the Tutorial.
I’m just diving into Unity and C# coding, though, I’ve done a bit of Arduino/C in the past.
Super beginner question: how do I use the ArduinoConnector.cs code in unity?
Do I attach it as a script to an object?
Do I use another script to call it?
For what it’s worth I have a super basic read protocol that simply calls sp.readline() from an Object’s Update() function and parses the line into variables – but for reasons you pointed it out there are big flaws.
I would like to try your code, but I’m not sure how/where to use it in unity…
Thanks for your tutorial and for your patience.
Okay – So I added the StartCoroutine(AsynchronousReadFromArduino(..)) function inside of a start() function in the ArduinoConenctor.cs file your provided.
Then I attached the script to an object.
Then set comport and Baudrate to match my arduino.
But when I run, I see nothing printed to the console.
I’d appreciate any suggestions to get this running.
Correction: I see an error printed to the console:
”
NullReferenceException: Object reference not set to an instance of an object
ArduinoConnector+c__Iterator0.MoveNext () (at Assets/Scripts/ArduinoConnector.cs:75)
UnityEngine.SetupCoroutine.InvokeMoveNext (IEnumerator enumerator, IntPtr returnValueAddress) (at C:/buildslave/unity/build/Runtime/Export/Coroutines.cs:17)
UnityEngine.MonoBehaviour:StartCoroutine(IEnumerator)
ArduinoConnector:Start() (at Assets/Scripts/ArduinoConnector.cs:22)
“
Okay, so now I call Open(); in my Start() function before StartCoroutine(..).
Now when I run game, I get only a single Error to the console:
”
Error!
UnityEngine.Debug:LogError(Object)
ArduinoConnector:m__1() (at Assets/Scripts/ArduinoConnector.cs:27)
c__Iterator0:MoveNext() (at Assets/Scripts/ArduinoConnector.cs:102)
UnityEngine.SetupCoroutine:InvokeMoveNext(IEnumerator, IntPtr)
”
I tried calling ReadFromArduino() in my Update() function. But I just get a string of errors on each call to Update:
ArgumentOutOfRangeException: Argument is out of range.
Parameter name: value
at System.IO.Ports.SerialPort.set_ReadTimeout (Int32 value) [0x00000] in :0
at (wrapper remoting-invoke-with-check) System.IO.Ports.SerialPort:set_ReadTimeout (int)
at ArduinoConnector.ReadFromArduino (Int32 timeout) [0x00008] in C:\Users\Lewis\Documents\Unity\Roll a Ball\Assets\Scripts\ArduinoConnector.cs:57
at ArduinoConnector.Update () [0x00003] in C:\Users\Lewis\Documents\Unity\Roll a Ball\Assets\Scripts\ArduinoConnector.cs:35
Any guidance really appreciated. Perhaps a zipped file of a unity project/scene that correctly uses the ArduinoConnector.cs file.
Thanks again for your patience.
Hey!
Unfortunately is really impossible to see what’s going on here without the entire project! 🙁
I don’t know if this forum is still active, but I’m getting a lot of Unity errors using this code. Missing namespaces, undeclared variables, etc. Someone who can help me with this?
Hey!
I made a couple of corrections to few types in the code, sorry about that!
Is there any specific issue you’re experiencing?
The code is provided in snippet, which I know is know ideal.
But missing namespaces and undeclared variables should be pretty easy to include and add! Sorry about that! :\
I’m going to second Lewis’s question. Your code is extremely readable (thank you for that), but it’s unclear how I’m supposed to call your Open(), WriteToArduino(), Close() functions. Do I call it from another script? Attach it to an object?
When I try to create an ArduinoConnector in another script (where I intend to send different messages based on different conditionals), I too get the “NullReferenceException.” How do I reference ArduinoConnector in another script?
Right now, in a separate script, I create a “public ArduinoConnector connector;” Then in Update(), under certain conditions, I call connector.Open(), connector.WriteToArduino(“specific condition trigger”), connector.Close().
Thank you for your help!
Hi Emily!
Apologies if this tutorial has not been very clear!
It was intended for relatively experienced devs. I might re-view it soon, to make sure is still accessible to most developers!
Yes, what you are doing is indeed correct. You should create a separate script that runs the logic of your game. The “connector” variable is ok. But obviously you will get a “NullReferenceException”, as that is not linked to anything in particular.
To make the connection, you have to drag your AdruinoConnector component inside the slot of your “public ArduinoConnector connector”. I hope that makes it clear!
I’m doing as you recommend and calling write and read from a new object in another script. I was wondering how I can call the StartCoroutine function.
Hello Alan,
I would like to ask one simply question. I’m beginner in Unity. I created script for ArduinoConnector and other script where is included “public ArduinoConnector Arduino”. I attached them to new GameObject as scripts and then run the game. After that i get “NullReferenceException” error with this “Arduino”. Could you please tell me what is wrong?
Hey! Is very hard to know what’s wrong without a chance to see the code! 🙁
Thank you for answer! Code is very simply:
using System.Collections;
using System.Collections.Generic;
using UnityEngine;
public class NewBehaviourScript1 : MonoBehaviour {
// Use this for initialization
public static ArduinoConnector Arduino;
void Start () {
Arduino.Open();
Arduino.ReadFromArduino();
Arduino.WriteToArduino(“PING”);
}
// Update is called once per frame
void Update () {
}
}
And the code of ArduinoConnector:
/* ArduinoConnector by Alan Zucconi
* http://www.alanzucconi.com/?p=2979
*/
using UnityEngine;
using System;
using System.Collections;
using System.IO.Ports;
public class ArduinoConnector : MonoBehaviour
{
/* The serial port where the Arduino is connected. */
[Tooltip(“The serial port where the Arduino is connected”)]
public string port = “COM26”;
/* The baudrate of the serial port. */
[Tooltip(“The baudrate of the serial port”)]
public int baudrate = 9600;
private SerialPort stream;
public void Open()
{
// Opens the serial port
stream = new SerialPort(port, baudrate);
stream.ReadTimeout = 50;
stream.Open();
//this.stream.DataReceived += new SerialDataReceivedEventHandler(DataReceivedHandler);
}
public void WriteToArduino(string message)
{
// Send the request
stream.WriteLine(message);
stream.BaseStream.Flush();
}
public string ReadFromArduino(int timeout = 0)
{
stream.ReadTimeout = timeout;
try
{
return stream.ReadLine();
}
catch (TimeoutException)
{
return null;
}
}
public IEnumerator AsynchronousReadFromArduino(Action callback, Action fail = null, float timeout = float.PositiveInfinity)
{
DateTime initialTime = DateTime.Now;
DateTime nowTime;
TimeSpan diff = default(TimeSpan);
string dataString = null;
do
{
// A single read attempt
try
{
dataString = stream.ReadLine();
}
catch (TimeoutException)
{
dataString = null;
}
if (dataString != null)
{
callback(dataString);
yield return null;
}
else
yield return new WaitForSeconds(0.05f);
nowTime = DateTime.Now;
diff = nowTime – initialTime;
} while (diff.Milliseconds < timeout);
if (fail != null)
fail();
yield return null;
}
public void Close()
{
stream.Close();
}
}
There’s a slight change to pingHandler function
https://stackoverflow.com/questions/45811909/void-const-char-to-void-fpermissive/45812041#45812041
Hey Alan Thanks for the tutorial, super helpful.
I’m having a little bit of trouble with the signal in unity, I’m getting about as many errors as I am successful readings when invoke the IEnumerator. Any suggestions?
Hey!
Can you tell me a little bit more about the errors you’re receiving?
I’m also getting ‘arg’ issue that is not name or type error to complie.
Where did you refered it?
Is it can be a literal?
I can’t found the ‘arg’ member or used as literal ever.
I am having trouble using the asynchronous read. After starting the coroutine, it runs once, throws a timeout exception, and immediately calls the Debug.LogError(“Error!”). Any ideas why it is not looping until it runs out of time?
I found the problem. The comment says that the timeout is in seconds but it is actually in milliseconds, so my code was timing out after one call. Thanks for the tutorial!
Oops my bad!
I’ve corrected it, thank you!
Hey i have managed to get this AND the threading for asynchronous comms working beautifully for my third year project at uni. I do have ONE question though.
On unity side, i am sending a “PING” string that is picked up by the arduino’s handler and thus triggering a function. BUT, i want to send an int or float with the “PING” and am having trouble getting the arduino to receive both “PING” handler call, and extra data.
for example,
myConnector.SendToArduino(“PING”); // this is from your example
to add more data ive tried;
myConnector.SendToArduino(“PING” + ” ” + myString);
and ive tried
myConnector.SendToArduino(“PING” + ” ” + myString + “\r”);
and i’ve tried
myConnector.SendToArduino(“PING”)
myConnector.SendToArduino(myString);
I want to trigger the ping handler on my arduino as well as send some information at the same time.
void pingHandler ()
{
//PONG BACK FOR RECOGNITION FOR FIRST CONTACT
if(firstContact == false){
Serial.println(“PONG”);
firstContact = true;
}
else{
//Write feedback here
myString = Serial.readString(); //trying to read for added data
Serial.println(myString); //send the data back for verification of success
}
}
Please halp :L im stuck
Just my luck, i’ve been stuck for a days and i’ve just figured it out.
To anyone wanting how to create your own commands and handlers, and are a bit slow like me,
On unity side send it like this, where handlername is a string of your choosing
myConnector.SendToArduino(“handlername” + ” ” + value.ToString() + “\r”);
On arduino side, much like the ECHO handler
void handlernameHandler ()
{
char *arg;
arg = sCmd.next(); //this is the part that reads on from the prefix till \r
if (arg != NULL)
Serial.println(arg);
else
Serial.println(“nothing to process”);
}
just make you add your custom handler in the start() function
sCmd.addCommand(“handlername”, handlernameHandler);
That was fun
Hi, thanks for the tutorial! So I want to use an arduino to monitor a light sensor and feed the info into unity. When I call the coroutine to read arduino, it gives me one value, and then stops. How can I get it to give me a stream of values in unity?
I tried to call the ‘ping’ function inside another coroutine, but that just gives everything a massive lag and gives me a value every few seconds ( I didn’t tell it to wait at all, ie I used yield return null). Thanks!
Hi Ben!
Serial communication is very slow, so is no wonder that it slows down your entire game.
Coroutines are tricky because they are NOT executed in parallel. This means that if a coroutine has to wait 500ms for Arduino to reply, it will stop the game for 500ms.
This is a big problem, and I have written about this in another tutorial: https://www.alanzucconi.com/2016/12/01/asynchronous-serial-communication/
I have attenuated this problem by running the check in a real thread, which is something that truly runs in parallel to your code!
I hope this solves your issue. If not, please feel free to tell me more about it!
Hi Alan,
Thanks so much! I’ve just left a comment with some questions on over on that post.
Hello Alan,
Im trying to get a basic sphere to move in unity from a force sensing resistor input in Arduino, only issue is I don’t have a ton of experience in C#. Below is the closest I think I’ve come to getting it to work. I believe the issue is in the last few lines of the Unity code, am I properly using the read byte command?
UNITY:
using System.Collections;
using System.Collections.Generic;
using UnityEngine;
using System.IO.Ports;
public class movement2 : MonoBehaviour
{
SerialPort forceinput = new SerialPort(“/dev/cu.usbmodem1411”, 9600);
// Use this for initialization
void Start()
{
forceinput.Open();
}
IEnumerator ReadDataFromSerialPort(){
while (true)
{
int valuestoread = forceinput.ReadByte();
movespeed = valuestoread;
yield return new WaitForSeconds(.05f);
}
}
float movespeed;
private void FixedUpdate()
{
transform.Translate(Vector3.forward * movespeed);
}
}
ARDUINO:
int touchinput = A0;
int movevalues = 0;
void setup() {
Serial.begin(9600);
pinMode(touchinput, INPUT);
}
void loop() {
movevalues = analogRead(touchinput);
Serial.print(movevalues);
delay(50);
}
*Full disclosure I built some of this by finagling some examples on Youtube/the internet
Hi Alan,
First of all, thank you for this, it has helped me immensely.
I hope you can help me with my issue. I had everything working perfectly, but later on in my project switched to .NET 4.x and thus lost the .Net2.0 setting as mentioned in your guide. I only switched for a minor thing so when I realized this broke the communication, I switched back.
However, this didn’t fix it. I’m writing messages to Arduino but they don’t seem to arrive/work. I have a hard time debugging as I can’t open the Arduino Serial monitor while Unity is running, and there are no errors on the Unity side.
Do you have any idea how I could fix this?
Thank you!
I resolved errors but what is to be done after 4 th step? Shall I directly start making my game on Unity ? if yes, how to control it using arduino
Hi, I ‘ve tried your codes, but Unity seems to receive serial data with delay. To see how much delay there is, I set data transmission frequency = every 2s or 3s. I found that Unity only receives data every 4s or 6s. It is doubled! Do you have any ideas about this problem?
If you put the code in Update, it will only check Arduino once a frame.
Did you try following this?
https://www.alanzucconi.com/2016/12/01/asynchronous-serial-communication/