
Part 1, Part 2, Part 3, Part 4, Part 5
This is the second part of a series of posts on Unity3D shaders, and it will focus on surface shaders. As previously mentioned, shaders are special programs written in a language called Cg / HLSL which is executed by GPUs. They are used to draw triangles of your 3D models on the screen. Shaders are, in a nutshell, the code which represents how different materials are rendered. Surface shaders are introduced in Unity3D to simplify the way developers can define the look of their materials.

The diagram above loosely shows how a surface shader works. The 3D model is firstly passed to a function which can alter its geometry. Then, it is passed (together with other information) to a function which defines its “look” using some intuitive properties. Finally, these properties are used by a lighting model to determine how the geometry will be affected by the nearby light sources. The result are the RGBA colours of every pixel of the model.
The surface function
The heart of a surface shader is its surface function. It takes data from the 3D model as input, and outputs its rendering properties. The following surface shader gives an object a diffuse white colour:
Shader "Example/Diffuse Simple" {
    SubShader {
      Tags { "RenderType" = "Opaque" }
      CGPROGRAM
      #pragma surface surf Lambert
      struct Input {
          float4 color : COLOR;
      };
      void surf (Input IN, inout SurfaceOutput o) {
          o.Albedo = 1; // 1 = (1,1,1,1) = white
      }
      ENDCG
    }
    Fallback "Diffuse"
  }

Line 5 specifies that the surface function for this shader is surf and that a Lambertian lighting model should be used. Line 10 indicates that the albedo of the material, that is its base colour, should be white. The surface function doesn’t use any data from the original 3D model; despite this, Cg / HLSL requires a input struct to be defined.
Surface output
The struct SurfaceOutput has several other properties which can be used to determine the final aspect of a material:
fixed3 Albedo: the base colour / texture of an object,fixed3 Normal: the direction of the face, which determines its reflection angle,fixed3 Emission: how much light this object is generating by itself,half Specular: how well the material reflects lights from 0 to 1,fixed Gloss: how diffuse the specular reflection is,fixed Alpha: how transparent the material is.
Cg / HLSL supports the traditional float type, but you’ll rarely need a 32 bit precision for your calculations. When 16 bits are enough, the half type is usually preferred. Since the majority of parameters have a range which goes from 0 to 1, or -1 to +1, Cg supports the fixed type. It spans at least from -2 to +2, and it uses 10 bits.
For all these types, Cg / HLSL also supports packed arrays: fixed2, fixed3, and fixed4. These types are optimised for parallel computation, so that most of the common operations can be performed in just one instruction. These four, for examples, are equivalent:
// Traditional C#
Albedo.r = 1;
Albedo.g = 1;
Albedo.b = 1;

// Packed arrays
Albedo.rgb = fixed3(1,1,1);
Albedo.rgb = 1;
Albedo = 1;
Sampling textures
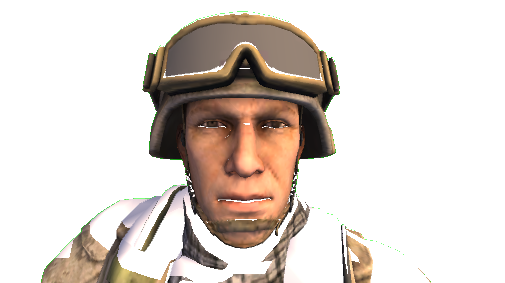
Adding a texture to to a model is slightly more complicated. Before showing the code, we need to understand how texture mapping works in 3D objects. Every textured model is made up of several triangles, each one made of three vertices. Data can be stored in these vertices. They typically contain UV and color data. UV is a 2D vector which indicates which point of the texture is mapped to that vertex.
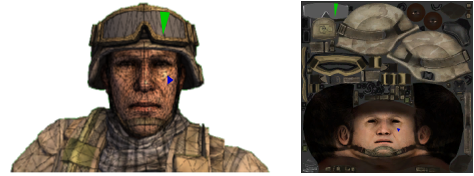
In the picture above you can see the model of a soldier from the Unity3D Bootcamp demo. It is rendered as shaded wireframe. Two triangles have been highlighted on the model: their vertices yield a couple of numbers. They are the Cartesian coordinates, normalised from 0 to 1, which map to the texture on the right. These numbers are the UV coordinates.
If we want to associate a texture to a 3D object, we need the UV data of its vertices. The following shader maps a texture onto a model, according its UV model.
  Shader "Example/Diffuse Texture" {
    Properties {
      _MainTex ("Texture", 2D) = "white" {}
    }
    SubShader {
      Tags { "RenderType" = "Opaque" }
      CGPROGRAM
      #pragma surface surf Lambert
      struct Input {
          float2 uv_MainTex;
      };
      sampler2D _MainTex;
      void surf (Input IN, inout SurfaceOutput o) {
          o.Albedo = tex2D (_MainTex, IN.uv_MainTex).rgb;
      }
      ENDCG
    }
    Fallback "Diffuse"
  }
The property _MainText is a texture which is declared in line 12 and made accessible from the material inspector in line 3. The UV data of the current pixel is gathered in line 10; this is done by naming a field of the Input struct as uv followed by the name of the texture (uv_MainText, in this case).
The next step is to find the part of the texture which UV refers to. Cg / HLSL provides a useful function for this, called tex2D: given a texture and some UV coordinate, it returns the RGBA colour. tex2D takes into account other parameters which can be set directly from Unity3D, when importing the texture.
It is important to remember that the UV coordinate are stored only in the vertices. When the shader evaluates a pixel which is not a vertex, the function tex2D interpolates the UV coordinates of the three closest vertices.
⭐ Suggested Unity Assets ⭐
Surface input
Cg / HLSL has some other interesting, non-obvious features. The surface input, Input, can be filled with values which Unity3D will calculate for us. For instance, adding float3 worldPos will be initialised with the world position of the point surf is elaborating. This is often used to creates effects which depends on the distance from a particular point.
Shader "Example/Diffuse Distance" {
	Properties {
		_MainTex ("Texture", 2D) = "white" {}
		_Center ("Center", Vector) = (0,0,0,0)
		_Radius ("Radius", Float) = 0.5
	}
	SubShader {
		Tags { "RenderType" = "Opaque" }
		CGPROGRAM
		#pragma surface surf Lambert
		struct Input {
			float2 uv_MainTex;
			float3 worldPos;
		};
		sampler2D _MainTex;
		float3 _Center;
		float _Radius;

		void surf (Input IN, inout SurfaceOutput o) {
			float d = distance(_Center, IN.worldPos);
			float dN = 1 - saturate(d / _Radius);

			if (dN > 0.25 && dN < 0.3)
				o.Albedo = half3(1,1,1);
			else
				o.Albedo = tex2D (_MainTex, IN.uv_MainTex).rgb;
		}

		ENDCG
	}
	Fallback "Diffuse"
}
Lines 20-21 calculated the distance of the pixel being drawn, IN.worldPos, from the point we’ve defined in the material inspector, _Center. Then, it clamps it between zero and one, so that is one in _Center and fades to zero at _Radius. If the distance falls within a certain range, pixels are coloured white.
Is worth noting that shaders are executed on GPUs, which are highly optimised for sequential code. Adding branches to a shader can dramatically lower its performance. It is often more efficient to calculate both branches and mixing the results:
float d = distance(_Center, IN.worldPos);
float dN = 1 - saturate(d / _Radius);
dN = step(0.25, dN) * step(dN, 0.3);
o.Albedo = tex2D (_MainTex, IN.uv_MainTex).rgb * (1-dN) + half3(1,1,1) * dN;
Cg / HLSL has lot of built-in functions, such as saturate and step, which can easily replace the majority of if statements.
Other inputs
Cg allows to use several other special fields such as worldPos; here’s a list of the most used according to Unity3D official documentation:
float3 viewDir: the direction of the camera (view direction);float4 name : COLOR: by using this syntax, the variablenamewill contain the colour of the vertex;float4 screenPos: the position on the current pixel on the screen;float3 worldPos: the position of the current pixel, in world coordinates.
Vertex function
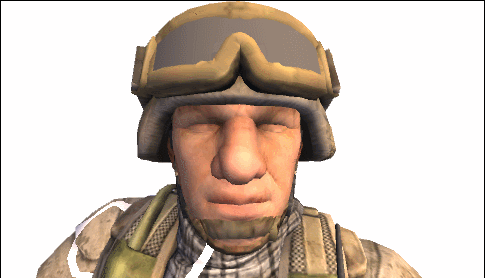
Another interesting feature of surface shaders is the ability to change vertices before sending them to surf. While surf manipulates colours in the RGBA space, to use a vertex modifier function you need to learn how to manipulate 3D points in space. Let’s start with an easy example: a shader which makes a 3D model …chubbier. To do this, we have to expand the triangles along the direction they’re facing (think about a balloon which is inflated). The direction of a triangle it’s given by its normal, which is a unit vector perpendicular to the surface of the triangle itself. If we want to extend its vertices in the direction of its normal, what we have to do it:
![\[newVertex = vertex + normal * amount\]](https://www.alanzucconi.com/wp-content/ql-cache/quicklatex.com-6d685b03ae4a3ba06584321027b379d8_l3.png "Rendered by QuickLaTeX.com")
where  indicates how much the new vertex will be displaced from the previous one. This technique is called normal extrusion.
 Shader "Example/Normal Extrusion" {
    Properties {
      _MainTex ("Texture", 2D) = "white" {}
      _Amount ("Extrusion Amount", Range(-0.0001,0.0001)) = 0
    }
    SubShader {
      Tags { "RenderType" = "Opaque" }
      CGPROGRAM
      #pragma surface surf Lambert vertex:vert
      struct Input {
          float2 uv_MainTex;
      };
      float _Amount;
      void vert (inout appdata_full v) {
          v.vertex.xyz += v.normal * _Amount;
      }
      sampler2D _MainTex;
      void surf (Input IN, inout SurfaceOutput o) {
          o.Albedo = tex2D (_MainTex, IN.uv_MainTex).rgb;
      }
      ENDCG
    }
    Fallback "Diffuse"
  }
Line 9 specifies that there is a vertex modifier, called vert. It takes the position of a vertex and it projects it along its normal. appdata_full is a struct which contains all the data of the current vertex.
Putting all together: the snow shader
A typical surface shader which uses both surf and vert is the infamous snow effect, which appeared in several blogs, each time with a slightly different flavour. It simulates the accumulation of snow on the triangles of a model. Initially only the triangles directly facing _SnowDirection are affected. By increasing _Snow, even the triangles which are not oriented towards the sky are eventually affected.
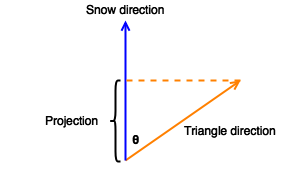 First of all, we need to understand when a triangle is oriented towards the sky. The direction the snow is coming from,
 _SnowDirection, will be a unit vector as well. There are many ways in which we can check how aligned they are, but the easiest one is projecting the normal onto the snow direction. Since both vectors have length one, the resulting quantity will be bounded between +1 (same direction) and -1 (opposite direction). We’ll encounter this quantity again in the next tutorial, but for now you just have to know that is known as dot product and equal to  . Asking the dot product to be greater then a certain value
 _Snow, means that we are only interested in the normals which differ, in direction, less then  . For instance:
 is true only when the two directions are the same;
 is true when is less then 90 degrees;
 is always true.
There’s another little piece of information which is needed. While _SnowDirection represents a direction expressed in world coordinates, normals are generally expressed in object coordinates. We cannot compare these two quantities directly, because they are mapped to different coordinate systems. Unity3D provides a function called WorldNormalVector which can be used to map normals into world coordinates.
Shader "Example/SnowShader" {
	Properties {
   	_MainColor ("Main Color", Color) = (1.0,1.0,1.0,1.0)
    	_MainTex ("Base (RGB)", 2D) = "white" {}
    	_Bump ("Bump", 2D) = "bump" {}
    	_Snow ("Level of snow", Range(-1, 1)) = 1
    	_SnowColor ("Color of snow", Color) = (1.0,1.0,1.0,1.0)
    	_SnowDirection ("Direction of snow", Vector) = (0,1,0)
    	_SnowDepth ("Depth of snow", Range(0,0.0001)) = 0
	}
	SubShader {
    	Tags { "RenderType"="Opaque" }
    	LOD 200

    	CGPROGRAM
    	#pragma surface surf Lambert vertex:vert

    	sampler2D _MainTex;
    	sampler2D _Bump;
    	float _Snow;
    	float4 _SnowColor;
    	float4 _MainColor;
    	float4 _SnowDirection;
    	float _SnowDepth;

    	struct Input {
        	float2 uv_MainTex;
        	float2 uv_Bump;
        	float3 worldNormal;
        	INTERNAL_DATA
    	};

    	void vert (inout appdata_full v)
    	{
   		 // Convert _SnowDirection from world space to object space
                 float4 sn = mul(_SnowDirection, _World2Object);
		 if(dot(v.normal, sn.xyz) >= _Snow)
   			 v.vertex.xyz += (sn.xyz + v.normal) * _SnowDepth * _Snow;
    	}

    	void surf (Input IN, inout SurfaceOutput o)
    	{
        	half4 c = tex2D (_MainTex, IN.uv_MainTex);
        	o.Normal = UnpackNormal (tex2D (_Bump, IN.uv_Bump));
        	if(dot(WorldNormalVector(IN, o.Normal), _SnowDirection.xyz)>=_Snow)
            	o.Albedo = _SnowColor.rgb;
        	else
            	o.Albedo = c.rgb * _MainColor;
        	o.Alpha = 1;
    	}
    	ENDCG
	}
	FallBack "Diffuse"
}
Rather the manually calculating the cosine of the angle between the vector, Cg has a very efficient implementation of the dot product called dot.
Line 36 utilises a different method to convert the normal into world coordinates. The function WorldNormalVector is in fact not available in the vertex modifier.
If you really need snow in your game, consider buying something more advanced, like Winter Shaders.
Conclusion
This post introduces surface shaders and shows how they can be used for a variety of effects. This post was inspired by the Surface Shader Examples page in the Unity3D manual. There is also another page which explains in details how to implement other lighting models. That topic will be explored in details in the third part of this tutorial.
- Part 1: A gentle introduction to shaders in Unity3D
- Part 2: Surface shaders in Unity3D
- Part 3: Physically Based Rendering and lighting models in Unity3D
- Part 4: Vertex and fragment shader in Unity3D
- Part 5: Screen shaders and postprocessing effects in Unity3D
💖 Support this blog
This website exists thanks to the contribution of patrons on Patreon. If you think these posts have either helped or inspired you, please consider supporting this blog.
📧 Stay updated
You will be notified when a new tutorial is released!
📝 Licensing
You are free to use, adapt and build upon this tutorial for your own projects (even commercially) as long as you credit me.
You are not allowed to redistribute the content of this tutorial on other platforms, especially the parts that are only available on Patreon.
If the knowledge you have gained had a significant impact on your project, a mention in the credit would be very appreciated. ❤️🧔🏻
You say GPUs are highly optimized for sequential code, but that sounds very ambiguous.
GPUs are highly optimized for parallel code, and that is exactly why branching is not as cheap as on a CPU. The same code is executed on a whole bunch of fragments at the same time (a group called a warp or a wavefront), it generally needs to execute both sides of the branch, and throw away the result of the side of the branch that does not apply. So it’s more that you can’t optimize away a bunch of code with an if statement.
Another part of that has to do with pipelining: if work can be predicted (such as a texture lookup), it can sometimes be done at the same time as other work. But if your texture lookups depend on the output of a calculation, that’s not quite as straightforward.
Hey, it works! Look at that!
Thanks for the tutorials. You’re definitely filling a major gap in what’s available out there.
I did not understand when talked about the snow shader. How a cos() function can be greater than 1?
Hey! In fact, it cannot be! That example refers directly to the line of code which is:
if(dot(v.normal, sn.xyz) >= _Snow)
In that line, the dot product is, de facto, the cosine function. If you place _Snow = +1, you get:
if (cos(theta) >= +1)
which is true for one value of theta only.
It is confusing that you use an IF statement just after saying it is not good practice. 😀
Haha touché!
When used improperly, if statements and loops can be rather inefficient in a shader.
But it is also true that avoiding them at any cost can sometimes create code that is impossible to read, or even more complex. So is all a matter of balance.
I am ok wasting a microsecond on an IF statement. It is not going to affect the speed of you game in any way noticeable. But if that IF is used inside three for loops for a screen shader… perhaps that would be a bit too much!
Also, for educational resources, I tend to prefer clear, clean and easy to understand snippets, rather than optimised ones.
i couldnt understand this part when i was reading “surface function”. First it said surface function (it takes data from 3dmodel as input) then later it said it(surf funtion) doesnt use any data from 3d model inspite of that an input struct has to be defined..i might be wrong somewhere but if you could explain it a bit?
i wouldve attached an image with lines highlighted for your convinience but it doesnt allow me to attach image.
The first part means surface shaders *in general* will take 3D model data as inputs. The second part means the specific surf function in the specific example in the article didn’t actually need any of the model data, but the language requires declaring the input value anyway.
Hey! Thanks a lot for your tutorial series – it’s much appreciated.
I’m a bit confused about the following lines:
// Convert the normal to world coordinates
float4 sn = mul(UNITY_MATRIX_IT_MV, _SnowDirection);
if(dot(v.normal, sn.xyz) >= _Snow)
[…]
According to http://forum.unity3d.com/threads/_object2world-or-unity_matrix_it_mv.112446/, “UNITY_MATRIX_IT_MV is for rotating normals from object into eye space”. But we don’t want to convert _SnowDirection from object to eye space – we want to convert it from world to object space, right? (And the comment seems to be totally misplaced as the normal isn’t converted at all.)
To make it work you should actually do:
float4 sn = mul(transpose(_Object2World), _SnowDirection);
Which converts the normal from object to world coordinates.
// Rotates normals from object to world space
float4 sn = mul(_SnowDirection, _World2Object);
where can I download the sample codes, including the shaders and 3D model, thanks.
Hey! I post most of the Unity packages on Patreon!
Hi, I can’t find the links. Where can I download this model of Unity Soldier?
Can you please post it here.
I think there is a typo.
In vert shader of the code for Snow Shader, you are saying “// Convert the normal to world coordinates” in the comment.
// Convert the normal to world coordinates
float4 sn = mul(_SnowDirection, _World2Object);
But isn’t it actually converting the world coordinate vector which is _SnowDirection into object coordinate?
So, sn is not object coordinate snow direction and not can be compare with appdata_full.normal which is object coordinate.
Please correct me if I am wrong.
Hi, I too have the same doubt as Jae . Are we converting snow direction from world space to object space here:
// Convert the normal to world coordinates
float4 sn = mul(_SnowDirection, _World2Object);
so, that we can compare with v.normal which is already in object space.
I don’t understand the line after the comment “// Convert the normal to world coordinates” either.
As Ivan wrote, it is equivalent to float4 sn = mul(transpose(_Object2World), _SnowDirection);
But why the transpose?
Hi!
Sorry for the confusion!
_SnowDirection is in world space.
In the surface function, I convert o.Normal from object to world space, so it can be compared with _SnowDirection.
In the vertex function, I convert _SnowDirection from world to object space, so it can be compared with v.Normal.
I have corrected the comment (which said the opposite).
Does it make sense to you know?
In surface input shader you are declaring the center in the inspector what if I had to obtain this center from another script?
Hi! I’m not sure I understand the question!
Hi. Thanks for tutorials. I started learning shader recently. I have a question in snow example.
// Convert _SnowDirection from world space to object space
float4 sn = mul(_SnowDirection, _World2Object);
Why do you have this? My understanding is that unity_WorldToObject is inverse of current world matrix, not matrix transformation for converting from world space to object space (https://docs.unity3d.com/Manual/SL-UnityShaderVariables.html).
I think the formula should be:
float4 sn = mul(_World2Object, float4(_SnowDirection, 0.0));
Because from :
_SnowDirection = _Object2World x sn;
=> _World2Object x _SnowDirection = _World2Object x _Object2World x sn;
=> _World2Object x _SnowDirection = sn;
Please correct me if I am wrong.
Guys regarding this amazing classic tutorial. (Which is amazing!)
The “vert” snow function is indeed incorrect.
Regarding the >comparisionsnowEven in the corrected versionnot= cutoff )
v.vertex.y += 1.0; // clever debugging check!
You’ll now see that it functions identically as in the surf function!
Then you have the issue of “moving” the verts as desired, do as desired.
Damn! Sorry for the broken post .. I don’t know how to delete, sorry.
Guys regarding this amazing classic tutorial. (Which is amazing!!!!)
The “vert” snow function is indeed incorrect.
(That is to say, it does not match the comparison in the surf function.)
Regarding the comparison,
In the surf function, we convert o.Normal from object to world space, so it can be compared with _SnowDirection.
Even in the corrected version (xmas 2018!) this is not being done.
To DEBUG this, after the comparison, just “add one height” to the vert, so:
if( .. your comparision .. )
v.vertex.y +=1.0;
You will straight away see that it is not doing the SAME pixels as the surf function.
To do the same pixels as the surf function:
For the first step, to convert a normal from object to world space
You can do
float3 worldNormal = UnityObjectToWorldNormal(v.normal);
or
float3 worldNormal = mul( v.normal, (float3x3)unity_WorldToObject );
(excellent discussion on how to convert to world space in vert functions: forum.unity.com/threads/world-space-normal.58810 )
then simply compare ..
float3 worldNormal = mul( v.normal, (float3x3)unity_WorldToObject );
if( dot( worldNormal, _SnowDirection.xyz) >= cutoff )
v.vertex.y += 1.0; // clever debugging check!
You’ll now see that it functions identically as in the surf function!
Then you have the issue of “moving” the verts as desired, do as desired.
Nice Post Thanks For Sharing and it is very helpful for us.
It seems to be very quality tool Unity3d. Thanks for sharing this creative information with us.
Thanks for this tutorial. Unity 3D is an impressive tool but do we implement or make some 3D apps for the real estate marketplace.
Thank you!
Nice post. Thanks for sharing
Nice Post Thanks For Sharing With Us and it is very informative and helpful for us. Browse designer clothes online at Shoperstyle that includes latest designer wear & accessories by long standing stalwarts in the fashion industry.Visit our website to buy now!
Good Post.Thanks for sharing
Hey! Thanks for this awesome introduction. Much better than any other resource.
All links to the CG documentation have changed url. The folder “Cg” was changed to “cg”:
Before:
https://developer.download.nvidia.com/Cg/distance.html
After:
https://developer.download.nvidia.com/cg/distance.html
Thanks for this tutorial. Unity 3D is an impressive tool but do we implement or make some 3D apps for the real estate marketplace.
Thanks a lot man.
I have a contribution. The code has a litle problem in the properties section.
The code: _Snow(“Level of snow”, Range(1, -1)) = 1
Must be: _Snow(“Level of snow”, Range(-1, 1)) = 1
Again. Thanks a lot!
Thank you for spotting that!
Great post! I have read and really enjoyed it!
Hi, you said “The UV data of the current pixel is gathered in line 10; this is done by naming a field of the Input struct as uv followed by the name of the texture (uv_MainText, in this case).” in “Sampling textures”. Does this mean the input structure will receive the uv just by being declared so.