This tutorial explains how to create C++ libraries in Arduino.
- Introduction
- Step 1. Setting up
- Step 2. The Header
- Step 3. The Body
- Step 4. The Keywords
- Conclusion & Downloads
Introduction
For this example we will create a toy library called Fader. As the name suggests, it will allows us to have fading timers which we can query at any time. Since Arduino libraries are written in C++, we need to create two files: Fader.h and Fader.cpp. They will contain the header and the body of the class Fader, respectively. The Arduino IDE comes with its own C++ compiler, so you won’t need any other additional tool for this tutorial.
Step 1. Setting up
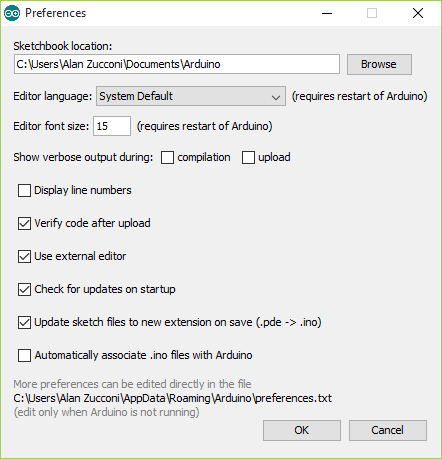
Before start writing our source codes, we have to find the folder which Arduino uses for its libraries. For Windows users is usually in C:\Users\<user name>\Documents\Arduino\libraries. You can find your folder by checking the Sketchbook location in the Arduino Preferences window. Browse to that folder and look for libraries.

Within that folder, you have to create another folder with the name of your library; in this example, Fader. This folder will contain all the files we need.
Step 2. The Header
Arduino’s headers
If you are unfamiliar with C++, the header is like a summary of what the library contains. Every time we want to use our library, we need to import its header; by doing so, the compiler knows which functions are available.
Almost every Arduino library header looks like this:
#ifndef Fader_h
#define Fader_h

#if ARDUINO >= 100
  #include "Arduino.h"
#else
  #include "WProgram.h"
  #include "pins_arduino.h"
  #include "WConstants.h"
#endif

// Your class header here...

#endif
Lines 1,2 and 14 are used to prevent this header from being included twice, and they are quite common in C++. Lines 4-10 are necessary if you want to use the standard Arduino functions or constants from within your code.
The Code
The header contains the definition of the Fader class, and it indicates which methods and attributes are available to use.
class Fader {
  public:
    Fader();

    void init(float initial);
    void fadeTo(float value, unsigned long duration);
    float getFade();

  private:
    unsigned long _startTime;
    float _startValue; // Start from this value

    unsigned long _stopTime;
    float _stopValue;   // Stop at this value

    float lerp(float m1, float M1, float m2, float M2, float v1);
};
The public methods that we can invoke on a Fader object are just fadeTo and getFade. The remaining components are declared as private and will be used internally.
Step 3. The Body
The body of the library is where the code actually is. It starts with #include "Fader.h", and then it provides a body for all the methods that have been defined in the header. For instance, the syntax Fader::fadeTo indicates that we are going to provide the body for the function fadeTo of the class Fader.
#include "Fader.h"

Fader::Fader()
{
}

Fader::init(float initial)
{
  _startTime = millis() -1;
  _startValue = initial -1;

  _stopTime = _startTime;
  _stopValue = initial;
}

void Fader::fadeTo(float value, unsigned long duration)
{
  _startTime = millis();
  _startValue = getFade();

  _stopTime = _startTime + duration;
  _stopValue = value;
}

float Fader::getFade()
{
  unsigned long currentTime = millis();
  float currentValue = lerp(_startTime, _startValue, _stopTime, _stopValue, currentTime);
  currentValue = constrain(currentValue, _startValue, _stopValue);
  return currentValue;
}

// Linear interpolation
float Fader::lerp (float m1, float M1, float m2, float M2, float v1)
{
  float d  = M1 - m1;
  float c  = (M2 - m2) / d;
  float o = ( -(M2 * m1) + (m2 * m1) + m2 * d) / d;
  return v1 * c + o;
}
Step 4. The Keywords
The editor of Arduino is notoriously bad when it comes to semantic syntax highlighting. You can help uses by adding an extra file in the library folder called keywords.txt.
#######################################
# Syntax Coloring Map For Fader
#######################################

#######################################
# Datatypes (KEYWORD1)
#######################################

Fader	KEYWORD1

#######################################
# Methods and Functions (KEYWORD2)
#######################################

init    KEYWORD2
fadeTo	KEYWORD2
getFade	KEYWORD2

#######################################
# Constants (LITERAL1)
#######################################
This step is totally optional, but allows to give specific keywords a different colour.
Step 5. Using the library
The final step is to use the library. To do that in an Arduino sketch, we need to import Fader.h first.
#include "Fader.h"
Fader fader = Fader();

int led = 9;              // the pin that the LED is attached to
int fadeDuration = 1000;  // 1 second

// the setup routine runs once when you press reset:
void setup()  {
  // declare pin 9 to be an output:
  pinMode(led, OUTPUT);
  fader.init(255);
}

// the loop routine runs over and over again forever:
void loop()  {
  // Get the current fade
  int fade = (int) fader.getFade();
  analogWrite(led, fade);

  // Restarts the fade, if necessary
  if (fade == 0)
    fader.fadeTo(255, fadeDuration);
  if (fade == 255)
    fader.fadeTo(0, fadeDuration);
}
This code reviews the “Fade” example provided in the Arduino Examples folder.
Installing the library
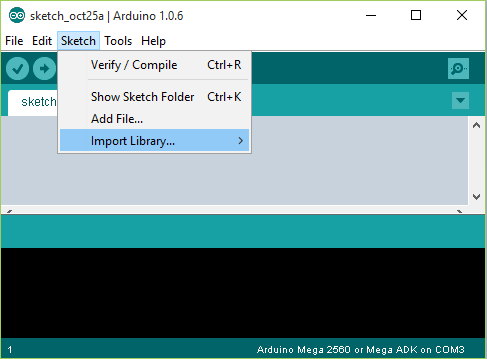
If you zip the folder where all the library files are, you can redistribute that file to other developers. Arduino has an option to import external libraries; it will extract the archive and place the files in the right folder.

Conclusion & Downloads
You can download the Fader toy library here.
Other resources
- Arduino – Using Libraries
- Arduino – Library Tutorial
💖 Support this blog
This website exists thanks to the contribution of patrons on Patreon. If you think these posts have either helped or inspired you, please consider supporting this blog.
📧 Stay updated
You will be notified when a new tutorial is released!
📝 Licensing
You are free to use, adapt and build upon this tutorial for your own projects (even commercially) as long as you credit me.
You are not allowed to redistribute the content of this tutorial on other platforms, especially the parts that are only available on Patreon.
If the knowledge you have gained had a significant impact on your project, a mention in the credit would be very appreciated. ❤️🧔🏻


Hi
Dear Alan, I’m already in trouble with the Sim800l’ module and can not I send an SMS with Arduino Due and could not help me, it requires professional code Writer, All code and libraries written for Arduino Uno and does not work in Arduino Due;
please help me.
Hey! Unfortunately I have not worked with Arduino Due, and I have not used Sim800, so I won’t be able to help you on this! 🙁
thank you very much
great & helpful
You’re welcome! 😀
Hey Alan,
Thanks for the tutorial. I’m dropping a line here because I had some trouble compiling your code. Don’t you need a return type for Fader::init? Thanks again!
Hi !
Do you know how to proceed to use a library in the library one is creating ? (In my case, Id like to include in my library a function that write on a SD card using SdFat library).
Thanks for this tuto !
Tom
hello sir, i would like to ask on how to convert the files of SM.h library and SM.cpp from this site to a library… i can’t be able to follow the instruction in creating the library…can you do this to me? ref. https://codebender.cc/library/SM#SM.cpp
I have the same isssue I have the .h file in text format, but don’t know what format to port into the Ardiono ide Library, is it saved as a ascii file, c++, not sure what t do with the text. Any ideas?
Hello… noob question here, but what program are you using to write the header file? Is it Arduino and you just save-as and add a .h at the end of the file name, or am I using a c++ compiler?
Hi! You can use whichever editor you prefer.
The Arduino IDE will compile the files for you.
It is just an ascii file. Can use any editor
In my case, it doesn’t work.
I observed that you changed some things such as the default constructor has been converted to a parameterized constructor. Even though, it does n’t work.
Just ON all the time (255)
Thanks in any case