

Let’s start with something trivial: sorting numbers. Regardless of the algorithm you’ll use, real numbers are naturally ordered. Mathematically speaking, they have a total order, in the sense that you can always decide if a number is greater than another one. There is no ambiguity in this, meaning you can actually sort them, and (excluding duplicates) this sort is unique. There are other fields which are not that lucky: colour, for instance, are very unlucky. Supposing you’re representing colours with their RGB values, there is no standard way to order triples in a line, since they are naturally not organised in a line fashion. The problem is even more complicated since colours have a meaning in the real world. How can we sort colours so that they look as continuous as possible? Which parameters affects the sorting order? Is azure closer to blue (similar hue) or to cyan (similar luminosity)? I can stop you all here and say that there is no solution to this problem. You can sort colours, but the overall result depends on what you are trying to achieve. This post will explore how colours can be sorted, and how this can lead to very different results.
Part 1: Colour sorting
Let’s start by creating a bunch of random colours, sampling them from the RGB space.
import random

colours_length = 1000
colours = []
for i in range(1, colours_length):
	colours.append (
		[
			random.random(),
			random.random(),
			random.random()
		]
	)
![]()
All the examples in this post will refer to this very list of random colours.
RGB sorting
The most trivial way in which we can sort colours is by directing sort its RGB values. Python has a very naive way of doing this: it sorts the first component, then the second and finally the third one. If two colours have the same quantity of red, the green channel will be used to determine which one is “bigger”.
colours.sort()
![]()
The result looks indeed very poor.
HSV sorting
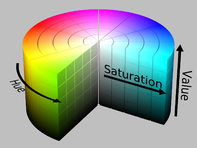 The RGB colour space works very well for monitors, but it does not represent how similar colours are. The HSV space attempts to overcome to this problem by introducing a parameter called hue. The hue is the base colour, made more intense or washed away by its saturation. The third component, simply called value, determined how “dark” the colour is. Since the hue has been arranged, by definition, in a rainbow fashion, sorting directly on the HSV values is likely to produce somehow visually pleasant results.
colours.sort(key=lambda rgb: colorsys.rgb_to_hsv(*rgb) )
![]()
Sorting using the HLS space, which organises colours in a similar fashion, produces seemingly indistinguishable results.
colours.sort(key=lambda rgb: colorsys.rgb_to_hls(*rgb) )
![]()
Both these solutions, however, looks very noisy.
Luminosity sorting
The reason why sorting in HSV and HLS colour spaces produces noisy result is caused by a single factor. HSV believes that hue is more important than luminosity. Two visually different shades of blue are closer, compared two two different colours with the similar intensity. An attempt to compensate for this is by sorting directly for the perceived luminosity of a colour.
def lum (r,g,b):
	return math.sqrt( .241 * r + .691 * g + .068 * b )
colours.sort(key=lambda rgb: lum(*rgb)	)
But this, unfortunately, still yields a very poor result.
Step sorting
If we want to sort colours in a visually pleasant way, we need to do something more complicated. We can, for instance, merge hue and luminosity information to obtain a smoother result. Another problem we encounter, however, is determined by how tuples are sorted in Python. To dampen the impact that sorting on the first component has, we can reduce the colour space from a float value between 0 to 1, to an integer from 0 to 7. By doing this, much of the noise is removed.
def step (r,g,b, repetitions=1):
	lum = math.sqrt( .241 * r + .691 * g + .068 * b )

	h, s, v = colorsys.rgb_to_hsv(r,g,b)

	h2 = int(h * repetitions)
	lum2 = int(lum * repetitions)
	v2 = int(v * repetitions)

	return (h2, lum, v2)
colours.sort(key=lambda (r,g,b): step(r,g,b,8)	)
![]()
Most of the noise is not removed, but the segments don’t look continuous any more. To fix this, we can invert the luminosity of every other segment.
def step (r,g,b, repetitions=1):
	lum = math.sqrt( .241 * r + .691 * g + .068 * b )

	h, s, v = colorsys.rgb_to_hsv(r,g,b)

	h2 = int(h * repetitions)
	lum2 = int(lum * repetitions)
	v2 = int(v * repetitions)

	if h2 % 2 == 1:
		v2 = repetitions - v2
		lum = repetitions - lum

	return (h2, lum, v2)
colours.sort(key=lambda (r,g,b): step(r,g,b,8)	)
![]()
Colours looks now organised in a neater way. They are mostly continuous, with very little noise compared to the native HSV sorting. This, however, came at the expense of a monotonic luminosity. When it comes to colour sorting, we can’t have it all.
Hilbert sorting
 There is another way to sort colours which looks rather interesting. It is based on the concept of Hilbert curve. You can image a Hilbert curve as a way of mapping every point in a 2D space by using a 1D curve.
This is possible because the Hilbert curve is a fractal space-filling object. We can extend the same concept of space-filling to our three dimensional colour space. What if we use a Hilbert curve to connect all the colours in their RGB space? For this example I am using Steve Witham‘s implementation of a Hilbert walk, as suggested by Jan Pöschko.
import hilbert
colours.sort(key=lambda (r,g,b):hilbert.Hilbert_to_int([int(r*255),int(g*255),int(b*255)])	)
![]()
The result is indeed intriguing and, despite not following any intuitive colour distribution, it looks very homogeneous. It’s interesting to notice that while all the above mentioned technique would sort greyscale colours correctly, Hilbert sorting rearranges them in a very different way.
![]()
Travelling Salesman sorting
 The travelling salesman problem refers to a very practical issues: visiting a certain number of cities minimising the overall distance and visiting each city only once. This sounds exactly what we want: visiting each colours only once, minimising the overall distance. Despite being such a critical issue, the travelling salesman problem is NP-complete, which is a fancy way of saying that is too computationally expensive to run over thousands of colours. The algorithm I’ll be using instead is a suboptimal version, called nearest neighbour. Without going too much into its details, it often finds solutions to the travelling salesman problem which are, on average, 25% worse. Which is not that bad, after all. I have used this version of the algorithm.
from scipy.spatial import distance
# Distance matrix
A = np.zeros([colours_length,colours_length])
for x in range(0, colours_length-1):
	for y in range(0, colours_length-1):
		A[x,y] = distance.euclidean(colours[x],colours[y])

# Nearest neighbour algorithm
path, _ = NN(A, 0)

# Final array
colours_nn = []
for i in path:
	colours_nn.append(	colours[i]	)
![]()
Its result is very smooth, even though the colours are all over the place. This solution, however, should be the one that really minimises the distances between them.
We can also use other colour spaces to calculate distance, such as the HSV (top) and the Lab (bottom) ones, although they all yields similar results:
![]()
![]()
Part 2: Colour distance
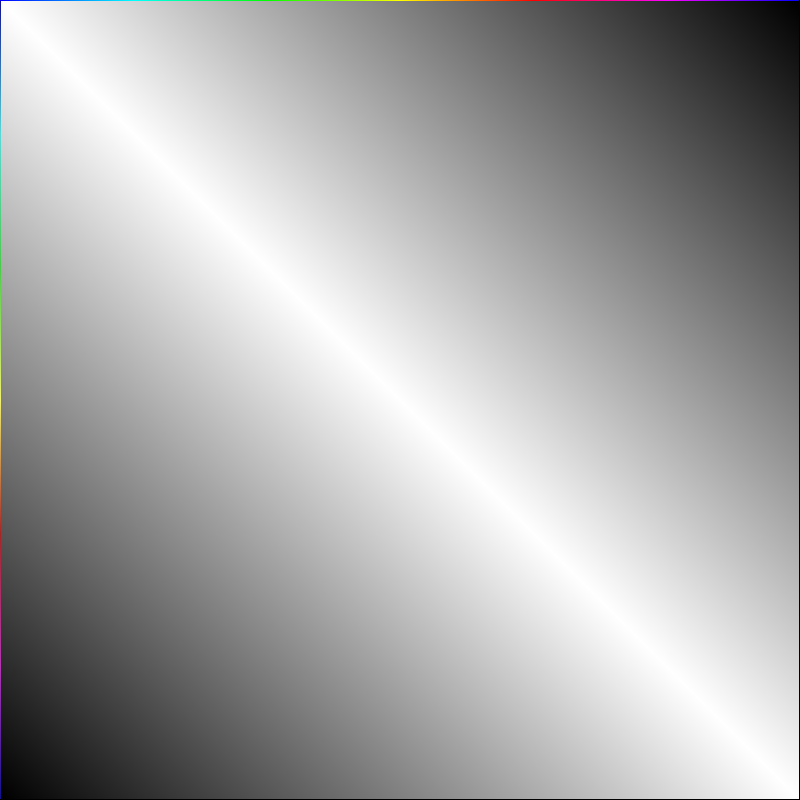
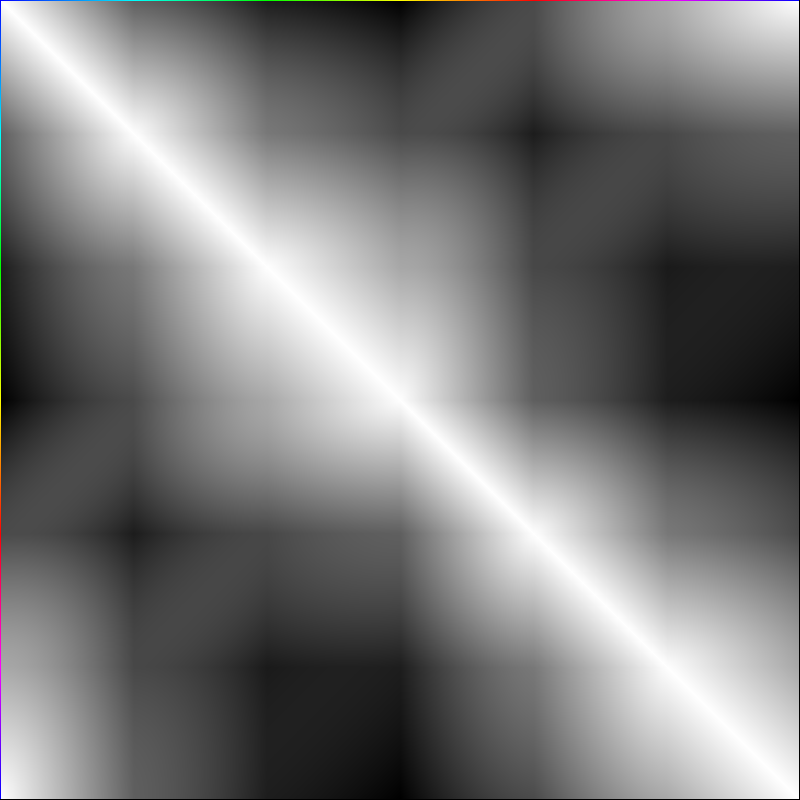
Colour sorting is deeply connected to another problem. Given two different colours, how distant are they? The concept of distance strongly depends on the space we are analysing them. Just to give you an indication, here there are some charts which will help you understand how distance is perceived in several colour space.
In the following diagrams, every (x,y) pixel indicates how distant the respective colours in the X and Y axes are. The X and Y axes arrange colours according to their hue value. White pixels indicate a perfect match: the colours have zero distance, meaning they are are identical. Dark pixels, instead, indicate a high distance. You can click on the charts to expand them.
|
HSV (& HSL)
|
|
|
|
|
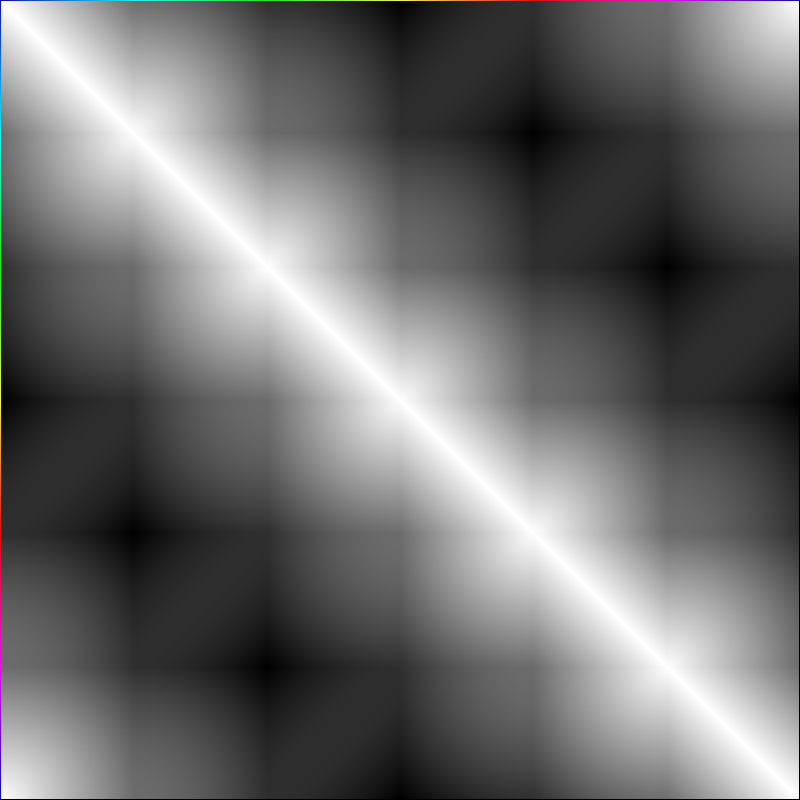

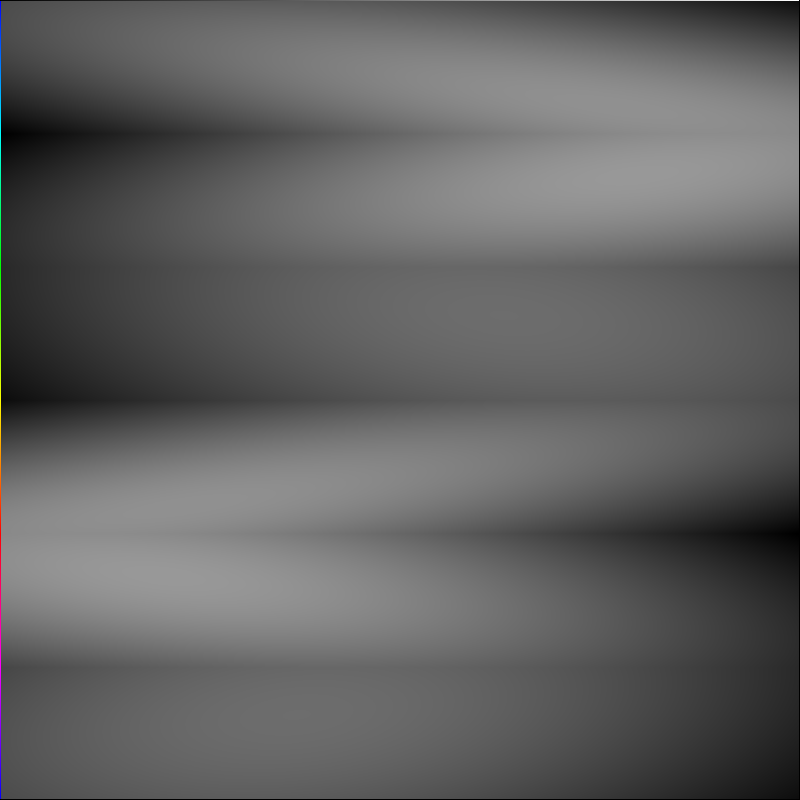
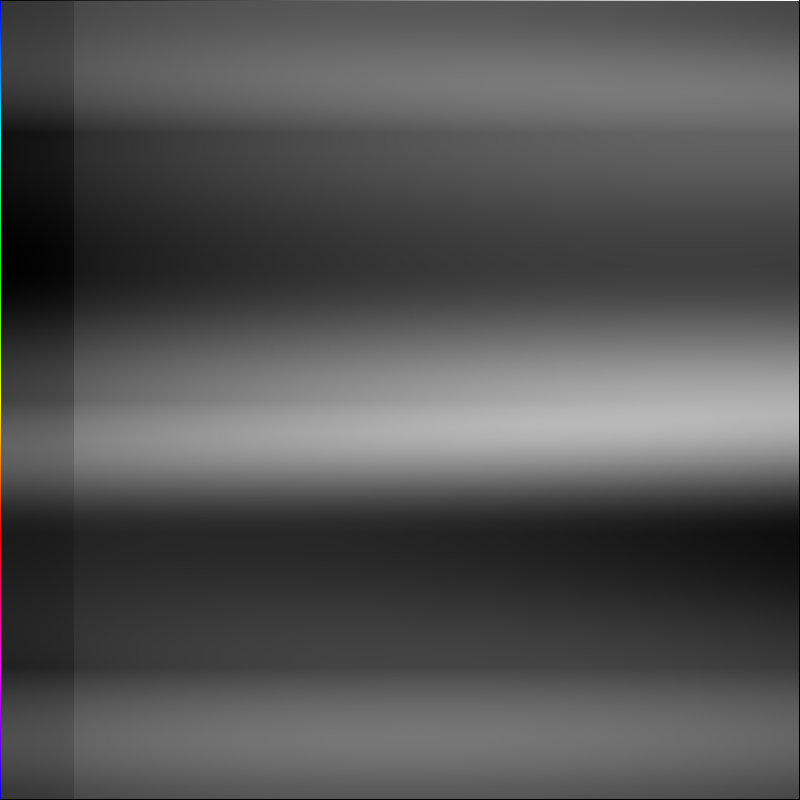
The next diagrams replace the rainbow colours on the horizontal axis with a greyscale gradient. There won’t be any white pixels since no two colours are the same now.
|
HSV & HSL
|
RGB
|
|
YIQ
|
LAB
|


Conclusion
Sorting by colours is a very common practice, especially in advertising and other form of media which requires to be visually pleasant. In a previous post I explained how I collected all the screenshots from #ScreenshotSaturday and sorted them, showing some interesting results over the predominant hues found in indie games. These mosaics are done using over 30.000 images, weighting almost 9Gb. You can download the full-size moisacs (16Mb, 71Mb, 40Mb, 13Mb) here on Patreon. Sceen size mosaics are also available in the tweet below.
Have you ever wondered what ALL the #ScreenshotSaturday submissions would look like together? @ScreenshotSat #gamedev pic.twitter.com/rnzd2PkP2c
— Alan Zucconi (@AlanZucconi) May 9, 2015
Sorting colours is a pain. There isn’t a magic function which will order them nicely, simply because the way we perceived them is based on three different components. Any attempt to flatten them onto one single dimension will inevitably collapse some of the complexity. When it comes to sort colours, you should understand which features you want to highlight. Is it the hue? Is it the luminosity? Start from there, and create your own function.
Other resources
- Sorting colours with Hilbert curves: the post which inspired the Hilbert sorting;
- Sorting colours in Mathematica: an interesting discussion on how colours can be sorted in Mathematica;
- A Visit to Disney’s Magic Kingdom: how colour clustering and sorting can be used to identify emotions in Disney’s movies;
- Using PCA to sort high dimensional objects: how to use Principal Component Analysis to sort colours;
- TSPPixelSort: how genetics algorithms can be used to sort colours;
- Rainbow Smoke: all the RGB colours sorted in a single image. It’s just beautiful.
- Part 1: How to retrieve all the images from a website
- Part 2: How to find the main colours in an image
- Part 3: The incredibly challenging task of sorting colours
💖 Support this blog
This website exists thanks to the contribution of patrons on Patreon. If you think these posts have either helped or inspired you, please consider supporting this blog.
📧 Stay updated
You will be notified when a new tutorial is released!
📝 Licensing
You are free to use, adapt and build upon this tutorial for your own projects (even commercially) as long as you credit me.
You are not allowed to redistribute the content of this tutorial on other platforms, especially the parts that are only available on Patreon.
If the knowledge you have gained had a significant impact on your project, a mention in the credit would be very appreciated. ❤️🧔🏻
Great post! Very interesting.
I have a question :
Are your sure you have to return “lum” and not “lum2” on Step algorithm ?
Otherwise I didn’t understand why you compute a “lum2” variable!
I didn’t understand anything and also I didn’t read it so… I m just looking for an Samsung app of sorting colors wish me luck…?
Yeah i noticed that to, i tried changing and it looks a bit different. I think the only thing it does is do the loop a couple time since its multiplied by repititions.
Hei, very nice article. Sorting colors is very hard actually. Currenty i’m on a project that need to sorting colors :D. I have a question, in lum formula:
lum = math.sqrt( .241 * r + .691 * g + .068 * b ),
where is .241, .691, .068 come from?
Hey! Those are magic numbers that refers to how the human eye perceive R, G and B components.
Hi there, would you please share the part of the code that displays these colours as vertical lines? thx
I used pillow library to draw it.
https://github.com/CovorSorin/python-colors
Nice! <3
Thank you, good article 🙂
what do you use to plot the colors in the strip
I wrote some custom code to initialise a numpy array which I then save as a PNG.
can you share it pls
Sure!
colours_length = 1000;
colours = [] # (0,1)
# Generates the colours
for i in range(0, colours_length):
colours.append (
[
random.random(),
random.random(),
random.random()
]
)
def generatePics (c_sorted):
# Generates the picture
height = 25;
img = np.zeros((height,colours_length,3), np.uint8) # (0,255)
for x in range(0, colours_length-1):
c = [c_sorted[x][0] * 255, c_sorted[x][1] * 255, c_sorted[x][2] * 255]
img[:,x] = c
cv2.imwrite(“sort.png”, img)
generatePics(colours)
Thank you so much!
I did a lot of work recently to take pictures of a rubiks cube and extract the RGB values for each square. The next step was to examine the RGB values and figure out which of the six sides of the cube that color belonged to…your article was a big help with this, thank you for writing it. In order to correctly ID the colors I ended up converting to Lab and using cie2000 color distance.
In your article in the traveling salesman section you used Lab but it looks like you used the euclidean distance of the Lab values…did you try with cie2000? I tried that and got some decent results:
https://photos.smugmug.com/Misc/Rubiks-Cubes/Foo/i-gxZ6MKb/0/cb459fcf/X3/Screen%20Shot%202018-11-10%20at%202.02.31%20PM-X3.png
Thank you for sharing this!
It looks awesome, and I’m glad this helped! 🙂
Hey Alan,
Thanks for putting that together, it is exactly what we were looking for. There’s just one problem, I can’t code. How hard would it be to use this algorithm to sort colours in Corel .xml colour palette? Can someone help me?
Thanks
Hi Brett!
That really depends on what you want to do, exactly. All the code I used in this tutorial was written in Python, but there is no reason why you wouldn’t be able to re-make it in any other language.
Of course, you will need some basic programming skills.
If you are interested in playing with colours, it would be a very useful skill to have!
Hello Alan !
The article is really helpful however I am stuck at the hilbert sort method .
I found a hilbert.py file which I imported however when I am trying to use the sort syntax , the same as yours , it’s showing me invalid syntax error .
Hi Aemie!
If you are using a different library, you will need to look at its documentation to know exactly how to use it. Unless it’s the exact file I have used, is unlikely to work in the exact same way.
Also, it is likely that a syntax error might be unrelated to that. Perhaps there is a typo of some kind that is also stopping your script from working!
Can you share the link of the exact file you used for hilbert as I am not able to open the Hilbert Walk from your article .
I also had this issue, but i remember the always handy web archive. Its making an archive of 100k sites.
Here’s that hilber file
http://web.archive.org/web/20170930074441/http://www.tiac.net/~sw/2008/10/Hilbert/hilbert.py
and the article
http://web.archive.org/web/20170918004707/http://www.tiac.net/~sw/2008/10/Hilbert/
Im trying to use in a color sorting for Blender. But that Hilbert function is giving me a headache. I dont know much about how to convert it to working blender python
Thank you , however when I am trying to do :
colors.sort(key=lambda(r,g,b) : step(r,g,b,8)) , it;s also giving a syntax error .
I couldn’t find any method on using lambda with nested list and hence , I am not able to comprehend .
I found out a method to do so , thankyou for your assistance .
I found out a method to do so , thankyou for your assistance .
Could eleborate how you got it solved or your other solution?
I also get that synthax error for the first bracket after Lambda (r, g, b)
I guess it doesnt play well with sub-list orso?
I ran into this problem as well, the issue is that the code is in Python2 syntax but breaks in Python3.
If you run Alan’s code through a python 2->3 convert it runs for me: https://www.pythonconverter.com/
Here’s the stepped code for python3:
def step (r,g,b, repetitions=1):
lum = math.sqrt( .241 * r + .691 * g + .068 * b )
h, s, v = colorsys.rgb_to_hsv(r,g,b)
h2 = int(h * repetitions)
lum2 = int(lum * repetitions)
v2 = int(v * repetitions)
return (h2, lum, v2)
colours.sort(key=lambda r_g_b: step(r_g_b[0],r_g_b[1],r_g_b[2],8) )
The most advanced color model to date, CIECAM02, can sort colors better than any other model. I wrote a python script which uses that model (and I library built on it, which someone else coded) to sort colors, and I was happy with the results. Example output and links to the script and library are over at a recent post at my blog, which this comment system seems bent on not letting me link directly to.
Interesting article, in case anyone is interested, I wrote a script implementing the step sorting using numpy, complete with color array and final image generation:
import itertools
import warnings
import numpy as np
import cv2
from skimage.color import deltaE_ciede2000, rgb2lab, lab2rgb, rgb2hsv
from skimage import img_as_ubyte, img_as_float32
from PIL import Image
h, w = (20, 5)
# # produce all possible colors
all_colors = [color for color in itertools.product(range(256), repeat=3)]
# # equivalent but ~8% slower on my computer
# all_colors = [(r, g, b) for r in range(256) for g in range(256) for b in range(256)]
all_colors = img_as_float32(np.expand_dims(np.array(all_colors, dtype=np.uint8), axis=0))
# # equivalent but ~5% slower on my computer
# all_colors = np.expand_dims(np.array(all_colors, dtype=np.float32) / 255, axis=0)
all_colors = cv2.cvtColor(all_colors, cv2.COLOR_RGB2Lab)[0]
# # equivalent but ~2400% slower on my computer
# all_colors = rgb2lab(all_colors)[0]
# select only sufficiently dissimilar colors
final_colors = []
while all_colors.size > 0:
color = all_colors[np.random.choice(all_colors.shape[0])]
final_colors.append(color)
similarity = deltaE_ciede2000(color, all_colors)
all_colors = all_colors[similarity > 10]
# # deltaE_ciede2000 distance:
# # <= 1.0 Not perceptible by human eyes.
# # 1 – 2 Perceptible through close observation.
# # 2 – 10 Perceptible at a glance.
# # 11 – 49 Colors are more similar than opposite
# # 100 Colors are exact opposite
# # If you want all color instead, but beware of memory errors
# final_colors = all_colors
def transform_to_sorting_color_space(hsv_arr, hue_nb):
arr = hsv_arr.copy()
sat = arr[:, :, 1]
grey_threshold = 0.15
arr[:, :, 0] = (arr[:, :, 0] * (hue_nb – 2)).round() + 1
# # personal remix, to regroup color that are really a shade of grey to the left
indexes_greys = (sat < grey_threshold)
arr[:, :, 0][indexes_greys] = 0
# invert the luminosity of every other segment
indexes_odd_hue = (arr[:, :, 0] % 2 == 1)
arr[:, :, 1:][indexes_odd_hue] = 1 – arr[:, :, 1:][indexes_odd_hue]
arr[:, :, 1:] = arr[:, :, [2, 1]]
return arr
final_colors = np.expand_dims(np.array(final_colors, dtype=np.float32), axis=0)
final_colors = lab2rgb(final_colors)
hsv_colors = rgb2hsv(final_colors)
# Step sorting
sorting_colors = transform_to_sorting_color_space(hsv_colors, 12)[0]
sort_indices = np.lexsort(sorting_colors[:, ::-1].T)
final_colors[0] = final_colors[0, sort_indices]
# # If you prefer Hue sort
# final_colors[0] = final_colors[0][np.lexsort(hsv_colors[0][:, ::-1].T)]
with warnings.catch_warnings():
warnings.simplefilter("ignore")
final_colors = img_as_ubyte(final_colors)[0]
print(f'nb_colors : {final_colors.shape[0]}')
# produce image
color_img = Image.new('RGB', (w * final_colors.shape[0], h))
final_colors = sum([[tuple(color)] * w for color in final_colors] * h, [])
color_img.putdata(final_colors)
color_img.save('./all_colors.png')
Thank you!
Im trying to use this in Blender and im getting error for the first bracket in after the lambda?
rgb.sort(key=lambda (r, g, b): step(r, g, b, 8))
Okay looked at your repo and your code is actually different than this articel
in your colour-sort.py the line is like this;
colors.sort(key=lambda rgb: step(rgb,8))
instead of
colors.sort(key=lambda (r, g, b): step(r, g, b,8))
Is there a reason lum2 is not used and also in the HSV the saturation is not used?
Alan, let me start by thanking you for the absolutely brilliant article. I spent a long time trying to figure out where your brightness formula and numbers originated and finally came to understand it’s a composite of two things that aren’t totally accurate (but pretty close). You use this:
lum = math.sqrt( .241 * r + .691 * g + .068 * b )
but this has 2 parts that can be corrected for better calculation. First part, the numbers come from calculating luminescence in the YIQ color space (ITU BT.601 standard). The numbers should be:
Y = 0.299 * R + 0.587 * G + 0.114 * B
Using the square root of this creates a linear scale approximation accounting for gamma correction (should actually take the 2.2 root instead of 2). You can use the raw brightness formula (much less processor intensive and still accurate)
If you really want the gamma corrected formula you can write it like this:
lum = math.pow((0.299 * r + 0.587 * g + 0.114 * b), 1/2.2)
https://www.itu.int/rec/R-REC-BT.601/
Hi!
Thank you so much for your input on this!
I’ll need to have a look and update the article at some point!
very bad at this (sorting colors and computers), if i let you the hex value of my amount of colors would you (anyone) sort for me.
These visualisations are very helpful, thanks! They confirmed that sorting by luminosity was primarily what I wanted for my purpose, but that I needed to do some secondary sorting to make it look nicer. Arrange the colours sorted by luminosity in a square image, and then sort each horizontal line by hue.
Thanks for this! Sorting by HSV used to be my solution, except I sorted desaturated colours into a separate band, so you don’t have greys mixed with colours.
I finally tried TSP as well, after thinking about it a few times over the years, and for the non-random palettes I’m using it seems to be the most usable result. I used python-tsp, and set the distances in the first column to 0 as path doesn’t need to return.
def step (r,g,b, repetitions=1):
lum = math.sqrt( .241 * r + .691 * g + .068 * b )
h, s, v = colorsys.rgb_to_hsv(r,g,b)
h2 = int(h * repetitions)
lum2 = int(lum * repetitions)
v2 = int(v * repetitions)
if h2 % 2 == 1:
v2 = repetitions – v2
lum = repetitions – lum
return (h2, lum, v2)
Hello! I do not know too much about color sorting, I just want to reuse your code. But I found that value of variable “lum2” is never used, I want to know why ? is there an error in the example code?