

Developers that are approaching electronics for the very first time have a lesson to learn; and this usually happens the hard way. Wiring a circuit incorrectly, and you can potentially destroy your Arduino board. When it comes to mistakes, hardware is generally not as forgiving as software. This tutorial shows the most common ways you can accidentally destroy an Arduino board; and how to avoid it.
- Applying overvoltage to power pins
- Drawing too much current from the board
- Shorting pins
- Inductive loads without flyback diodes
- EEPROM wear
Applying overvoltage to power pins
- Apply >
 to power jack
 - Apply > to Vin pin
- Apply >
 to 5V pin
 - Apply >
 to 3V3 pin
There are several ways in which an Arduino board can be powered. If you are using an external power supply, you can plug the barrel connector into the board’s power jack. A standard Arduino Uno board comes with a voltage regulator. Arduino generally tolerate any voltage between  and . If you want to be safe, the recommended range is between
  to
to  .
.
Alternatively, you can power an Arduino directly connecting its Vin and GND pins to a power supply. You can also power the board via the 5V and 3V3 pins. Conversely to Vin, those two pins are not attached to a voltage regulator. Providing a different voltage to the one requires can potentially break the board.

Drawing too much current from the board
- Drawing >
 from 5V pin
 - Drawing >
 from a I/O pin
 - Drawing >
 from all I/O pins
 - Drawing >

Many examples from the Arduino Playground shows board powering LEDs and other small electrical components. In order for this to work, current must be draw directly from the board. Each I/O pin is rated for a maximum of . Drawing more current will cause the pin to overheat due to its internal resistance. The recommended maximum current is  .
.
Devices that require a lot of current (such as motors) should never be powered directly from an Arduino. The correct approach is to attach an external power supply to the motor, controlled by a transistor. The I/O pins might not be powerful enough to control a motor, but they can be used to drive a transistor’s base.
Even if all of your pins are providing the recommended , there is a risk of frying the board. Arduino limits the amount of current you can draw across all pins to . This can be easily achieved by powering 10 LEDs at once.
Lastly, Arduino comes with a fuse, possibly to prevent unwanted currents to destroy your USB port.
Shorting pins
- Shorting Vin pin to ground
- Shorting I/O pins to ground
- Shorting I/O pins to each other
A shortcircuit occurs when voltage is allowed to travel to a path that, by mistake, has very low resistance. Connecting two pins with different voltage without a resistor in between them is usually enough to cause a shortcircuit. The problem with shortcircuits is that they allow potentially large current to dissipate over a wire. This often results in overheating or current spikes that can damage the board.
There are several ways to cause a shortcircuit with an Arduino. Connecting a power pin (such as Vin) directly to the ground will allow more than of current to flow through the microcontroller. Similarly, shorting I/O pins to ground as a similar effect. Connecting two I/O pins together is not necessarily bad. However, if you set one to HIGH and one to LOW, you are de-facto shorting one of the pins to ground. The article 10 Ways to Destroy an Arduino shows detailed schematics of why this happens.
Inductive loads without flyback diodes
When LEDs stop receiving power, they simply stop emitting light. This is not the case with other electrical components. Some of them, once depowered, will induce back currents directely towards your board. This typically happens with motors; the reason lies in the way they are built. Within most motors there is a solenoid, which is a conductive coil used to generate a magnetic field. When depowered, the magnetic field inside the coil induces an opposite current back into the coil. This spike lasts for a very short period of time, but can be very dangerous for your electronics.
The way to solve this problem is to use a flyback diode. A diode is a component that allows current to flow only in a one direction. By attaching a diode (D1, below) to in parallel to a solenoid (L1, below), you can prevent current to flow backwards.
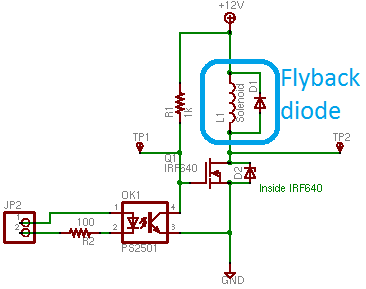
The Arduino Playground has a detailed tutorial on how to work with solenoids.
EEPROM wear
Every board comes with a memory chip that allows to store data even without power. Those chips are called EPPROM, and they allow only a limited number of writing operations. With time, EEPROM memories literally wear out, and it is impossible to override or erase their content. Before you start panicking, it’s important to notice that the ATmega328 EEPROM that is integrated in an Arduino board is rated for 100.000 write cycles. If you’re using the board for your DIY projects, EEPROM wear will never be an issue for you.
Applications that writes data continuously must take into account this limitation. The 100.000 cycles limit refers to a single memory location. You can dramatically reduce EEPROM wear if you cycle your writes on different locations, instead of writing at the same address.
The extended EEPROM library, EEPROMex, allows to set a limit on the numbers of writing operations you can perform.
EEPROM.setMaxAllowedWrites(MAX_ALLOWED_WRITES);
There are quite a lot of independent projects (here and here) that aimed to find out how many cycles are actually supported by an ATmega328. Continuous writes finally destroyed the EEPROM after more than a month, with more than 1.000.000 cycles.
Other resources
💖 Support this blog
This website exists thanks to the contribution of patrons on Patreon. If you think these posts have either helped or inspired you, please consider supporting this blog.
📧 Stay updated
You will be notified when a new tutorial is released!
📝 Licensing
You are free to use, adapt and build upon this tutorial for your own projects (even commercially) as long as you credit me.
You are not allowed to redistribute the content of this tutorial on other platforms, especially the parts that are only available on Patreon.
If the knowledge you have gained had a significant impact on your project, a mention in the credit would be very appreciated. ❤️🧔🏻