

In the previous part of this series, Inside Facebook 3D Photos, we have explained how modern mobile phones are able to infer depth from pictures. Such a piece of information is stored in a depth map, which is used for a variety of effects. From blurring the background to three-dimensional reconstruction, this type of technology will become more and more present in our daily lives.

This is a two-part series. You can read all the posts here:
- Part 1. Inside Facebook 3D Photos
- Part 2. Parallax Shaders & Depth Maps
A link to the complete Unity package is available at the end of the tutorial.
The Shader Template
If we want to recreate Facebook 3D photos using a shader, we first need to establish what exactly we are going to do. Since this effect works best on 2D images, it makes sense to implement a solution that is compatible with Unity Sprites. This will be achieved by creating a shader that can be used on Sprite Renderers.
While it is possible to create such a shader from scratch, it is often preferable to start from an existing template. The best way forward is to make a copy of the existing sprite diffuse shader that Unity is using by default for all sprites. Unfortunately, the engine is not shipped with a shader file that we can edit ourselves.
To retrieve it, we need to visit the Unity download archive, and download the Built in shaders package (below) for the version we are currently using.
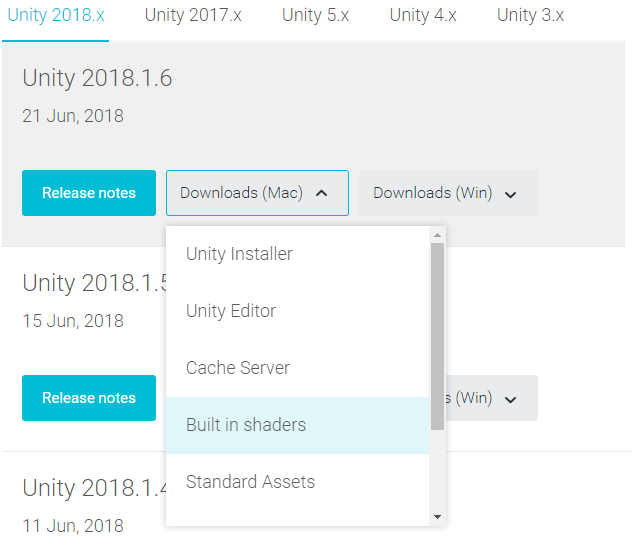
Once the package is extracted, we can browse the source code for all the shaders that are shipped in Unity. The one we are interested in is Sprites-Diffuse.shader, which is the one used by default for all the newly created sprites.
The Images
The second aspect that we need to formalise is what data we have. Let’s imagine we have both the image that we want to animate, and its depth map. The latter will be a black and white image where black and white indicates that pixels are, respectively, very far or very close to the camera.
The images used for this tutorial come from Dennis Hotson‘s Pickle cat project (🥒🐱) which is, undoubtedly, the best thing you will see today.

The depth map associated with the image above has been designed to reproduce the distance of the cat’s face from the camera.

It’s easy to see how relatively good results can be achieved with such a simple depth map. This means that is not hard to create your own depth maps for images that already exist.
The Properties
Now that we have all the resources, we have everything we need to start coding our parallax shader. If we import the main image as a sprite, then Unity will pass it to the shader automatically via the _MainTex property. What we need to add, however, is a way to make the depth map accessible to the shader. We can do this by adding a new shader property called _HeightTex. I have intentionally decided not to call this _DepthTex to avoid confusion with the depth texture (a similar concept in Unity that is used to render depth maps from a scene).
To modulate the strength of the effect, we also add a property called _Scale.
Properties
{
    ...

    _HeightTex ("Heightmap (R)", 2D) = "gray" {}
    _Scale ("Scale", Vector) = (0,0,0,0)
}
These two newly created properties also have to be matched by two variables with the same name, to be included in the CGPROGRAM/ENDCG section:
sampler2D _HeightTex;
fixed2 _Scale;
Now that we have everything, we are ready to write the code that actually makes the displacement happen.
The first step is to sample the value of the depth map, which is possible thanks to the tex2D function. Since _HeightTex is a black and white texture, we can simply take its red channel discarding all the others. The value that we now have measures, on some arbitrary units, the distance of the current pixel from the camera.
The depth value ranges from  to
to  , but we stretch it over the interval
  to
to  . This allows experiencing both positive and negative parallax where the depth map is white and black, respectively.
⭐ Suggested Unity Assets ⭐
The Theory
To simulate the parallax effect, what we need to do at this point is to use the depth information to shift the pixels of an image. The closer a pixel is, the more we need to shift it. This process is explained in the diagram below. The red pixel from the original image should be shifted by two pixels on the left, according to the information from its depth map. Likewise, the blue pixel is supposed to be shifted two pixels on the right.
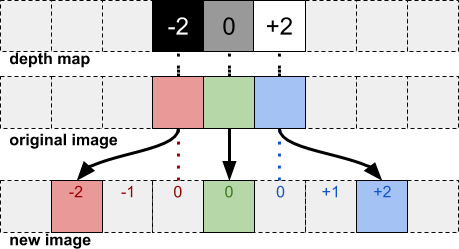
While this works theoretically, there is no easy way to achieve it in a shader. This is because a shader, by design, can only change the colour of the current pixel. When the shader code is executed, it is to draw a specific pixel on the screen; we cannot simply shift that pixel to another location, or changing the colour of a nearby one. This constraint of locality allows shaders to be run in parallel very efficiently, but also prevents us from achieving all sorts of effects that would be trivial if we had random write access to every pixel in an image.
If we really wanted to be precise, we would need to sample the depth map of all nearby pixels to find out which one (if any) is supposed to move to our position. If multiple pixels lands on our very position, we can average their contribution accordingly. While this works and gives the best possible result, it is also exceptionally inefficient and potentially hundreds of times slower than the original diffuse shader we started from.
The next best thing that we can do, is another one. We retrieve the depth of the current pixel from the depth map; then, if we were supposed to shift on the right, we replace the current colour with the pixel on the left (below). The assumption here is that if we are supposed to move to the right, perhaps the nearby pixels on the left is supposed to move in a similar way as well.
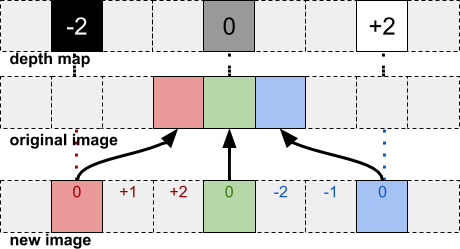
It should be easy to see that this is only a cheap approximation of what we really want to achieve. Nonetheless, it turns out to be very effective. This is because depth maps are generally smooth.
The Code
Following the algorithm described in the previous section, we can implement a parallax shader using a simple UV displacement approach.
This leads to the following code:
void surf (Input IN, inout SurfaceOutput o)
{
	// Displacement
	fixed height = tex2D(_HeightTex, IN.uv_MainTex).r;
	fixed2 displacement = _Scale * ((height - 0.5) * 2);

	fixed4 c = SampleSpriteTexture (IN.uv_MainTex - displacement) * IN.color;
        ...
}
The technique works well with mostly flats objects, as it can be seen in the animation below.
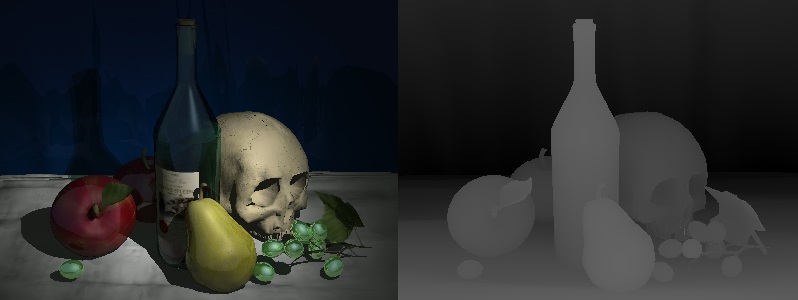
This technique really shines on 3D models. This is because is very easy to render depth textures for 3D scenes. Below, you can see an image that has been rendered in 3D next to its depth map.
The final results can be seen here:

Conclusion
This online course introduced the concept of 3D photos, and how they can be reimplemented in Unity.
This is a two-part series. You can read all the posts here:
- Part 1. Inside Facebook 3D Photos
- Part 2. Parallax Shaders & Depth Maps
Become a Patron!You can download the full Unity Project for this download on Patreon.
Credits for the picture of the cat and its depth map goes to Dennis Hotson‘s Pickle cat project.
💖 Support this blog
This website exists thanks to the contribution of patrons on Patreon. If you think these posts have either helped or inspired you, please consider supporting this blog.
📧 Stay updated
You will be notified when a new tutorial is released!
📝 Licensing
You are free to use, adapt and build upon this tutorial for your own projects (even commercially) as long as you credit me.
You are not allowed to redistribute the content of this tutorial on other platforms, especially the parts that are only available on Patreon.
If the knowledge you have gained had a significant impact on your project, a mention in the credit would be very appreciated. ❤️🧔🏻
Awesome, great read.
Thank you!
Excellent tutorial!
However, during the implement it, I found weird bugs: my sprite has black parts on the part that supposes to be transparent (tested in version 2018.3.2f1 and 2017.2.1f1)
My final solution is to not use the built-in sprite diffuse shader, but modified from sprite default shader.
Not quite understand how this works though, supposedly the alpha should act differently when using surface shader (sprite diffuse uses surface shader, sprite default uses vertex-fragment shader)
Great article. Can you have some sample code for this?
If GameObject like Geo not sprite like maya displacement z axis
real 3D?
It’s really a great article for someone to read! Thanks for posting this..
Thanks for your hard work, has there ever been released the full shader code? I’m wanting to potentially take a lot of my 3D photos (i have the depth maps) into VR and see if I could use this shader to see if it keeps that 3d feel..
Hi! Yes, the full code is available on Patreon!
https://www.patreon.com/posts/23680800