
This series of tutorials will teach you how use shaders for simulations; in particular how to use them to simulate fluids. This first post will focus on how to continuously process a texture using a shader. This technique is at the heart of most simulations and will be used in this series to implement shaders that simulate smoke and liquids.
- Introduction
- Part 1. The Code
- Part 2. The Shader
- Conclusion & download
Introduction
A previous post (Screen Shaders & Image Effects) explained how shaders can affect not only objects, but also cameras. Similarly, we will use a shader to process a texture. As far as the GPU is concerned, we’re only manipulating pixels – regardless whether they come from a camera or a 3D model. If you’re familiar with Unity, you might know how the pipeline for post processing works:
![]()
The technique shown in this post is substantially different, because the edited texture is fed again to the shader, allowing to be processed continuously:
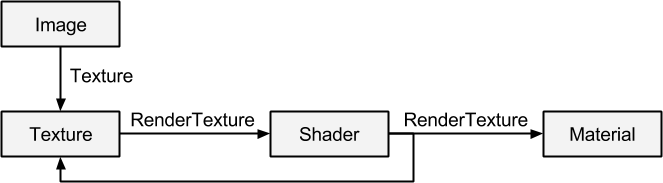
In the context of traditional materials, this doesn’t really make sense. There are situations, however, in which we want to repeat a certain process. Simulating how smoke diffuse, for instance, requires a constant computation. For this toy example we will create a shader that simply inverts the colours of a texture.
The Script
Since this new pipeline is not standard, we will need a script (ApplyShader) that triggers it. To process a texture with a shader, Unity offers the function Graphics.Blit:
Graphics.Blit(sourceTexture, destinationTexture, material);
The shader needs to be wrapped into a material and the two textures have to be different. If we want to update the original texture, we need to use an additional buffer texture:
public Material material; // Wraps the shader

public RenderTexture texture;
private RenderTexture buffer;

public void UpdateTexture()
{
    Graphics.Blit(texture, buffer, material);
    Graphics.Blit(buffer, texture);
}
The original texture is processed into buffer, which is then copied again into texture. We also need to start the loop somewhere, so is necessary to initialise the with an image for the first iteration:
public Texture initialTexture;

void Start ()
{
    Graphics.Blit(initialTexture, texture);

    buffer = new RenderTexture(texture.width, texture.height, texture.depth, texture.format);
}
The buffer is allocated with the same properties of the original render texture.
Updating periodically
The last step is now to invoke the UpdateTexture function periodically.
private float lastUpdateTime = 0;
public float updateInterval = 0.1f; // Seconds

public void Update ()
{
    if (Time.time > lastUpdateTime + updateInterval)
    {
        UpdateTexture();
        lastUpdateTime = Time.time;
    }
}
⭐ Suggested Unity Assets ⭐
The Shader
All the code written so far requires a shader in order to process pixels. Post processing requires a vertex and fragment shader in order to work. For this specific example, we will create one that simply inverts the colour of the image it receives.
float4 frag(v2f_img i) : COLOR
{
	float4 c = tex2D(_MainTex, i.uv);
	return 1 - c;
}
For the invert shader to work as a post processing effect, is necessary to set the following properties:
ZTest Always Cull Off ZWrite Off
Fog { Mode off }
Conclusion & Download
Become a Patron!
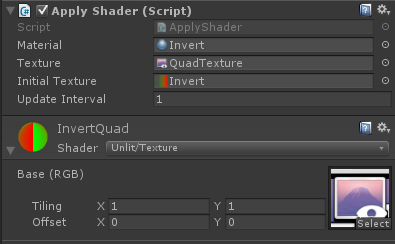
To make ApplyShader works, you will need to provide it with the following:
- Initial Texture: A texture to initialise the process;
- Texture: A render texture, which will be continuously fed to the shader;
- Material: A material that wraps the shader you want to use for the computation;
- Update Interval: how often (in seconds) this scripts will be called.
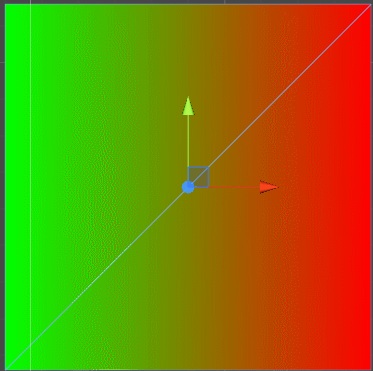
There is another important part that you must not skip: if you want your rendered texture to be displayed in the game, you need another material to render it, like in the picture below:
There are many interesting applications of this technique. The next tutorials in this series will explore how the ApplyShader script can be used to simulate water and smoke that are both realistic and interactive. There are other interesting applications, especially when it comes to computations that are highly parallalisable. A future tutorial will explain how to efficiently simulate Conway’s Game of Life within a shader.

If you want to use shaders to perform computation, you might be better off using Compute Shaders instead. Unfortunately they are not supported on all platforms, and there’s a general lack of resources on them. Using “traditional” shaders to simulate smoke and water is a little bit of a stretch, but requires little new knowledge and runs on everything that support shaders.
You can download the Unity package for this tutorial here.
The next part of this tutorial (How to Simulate Smoke with Shaders) will focus on how this technique can be used to simulate the diffusion component of particles (such as the ones that compose smoke) into a fluid (like air).
Other resources
- Part 1. How to Use Shaders for Simulations
- Part 2. How to Simulate Smoke with Shaders
- Part 3. How to Simulate Cellular Automata with Shaders
💖 Support this blog
This website exists thanks to the contribution of patrons on Patreon. If you think these posts have either helped or inspired you, please consider supporting this blog.
📧 Stay updated
You will be notified when a new tutorial is released!
📝 Licensing
You are free to use, adapt and build upon this tutorial for your own projects (even commercially) as long as you credit me.
You are not allowed to redistribute the content of this tutorial on other platforms, especially the parts that are only available on Patreon.
If the knowledge you have gained had a significant impact on your project, a mention in the credit would be very appreciated. ❤️🧔🏻
Graphics.Blit (texture, texture, mat);
is also working (instead Graphics.Blit (texture, buffer, mat); Graphics.Blit (buffer, texture, mat); )
what’s different? does the buffer is necessary needed?
Awesome tutorial. Thanks for this intro! Helped me a lot.