

Following the unexpected success of the tutorial on Inverse Kinematics for Tentacles, I have decided to share the shader that I used to make them so realistic.

If you are not familiar with shaders, fear not. This tutorial will be target at beginners, and you’ll only need a basic understanding of how Unity works.
- Introduction
- Part 1. Creating a new Shader
- Part 2. Refitting the Shader
- Part 3. Normal Extrusion
- Part 4. Sucker Waves
- Part 5. Selective Extrusion
- Conclusion & Download
A link to download the full Unity package for this tutorial is provided at the end.
Introduction
A 3D model usually contains only triangles. While textures are often used to give them a basic look, it’s shaders that really make the difference. Loosely speaking, a shader is a special script that is used to determine how a 3D models should be rendered.
There are many types of shaders, used for a variety of different effects. If you are interested in learning more about them, A Gentle Introduction to Shaders is a good starting point.
For the sole purpose of this tutorial, we will focus on Surface shaders. Among the many things they can do, two are the ones we are interested into: surface shading and vertex displacement. Surface shading is what gives to a material its look. It determines how light reflects on its triangles. A surface shader can tell Unity how normal maps and occlusion maps should be used to deflect the incoming light hitting a triangle. Vertex displacement, instead, changes the position of the triangles. We will use this feature to make the sucker pulsating in a realistic fashion.
❓ 3D models contains much more!- UV coordinates to map textures onto triangles,
- Normal directions to change the way light reflects on surfaces,
- Vertex colour to give a basic hue to triangles.
However, they are not relevant for the purpose of this tutorial.
Part 1. Creating a new Shader
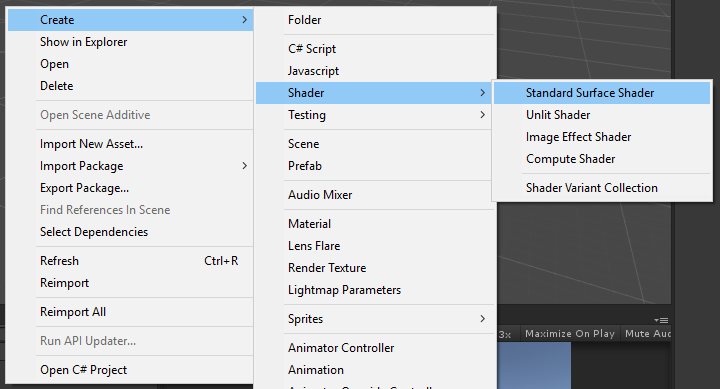
The first step is to create a shader. As already discussed,we will use a surface shader. In Unity, surface shaders can be created from the Create > Shader > Standard Surface Shader menu.
This should create the following file:
Shader "Custom/NewSurfaceShader" {
	Properties {
		_Color ("Color", Color) = (1,1,1,1)
		_MainTex ("Albedo (RGB)", 2D) = "white" {}
		_Glossiness ("Smoothness", Range(0,1)) = 0.5
		_Metallic ("Metallic", Range(0,1)) = 0.0
	}
	SubShader {
		Tags { "RenderType"="Opaque" }
		LOD 200

		CGPROGRAM
		// Physically based Standard lighting model, and enable shadows on all light types
		#pragma surface surf Standard fullforwardshadows

		// Use shader model 3.0 target, to get nicer looking lighting
		#pragma target 3.0

		sampler2D _MainTex;

		struct Input {
			float2 uv_MainTex;
		};

		half _Glossiness;
		half _Metallic;
		fixed4 _Color;

		// Add instancing support for this shader. You need to check 'Enable Instancing' on materials that use the shader.
		// See https://docs.unity3d.com/Manual/GPUInstancing.html for more information about instancing.
		// #pragma instancing_options assumeuniformscaling
		UNITY_INSTANCING_CBUFFER_START(Props)
			// put more per-instance properties here
		UNITY_INSTANCING_CBUFFER_END

		void surf (Input IN, inout SurfaceOutputStandard o) {
			// Albedo comes from a texture tinted by color
			fixed4 c = tex2D (_MainTex, IN.uv_MainTex) * _Color;
			o.Albedo = c.rgb;
			// Metallic and smoothness come from slider variables
			o.Metallic = _Metallic;
			o.Smoothness = _Glossiness;
			o.Alpha = c.a;
		}
		ENDCG
	}
	FallBack "Diffuse"
}
We will see in the next section how to change it.
Part 2. Refitting the Shader
Once the shader is created, we can proceed to edit it. This basic, default shader that Unity has created for us is unfortunately too basic. The first change we need to do it is to make sure the shader can use normal and occlusion maps. This step is not strictly necessary, but ensures sure that your tentacle can support realistically lighting.
The first step is to add properties to our shader. A property is something that appears in the material inspector. In this case, we need two textures: one for the normal and one for the occlusion maps. They are defined as follow, within the Properties block:
_Normal ("Normal", 2D) = "bump" {}
_Occlusion ("Occlusion", 2D) = "white" {}
Those lines ensures that the material inspector can accept two textures. If none are provided, Unity will automatically use gray ("bump") and a white ("white") ones.
While those two properties appear in the material inspector, we still need to define the variables that will be used for the code. They need to have the same name of their respective properties, and live in the CGPROGRAM/ENDCG section:
sampler2D _Normal;
sampler2D _Occlusion;
You can see the final code here:
Shader "Alan Zucconi/Tentacle" {
	Properties {
		_Color ("Color", Color) = (1,1,1,1)
		_MainTex ("Albedo (RGB)", 2D) = "white" {}
		_Glossiness ("Smoothness", 2D) = "white" {}
		_Normal ("Normal", 2D) = "bump" {}
		_Occlusion ("Occlusion", 2D) = "white" {}
		_Metallic ("Metallic", Range(0,1)) = 0.0	}
	SubShader {
		Tags { "RenderType"="Opaque" }
		LOD 200


		CGPROGRAM
		// Physically based Standard lighting model, and enable shadows on all light types
		#pragma surface surf Standard fullforwardshadows

		// Use shader model 3.0 target, to get nicer looking lighting
		#pragma target 4.0

		sampler2D _MainTex;
		sampler2D _Normal;
		sampler2D _Occlusion;

		struct Input {
			float2 uv_MainTex;
		};

		half _Glossiness;
		half _Metallic;
		fixed4 _Color;

		// Add instancing support for this shader. You need to check 'Enable Instancing' on materials that use the shader.
		// See https://docs.unity3d.com/Manual/GPUInstancing.html for more information about instancing.
		// #pragma instancing_options assumeuniformscaling
		UNITY_INSTANCING_CBUFFER_START(Props)
			// put more per-instance properties here
		UNITY_INSTANCING_CBUFFER_END

		void surf (Input IN, inout SurfaceOutputStandard o) {
			// Albedo comes from a texture tinted by color
			fixed4 c = tex2D (_MainTex, IN.uv_MainTex) * _Color;
			o.Albedo = c.rgb;
			// Metallic and smoothness come from slider variables
			o.Metallic = _Metallic;
			o.Smoothness = _Glossiness;
			o.Alpha = c.a;

			o.Occlusion = tex2D (_Occlusion, IN.uv_MainTex).r;
			o.Normal = UnpackNormal(tex2D (_Normal, IN.uv_MainTex));
		}
		ENDCG
	}
	FallBack "Diffuse"
}
Once _Normal and _Occlusion are defined as variables, we can tell the shader how to use them. Their values are used to initialise the Normal and Occlusion fields of the StandardOutputSurface structure o.
Each pixel in a texture has R, G, B and A values. Each one goes from 0 to 1. Hence, when we sample the red channel of the occlusion map, we have a value from 0 to 1. The Occlusion field of StandardOutputSurface takes a value in the same range, so no action is required.
The same does not apply to the normal map. The Normal field requires a three dimensional vector, which components range from -1 to +1. Such range is outside what we can store in an image. For this reason, we need to unpack the normals from the normal map. This means taking a value from 0 to 1, and remapping it to the range that goes from -1 to +1. The function that does this is called UnpackNormal.
❓ How does UnpackNormal work?
UnpackNormal remaps values sampled from the normal map ( range: [0,+1]) to values compatible with the
 Normal field StandardOutputSurface ( range: [-1,+1]).
Mathematically speaking, this can be done with the following transformation:
![\[xyz = rgb \cdot 2 - 1\]](https://www.alanzucconi.com/wp-content/ql-cache/quicklatex.com-059f0374ce9ad59b2d15d3bc20e2050b_l3.png "Rendered by QuickLaTeX.com")
However, this is only part of the story. If you try to do the following:
o.Normal = tex2D (_Normal, IN.uv_MainTex) * 2 -1;
you will not get the expected result.
This is because the normal direction must be a unit vector. This means that its three components, X, Y and Z are linked together so that the total length of the 3D vector they represent is 1.
Depending on the platform you are running your game onto, normals are stored either in the RGB channels or in the GA. While the former requires only the  transformation, the latter needs a little bit more than that.
If a vector has to have unit length, than only two of its components are necessary; the third one can always be calculated from them. In situations in which memory is a precious resource, one might only want to store two components (instead of 3) and then calculate the third one manually. This can be done with the following equation:
![\[z = \sqrt{1 - x^2 - y^2}\]](https://www.alanzucconi.com/wp-content/ql-cache/quicklatex.com-938fdc2bfb6a963a82f688d72d7fa44d_l3.png "Rendered by QuickLaTeX.com")
which follows from the fact that the vector must have length 1:
![\[length\left(xyz\right) = 1 \Leftrightarrow \sqrt{x^2 + y^2 + z^2} = 1\]](https://www.alanzucconi.com/wp-content/ql-cache/quicklatex.com-ebf43ae666e0833c8fd231f985b8cf74_l3.png "Rendered by QuickLaTeX.com")
In fact:
![\[\sqrt{x^2 + y^2 + z^2} = 1 \Rightarrow\]](https://www.alanzucconi.com/wp-content/ql-cache/quicklatex.com-ab9875a9b4a383c0a89694f0cfa7fa3c_l3.png "Rendered by QuickLaTeX.com")
![\[\Rightarrow x^2 + y^2 + z^2 = 1^2 =1 \Rightarrow\]](https://www.alanzucconi.com/wp-content/ql-cache/quicklatex.com-69388dfcc8d5d71fa024c3b08b44b4a3_l3.png "Rendered by QuickLaTeX.com")
![\[\Rightarrow z^2 = 1 - x^2 - y^2\Rightarrow\]](https://www.alanzucconi.com/wp-content/ql-cache/quicklatex.com-965b8377f34afef186992d4d69455776_l3.png "Rendered by QuickLaTeX.com")
![\[\Rightarrow z = \sqrt{1 - x^2 - y^2}\]](https://www.alanzucconi.com/wp-content/ql-cache/quicklatex.com-37e3eb25d55d02ab7f2ec812454de926_l3.png "Rendered by QuickLaTeX.com")
This should be enough to understand how the UnpackNormal function works:
inline fixed3 UnpackNormal(fixed4 packednormal)
{
#if defined(SHADER_API_GLES)  defined(SHADER_API_MOBILE)
    return packednormal.xyz * 2 - 1;
#else
    fixed3 normal;
    normal.xy = packednormal.wy * 2 - 1;
    normal.z = sqrt(1 - normal.x*normal.x - normal.y * normal.y);
    return normal;
#endif
}
If you are curious to find out more, the function can be found in the file UnityCG.cginc
⭐ Suggested Unity Assets ⭐
Part 3. Normal Extrusion
With the shader now expanded, we can have perfectly working normal maps and occlusion maps. This allows for our shader to be extra realistic.
It’s now time to focus on the geometry, by adding a vertex displacement function. This can be done by adding vertex:vert to the pragma directive.
#pragma surface surf Standard fullforwardshadows vertex:vert
This will force Unity to invoke a function called vert, which sole responsibility is to edit the vertices of the model. Its input is a struct called appdata_full, which holds the data necessary to represent the position of a vertex in a 3D space.
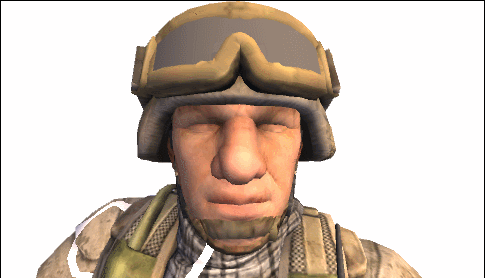
A common technique to manipulate vertices is called normal extrusion, and is discussed intensively in the tutorial on Surface Shaders, where it has been used to change the “weight” of a soldier.
It works by “projecting” a triangle outward (or inward) along its normal direction. Mathematically, this is can be done like this:
void vert (inout appdata_full v) {
    v.vertex.xyz += v.normal * 1;
}
The result pushes each triangle 1 metres away from its original position, along its normal vector. This gives to the geometry a “chubbier” look. And it’s the first step to a more complex function.
Part 4. Sucker Waves
The normal extrusion done in the previous section is static. The tentacle is always chubbier. For our effect, we want this extrusion to change over time. When you want something to oscillate over time, a good starting point is to use a sine wave. The sine wave is a period function which oscillate in the range [-1,+1], with a very gentle curve.

We can use it to control the value of our extrusion, so that it wobbles between two fixed values. For this effect, let’s say that we want the extrusion value to go from o (no extrusion at all) to a value value called _PulseAmount, completing an entire “wobble” in _PulsePeriod seconds. The first step is to make these two properties available to the shader (don’t forget to also add their respective variable in the CGPROGRAM/ENDCG section!):
_PulseAmount ("Pulse amount", Range(0,0.5)) = 0.1 // metres
_PulsePeriod ("Pulse period", Float) = 1          // seconds
We can now use them to manipulate a sine wave. Its normal range is [-1,+1], but we want it to go from [0,_PulseAmount]. Let’s do this step by step, firstly mapping it onto the range [0, 1]. This is exactly the opposite of what we have seen when we unpacked the normals, and it can be done like this:
![\[v = \frac{\sin\left(time\right) + 1}{2}\]](https://www.alanzucconi.com/wp-content/ql-cache/quicklatex.com-b7bd552d96c84b58c95f719a57b98fc6_l3.png "Rendered by QuickLaTeX.com")
In a Unity shader, the variable that contains the current time in seconds is called _Time.y.
Now that the range of our sine wave is correct, we have to change its period so that it completes a wobble in exactly _PulsePeriod seconds. To do this, we have to first understand that a sine wave has period  , meaning that it completes a wobble in approximately 6.28 seconds. The problem now is to take something in the range [0,
 _PulsePeriod] to to remap it to the range [0,  ]. This can be done with the following equation:
![\[v = \frac{\sin\left(time \cdot \frac{\tau}{period} \right) + 1}{2}\]](https://www.alanzucconi.com/wp-content/ql-cache/quicklatex.com-745665fdc06f6c5953976c79d3ab1aee_l3.png "Rendered by QuickLaTeX.com")
which is implemented like this:
void vert (inout appdata_full v) {
    // Time component
    const float TAU = 6.28318530718;
    float time = (sin (_Time.y / _PulsePeriod * TAU) + 1.0) / 2.0; // [0,1]

    // Final extrusion
    v.vertex.xyz += v.normal * time * _PulseAmount;
}
The result is an extruding tentacle, which wobbly behaviour can be fully controlled from its material inspector:

is objectively superior to  in every possible way. PERIOD.
Positional Waves
There is an extra thing that we can tweak to give a more organic feel to our tentacle. At the moment the extrusion takes place at the same time on each triangle. We change that, by adding a component that takes into account the current position.
For this purpose, we can use the UV map of the texture. This is not a perfect solution, but if the map is wrapped nicely, you will hardly see any seams.
void vert (inout appdata_full v) {
    // Position component
    float y = v.texcoord.xy + 0.5;

    // Time component
    const float TAU = 6.28318530718;
    float time = (sin (_Time.y / _PulsePeriod * TAU) + 1.0) / 2.0; // [0,1]

    // Final extrusion
    v.vertex.xyz += v.normal * time * _PulseAmount * y;
}
This new results gives the illusion the wave is propagating through the tentacle. In actuality, the extrusion happens on each vertex at the same time, although the wave is shifted in time depending on its UV coordinate.

Part 5. Selective Extrusion
With the code done so far, the entire tentacle wobbles. What we want is that only the suckers should move. Doing this solely by code is virtually impossible, as we have no idea which vertices are part of the suckers.
The solution is to rely on an additional texture that we can sample, called _PulseTex. Its sampled value, from 0 to 1, will be used as a multiplicative coefficient for the extrusion amount. Parts of the tentacle that are not sucker will still be extruded, but by zero metres, making them static.
// Property
_PulseTex ("Pulse tex", 2D) = "white" {}
...
// Variable
sampler2D _PulseTex;
In the shading function we have used the function tex2D to sample a texture at a specific UV coordinate. That function cannot be used in the vertex function; tex2Dlod should be used instead. The only difference is that instead of taking UV coordinates, it requires two additional parameters. If we want to achieve the same behaviours of its counterpart, we can simply set them to zero.
In the following example, the blue channel of _PulseTex is used.
// Effect multiplier
fixed4 c = tex2Dlod (_PulseTex, float4(v.texcoord.xy,0,0));
float pulse = c.b; // Uses the blue channel

// Time and position component
const float TAU = 6.28318530718;
float time = (sin (_Time.y / _PulsePeriod * TAU) + 1.0) / 2.0; // [0,1]

v.vertex.xyz += v.normal * pulse * time * _PulseAmount * y;
By using a texture that is white (or blue) where the suckers are, we can achieve a very realistic look:
Conclusion & Downloads
This tutorials showed how to create a shader that gives an organic, creepy look to a tentacle. Despite being used for a tentacle, this technique can be applied to a huge variety of scenarios.
If you are interested in more tutorial on tentacles, have a look at the series on Inverse Kinematics:
- Part 1. An Introduction to Procedural Animations
- Part 2. The Mathematics of Forward Kinematics
- Part 3. Implementing Forward Kinematics
- Part 4. An Introduction to Gradient Descent
- Part 5. Inverse Kinematics for Robotic Arms
- Part 6. Inverse Kinematics for Tentacles
- Part 7. Inverse Kinematics for Spider Legs
For more shader goodness, this other series might be worth having a look:
- Part 1: A Gentle Introduction to Shaders
- Part 2: Surface Shaders
- Part 3: Physically Based Rendering and Lighting Models
- Part 4: Vertex and Fragment Shader
- Part 5: Screen Shaders and Postprocessing Effects
Become a Patron!
Download: You can download the Unity project for this tutorial on Patreon.
Credits for the 3D model of the tentacle goes to Daniel Glebinski.
💖 Support this blog
This website exists thanks to the contribution of patrons on Patreon. If you think these posts have either helped or inspired you, please consider supporting this blog.
📧 Stay updated
You will be notified when a new tutorial is released!
📝 Licensing
You are free to use, adapt and build upon this tutorial for your own projects (even commercially) as long as you credit me.
You are not allowed to redistribute the content of this tutorial on other platforms, especially the parts that are only available on Patreon.
If the knowledge you have gained had a significant impact on your project, a mention in the credit would be very appreciated. ❤️🧔🏻
Great post as always Alan! The level of detailed explanation has really improved lately too
Thank you so much! <3